
Converting cast iron drain pipe to PVC is one of the most impactful plumbing upgrades a homeowner can undertake. For decades, cast iron dominated residential drainage systems, but age, corrosion, and better alternatives have made PVC the clear choice for modern installations. Whether you’re dealing with a failing original system in an older home or planning a preventive upgrade during a renovation, understanding the conversion process ensures successful results that will last generations.
This guide walks you through everything you need to know about transitioning from cast iron to PVC, from initial assessment through final inspection. You’ll learn how to evaluate your existing system, choose the right connection methods, gather appropriate tools, navigate building codes, and execute a conversion that meets professional standards. By the end, you’ll have the knowledge to decide whether to tackle this project yourself or communicate effectively with hired contractors.
Why Your Aging Cast Iron Pipes Need PVC Replacement
Cast iron served plumbing systems well for over a century, but modern PVC offers compelling advantages that explain its industry dominance. Understanding these benefits helps you evaluate whether conversion is right for your situation and communicate the value to any stakeholders involved in the decision.
Corrosion resistance represents PVC’s most significant advantage over cast iron. Cast iron pipes deteriorate from the inside out due to hydrogen sulfide gas exposure—a natural byproduct of sewage decomposition. This biogenic sulfide corrosion creates rough interior surfaces that trap debris, reduce flow capacity, and eventually lead to complete failure. PVC resists this chemical attack completely, providing theoretical service lives exceeding 100 years under typical conditions.
Installation efficiency dramatically reduces labor costs and project timelines. A single worker can handle PVC sections that would require multiple workers or equipment for cast iron. Solvent-welded joints take minutes rather than the hours required for lead-and-oakum cast iron connections. This weight advantage—PVC weighs approximately one-tenth of equivalent cast iron—also reduces structural loading on buildings and simplifies routing through tight spaces.
Flow performance improves with PVC’s smooth interior surface, which provides hydraulic efficiency roughly 10-15% greater than equivalent-diameter cast iron. The smoother surface resists grease and debris accumulation, reducing clog frequency and improving drainage speed. These flow advantages become particularly noticeable in kitchen drains where grease accumulation is common.
How to Identify Problem Areas in Your Cast Iron Drain System

Before purchasing materials or scheduling work, thoroughly evaluate your current cast iron system to understand the project scope. This assessment identifies problem areas, helps you plan material quantities, and reveals complications that might affect your approach.
Begin by mapping your drain system from fixture connections through the municipal connection point. Identify all accessible cast iron components, noting pipe diameters, joint types, and fitting configurations. Common joint styles include hub-and-spigot arrangements sealed with lead and oakum, no-hub couplings with stainless steel bands, and threaded connections. Understanding what you have determines what transition fittings you’ll need.
Look for visible signs of deterioration that indicate problem sections requiring priority replacement. Rust stains on pipe exterior suggest external corrosion from soil contact. Leaking joints, particularly at lead-and-oakum connections, indicate seal failure. Reduced drainage flow rates suggest internal corrosion or sediment accumulation. In severe cases, pipe collapses or visible deformities indicate advanced failure requiring immediate attention.
Consider professional camera inspection for comprehensive assessment, particularly for buried or concealed sections. Video inspection traverses the entire pipe length, documenting corrosion, offset joints, root intrusion, and other defects with precise location data. This investment—typically $200-$500—reveals hidden problems that might otherwise surprise you during demolition, potentially saving far more in unexpected repairs.
Must-Have Tools for Cast Iron to PVC Pipe Replacement
Successful conversion requires proper preparation with the right equipment. Gathering tools and materials before work begins prevents frustrating delays and ensures smooth project execution.
Cutting and removal tools handle cast iron extraction efficiently. A reciprocating saw with bi-metal or carbide-tipped blades makes most cuts through pipe sections and fitting connections. Angle grinders with cutting wheels handle cleanup of irregular cut edges and prepare joint surfaces for transition connections. Pipe wrenches in 14-inch, 18-inch, and 24-inch sizes manipulate stubborn fittings and threaded connections. A sledgehammer assists with breaking loose corroded sections, though controlled striking prevents damage to surrounding structures.
PVC installation tools ensure proper joint assembly. Pipe cutters or fine-tooth hacksaws create clean, square cuts. De-bevelling tools or sandpaper remove sharp edges and create proper solvent-weld geometry. Applicators for primer and cement should match pipe diameter for even coverage. A properly sized pipe wrench assists with tightening threaded connections, though careful force application prevents damage to PVC threads.
Materials checklist for a typical bathroom conversion includes PVC pipe in appropriate diameters (typically 2-inch for fixtures, 3-4-inch for main lines), various fittings including couplings, elbows, tees, and cleanout adapters, and transition couplings designed for cast iron-to-PVC connections. Solvent cement and primer in formulations appropriate for DWV applications ensure proper bonding. Stainless steel clamps for rubber couplings should match coupling specifications. Pipe support hardware including straps and hangers maintains proper alignment.
Safety equipment protects against common hazards. Safety glasses or goggles guard against flying debris during cutting. Hearing protection proves essential when operating power tools for extended periods. Dust masks or respirators prevent inhalation of pipe dust and solvent vapors. Work gloves protect hands from sharp edges and chemical exposure. Knee pads reduce strain during floor-level work.
Proven Methods for Connecting Cast Iron Drain Pipe to PVC
Joining dissimilar materials requires specific techniques that accommodate different pipe characteristics. Understanding available methods helps you choose the right approach for your configuration and application.
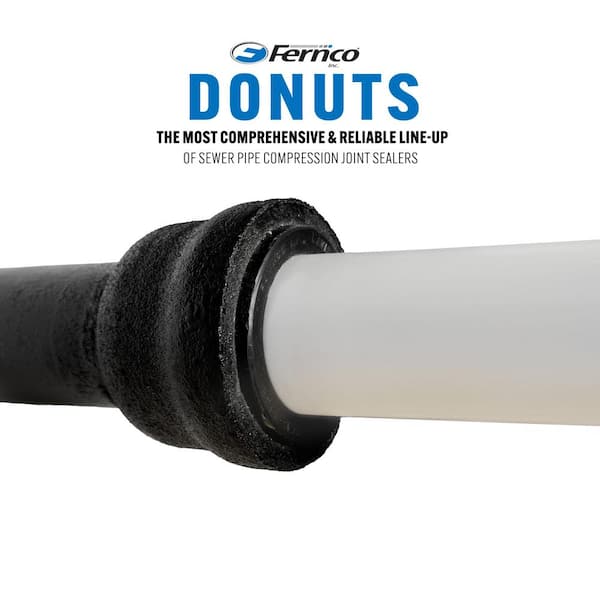
Rubber transition couplings represent the most common solution for cast iron to PVC connections. Products like Fernco couplings and ProFlex connectors create reliable seals by compressing a flexible elastomer sleeve between the outer surfaces of both pipes. These couplings work with hub-ended cast iron, no-hub cast iron, and spigot ends, making them versatile for various connection scenarios. Installation requires clean, prepared pipe surfaces and proper clamp torque—typically around 60 inch-pounds for most couplings.
Proper coupling installation begins with thorough surface preparation. Clean cast iron surfaces to remove rust, scale, and old seal material using wire brushes, sandpaper, or grinding wheels. Clean PVC surfaces with primer to remove handling contamination and surface gloss. Slide the coupling over the PVC pipe first, then position the coupling to center the sealing sleeve over the connection interface with equal overlap on both pipes. Tighten clamps gradually and evenly, alternating between clamps to ensure uniform compression.
Push-fit and mechanical connections offer alternatives for specific applications. Some push-fit fittings accommodate both materials without separate couplings, simplifying installation for DIY projects. These products typically include internal sealing mechanisms that compress against both pipe surfaces when the fitting is pushed together. While convenient, push-fit connections may not be approved for all applications—verify local code requirements before use.
Sectional replacement strategies preserve functional portions of existing systems while replacing only failed sections. This hybrid approach reduces cost and disruption but requires careful joint connections between old and new materials. The fundamental challenge lies in joining pipes with different expansion coefficients, different connection methods, and different structural characteristics. Successful transitions require appropriate transition fittings and meticulous attention to manufacturer specifications.
How to Replace Cast Iron Drain Pipe with PVC in 6 Critical Steps
Following a systematic approach ensures successful results while minimizing disruption and unexpected complications. The following process applies to typical residential conversions, though specific applications may require adjustments.
Plan Your Cast Iron to PVC Conversion Before Cutting
Create detailed documentation of your existing system before work begins. Photograph all accessible components, measure pipe diameters, and sketch the configuration including all fittings and connection points. This documentation helps identify required materials and anticipate routing challenges. Verify local code requirements and obtain necessary permits—most drain replacements require building permits regardless of scope.
Stage materials near the work area to minimize carrying distance during installation. Arrange tools for efficient access. Protect surrounding surfaces with drop cloths or plastic sheeting. Establish clear pathways for material removal and debris disposal. Inform all household members of the project schedule and temporary facility limitations.
Isolate Drain Lines Before Removing Cast Iron Sections
Safe conversion requires proper system isolation to prevent sewage discharge during work. Close shutoff valves for affected fixtures, recognizing that some older systems lack individual isolation. For main line work, toilet facilities become unusable until restoration. Drain residual water by operating fixtures and opening lowest access points. Manual trap primer activation fills floor drain traps and prevents sewer gas entry.
Verify isolation effectiveness before proceeding with pipe work. Unintended discharge creates cleanup requirements and potential health hazards. For multi-story buildings, coordinate work timing to prevent simultaneous use of upper-floor fixtures that could discharge through opened lines.
Cut and Remove Failing Cast Iron Pipe Sections Safely
Strategic cutting creates manageable sections while preserving connection points for transition work. Identify natural breaking points including joints, fittings, and straight pipe sections. Make complete cuts through the pipe wall using reciprocating saws or angle grinders. For vertical stacks, work from top to bottom, securing upper sections before cutting lower connections.
Remove sections carefully to prevent damage to remaining infrastructure or surrounding structures. Some sections may require additional cutting for extraction through tight openings. Clean connection points of lead, oakum, and corrosion products using chisels, wire brushes, and grinding wheels as conditions require. Inspect preserved pipe sections for hidden deterioration that may require additional replacement.
Install New PVC Drain Lines with Proper Solvent Welding
Measure twice and cut once to ensure precision—short pipes create gaps while excessive length creates connection stress. Use pipe cutters or fine-tooth hacksaws for clean cuts perpendicular to the pipe axis. De-bevelling the cut end removes sharp edges and creates proper solvent-weld geometry. Clean all pipe and fitting surfaces with appropriate primer to remove surface contamination.
Apply solvent cement using proper technique for leak-free joints. Apply primer to both pipe exterior and fitting interior surfaces, allowing dwell time per product specifications. Apply cement evenly to both surfaces without excess that could create internal obstruction. Insert pipe fully into fitting with a quarter-turn motion to distribute cement evenly, holding in place for the specified setting time. Allow joints to cure fully before pressure testing—typically 30 minutes for up to 90 PSI.
Secure Cast Iron to PVC Transition Connections Properly
Transition connections between cast iron and PVC require careful surface preparation and proper coupling installation. Clean cast iron surfaces thoroughly to remove all rust, scale, and old seal material. Clean PVC surfaces with primer to ensure proper coupling seal. Verify both surfaces are completely dry before coupling installation.
Slide the transition coupling over the PVC pipe first, positioning it away from the connection point. Insert the PVC pipe fully into the cast iron hub or onto the cast iron spigot, verifying proper engagement and alignment. Slide the coupling into position, centering the sealing sleeve over the connection interface with equal overlap on both pipes. Tighten stainless steel clamps gradually and evenly, alternating between clamps to ensure uniform compression. Verify proper torque per coupling manufacturer specifications.
Test Your New PVC Drain System Before Finalizing Work
System testing validates successful installation before restoration work begins. Visual inspection identifies obvious problems including misaligned connections, visible gaps, and debris accumulation. Initial testing involves filling the system with water and checking for leaks at all connection points, particularly transition joints between cast iron and PVC.
More rigorous testing employs air pressure or hydrostatic pressure to verify joint integrity. Air testing introduces controlled pressure (typically 5-10 PSI for drain lines) and monitors pressure loss over time. Hydrostatic testing fills the system with water and maintains pressure to identify weeping leaks. Document test results for inspection purposes. Schedule required inspections with local building authorities before concealing work with walls, floors, or backfilling trenches.
Avoid Costly Mistakes with These Cast Iron to PVC Code Requirements
Most jurisdictions adopt standardized plumbing codes that govern drain pipe materials, installation methods, and inspection requirements. The International Plumbing Code (IPC) and Uniform Plumbing Code (UPC) provide frameworks for most local regulations, though specific amendments vary by location. Understanding applicable codes before beginning work prevents costly corrections and ensures passing inspection.
Current codes generally permit PVC for drain, waste, and vent applications in residential construction, with specific requirements for pipe schedule (typically Schedule 40 for pipes 3 inches and larger), joint methods, and connection to existing materials. Many codes require specific transition fittings rather than improvised connections, and some jurisdictions prohibit certain coupling types for specific applications. Underground installations typically require specific bedding materials, depth specifications, and warning tape placement.
Permit requirements vary by jurisdiction but most drain pipe replacement projects require building permits regardless of scope. Minor repairs may qualify for simplified permitting, but significant replacements require standard plumbing permits. Permit applications require project descriptions, sometimes including system diagrams showing pipe configurations, diameters, and connection methods. Permit fees typically range from $50-$500 depending on jurisdiction and project scope.
Inspection procedures verify code compliance at various project stages. Rough-in inspection occurs after installation but before concealment, verifying proper pipe sizing, slope, support, and connection methods. Final inspection confirms successful testing and proper system restoration. Some jurisdictions require additional inspections for underground work before backfilling. Failed inspections require correction and re-inspection before proceeding.
What Your Cast Iron to PVC Conversion Will Cost in 2024
Understanding cost components helps you plan realistically and compare professional quotes if you decide to hire contractors. Costs divide into materials, labor (if applicable), equipment, permits, and contingency for unexpected issues.
Material costs vary by project scope but typically range from $150-$400 for a bathroom conversion involving 20-30 linear feet of pipe with associated fittings. Complete house repiping requiring 100-200 linear feet may require $500-$1,500 in materials. PVC pipe costs approximately $1-$3 per linear foot for common residential diameters. Transition couplings typically cost $10-$25 each. Solvent cement, primer, and accessories add $20-$50.
Professional labor adds substantial cost but provides expertise and warranty protection. Plumbers typically charge $75-$150 per hour depending on market and specialization. A complete bathroom drain replacement typically requires 8-16 professional hours, translating to $600-$2,400 in labor plus materials. Professional quotes should itemize materials, labor, equipment rental, permit fees, and disposal costs.
DIY cost savings eliminate labor costs but require time investment and tool acquisition. The same bathroom replacement that costs $800-$2,800 professionally may require $150-$500 in materials plus tool costs for DIY execution. First-time DIYers should budget additional time for learning and potential corrections. Essential tools may already exist in home workshops; renting specialty tools reduces upfront investment.
Hidden costs and contingency prevent budget overruns from unforeseen conditions. Cast iron pipes often hide corrosion and structural problems invisible until exposure. Rotting support structures and unexpected routing obstacles add cost beyond initial estimates. Maintain contingency budgets of 20%-30% above base estimates. Additional costs include permit fees, inspection fees, equipment rental, disposal fees, and potential temporary living arrangements during invasive work.
Prevent Future Drain Problems with These PVC Maintenance Tips
Properly installed PVC drain systems require minimal maintenance, but periodic attention extends service life and identifies potential problems before failure. Establishing maintenance habits ensures decades of reliable performance.
Visual inspection of accessible pipes every few months identifies leaks, joint separation, or physical damage. Check under sinks and around fixtures for drips that might indicate developing problems. Listen to drainage sounds—gurgling or unusual noises often indicate venting problems or partial blockages requiring attention.
Periodic drain cleaning maintains flow capacity and prevents accumulation that could lead to clogs. Enzymatic drain treatments applied monthly maintain clear pipes without harsh chemicals that may damage PVC joints over time. Mechanical cleaning with snakes or augers handles developing clugs without chemical exposure. Avoid excessive chemical drain cleaner use—while PVC resists short-term exposure, repeated application can degrade joint integrity over extended periods.
Troubleshooting common problems addresses issues that occasionally develop despite PVC’s reliability. Leaking joints typically result from incomplete solvent welding during installation, joint stress from improper support, or mechanical damage to couplings. Small leaks at transition couplings may respond to clamp tightening, while failed solvent-weld joints require cutting and re-joining with proper technique. Slow drainage indicates partial blockage or insufficient slope—cleaning the affected section usually resolves the problem.
Converting cast iron drain pipe to PVC provides lasting benefits including improved reliability, corrosion resistance, and installation efficiency. Success requires thorough planning, appropriate material selection, proper installation techniques, and compliance with applicable codes. Whether undertaken as a comprehensive project or phased replacement, the conversion delivers long-term value that justifies the investment. When uncertainty exists, professional consultation provides expertise that prevents costly mistakes and ensures code-compliant, reliable installations that will serve your property for generations.


