
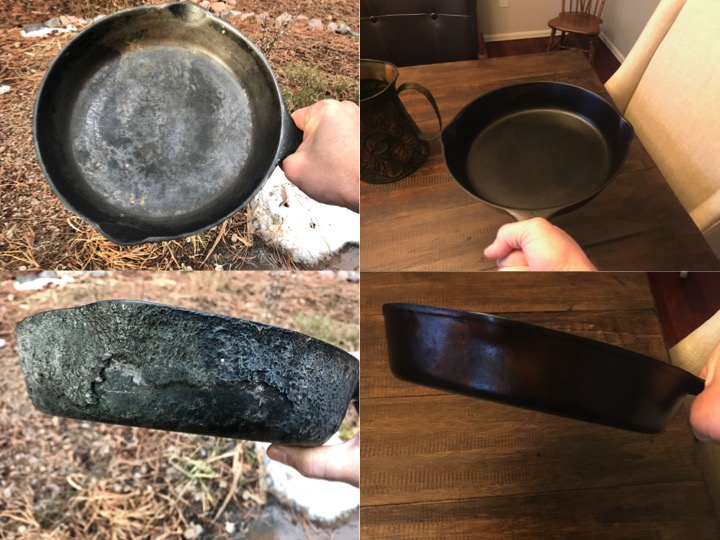
That family heirloom cast iron skillet covered in rust and carbon buildup doesn’t need to end up in the trash. For decades, cast iron enthusiasts have relied on cast iron pan electrolysis to restore neglected cookware to its original glory without damaging the precious surface. This electrochemical process gently removes rust and old seasoning while preserving the pan’s original cooking surface—unlike abrasive scrubbing or harsh chemicals that grind away metal. Whether you’ve rescued a rusty vintage piece from a garage sale or inherited a neglected heirloom, electrolysis can transform it into a functional kitchen treasure. The best part? You can set up a professional-quality electrolysis station for under $100 using materials from your local hardware store. In this guide, you’ll learn exactly how to revive your cast iron using this proven restoration method that professional collectors swear by.
Electrolysis works by reversing the rusting process through controlled electrical current, converting iron oxide back into metallic iron without harming the underlying cast iron. Unlike vinegar soaks that can pit the metal or wire brushing that damages seasoning grooves, electrolysis treats the entire submerged surface uniformly—reaching into crevices and details that manual methods miss. For vintage pieces from Griswold, Wagner, or Lodge, this gentle approach preserves the cookware’s value while restoring functionality. After reading this guide, you’ll confidently restore even the most neglected pans using proper equipment setup, solution chemistry, and post-treatment care that prevents flash rusting.
Essential Equipment for Cast Iron Electrolysis Restoration

Before plugging in your power supply, gather these specific components that make cast iron pan electrolysis effective and safe. Many items can be repurposed from your garage or purchased for minimal cost at hardware stores.
Power Supply Options for Reliable Results
Choose a DC power source that provides consistent current without automatic shutoff features. A 6V or 12V manual automotive battery charger (not automatic) costs $25-$50 and delivers the perfect amperage range (1-10A) for most pans. Bench power supplies offer precise control but cost more ($60+), while solar panels with charge controllers work well for outdoor setups. Never use AC power—it creates dangerous reactions that can damage your pan.
Optimal Anode Materials and Placement
Your sacrificial anode determines cleaning effectiveness and solution longevity. Type 304 or 316 stainless steel (spoons, bars, or mesh) provides the best balance of slow corrosion and availability. Graphite rods from old batteries work well but cost more. The anode should have at least equal surface area to your pan—a small anode depletes too quickly. Position it opposite the pan, facing the dirtiest areas, with 2-3 inches of clearance.
Electrolyte Solution Composition Guide
Washing soda (sodium carbonate) creates the ideal electrolyte solution—1-2 tablespoons per gallon of water. Find it in the laundry aisle for $3-$5 per box. Stir until fully dissolved (the solution should feel slippery). While baking soda works in a pinch, it’s less effective. Never use salt—it creates chlorine gas and damages the pan. The solution must completely cover both electrodes with several inches of clearance.
Set Up Your Electrolysis Station Properly

Creating a safe, effective electrolysis setup requires strategic placement and precise connections that maximize cleaning while minimizing risks.
Location and Container Requirements
Work in a well-ventilated area—preferably outdoors or in a garage with open doors—due to hydrogen gas production. Use a non-conductive plastic container (5+ gallons) that accommodates your pan with solution 2-3 inches above the highest point. Food-grade buckets work best; avoid metal containers that could short-circuit your setup.
Correct Connection Sequence
Follow this critical order to prevent electrical hazards:
1. Fill container with water and add washing soda
2. Position anode opposite where pan will sit
3. Attach negative (black) lead to pan at bare metal contact point
4. Attach positive (red) lead to anode
5. Plug in power supply and verify bubbles on pan surface
Always reverse this sequence when disconnecting—remove positive lead first, then negative—to prevent accidental short circuits.
The Electrolysis Process Step by Step
With your station prepared, the actual restoration requires minimal hands-on time but careful monitoring to achieve professional results.
Initial Pan Preparation Steps
Remove loose debris with a stiff brush before electrolysis—this improves solution contact without damaging the surface. Never use steel wool on the cooking surface, as it creates microscopic scratches that compromise seasoning. Position the pan to face its most contaminated areas toward the anode. Submerge completely, ensuring no part touches container walls.
Monitoring and Duration Guidelines
Light rust typically clears in 2-4 hours, while heavy carbon buildup may require 12-24 hours. Check every 30-60 minutes initially—bubbles should form steadily on the pan. The solution will turn brown/black as contaminants release. Slow bubble production indicates depleted electrolyte (add more washing soda) or depleted anode (replace stainless steel). Some restorers leave severely neglected pans overnight for dramatic transformations.
Post-Treatment Cleaning and Drying Techniques
The critical minutes after electrolysis determine whether your restoration succeeds or fails due to flash rusting.
Immediate Post-Process Protocol
Disconnect power before touching anything—this cannot be overstated. Rinse the pan thoroughly with clean water, then use a soft brush to remove loosened particles. The surface should appear uniform gray metal. Pat dry immediately with clean towels—any moisture left will cause rust within minutes. Place on stovetop over low heat for 5-10 minutes to evaporate hidden moisture.
First Oil Application Timing
While the pan is still warm (but not hot), apply the thinnest possible layer of high-smoke-point oil (flaxseed, grapeseed, or canola). Use a paper towel to wipe off excess until the surface looks almost dry—this prevents sticky seasoning. Never skip this step; bare cast iron exposed to air for more than 5 minutes will develop flash rust.
Re-Seasoning Your Restored Pan Correctly
Electrolysis strips all existing seasoning, requiring complete re-seasoning before cooking.
Oven Seasoning Method
Preheat oven to 400-450°F. Apply ultra-thin oil layer to all surfaces, then place pan upside down on middle rack with aluminum foil on lower rack to catch drips. Bake for 1-2 hours, then turn off oven and let cool inside. Repeat 3-5 times for durable seasoning. Excess oil creates sticky patches—if seasoning feels tacky, wipe with oil-free paper towel and rebake.
Seasoning Oil Comparison
| Oil Type | Smoke Point | Durability | Cost |
|---|---|---|---|
| Flaxseed | 225°F | Excellent | $ |
| Grapeseed | 420°F | Very Good | $$ |
| Canola | 400°F | Good | $ |
| Vegetable Shortening | 360°F | Moderate | $ |
Safety Precautions to Follow During Electrolysis
Ignoring these critical safety measures risks electrical hazards and chemical exposure.
Electrical Safety Essentials
Always use GFCI protection when working near water. Keep power supply elevated and dry—never place on floor near container. Never touch solution while powered—even low voltage can cause shocks in conductive solutions. Unplug before making adjustments. Hydrogen gas production means no open flames or sparks within 10 feet of your setup.
Chemical Handling Requirements
Washing soda is mildly alkaline—wear rubber gloves and eye protection when handling concentrated solution. Avoid inhaling fumes during mixing. Never mix washing soda with acids (vinegar, citric acid)—this creates dangerous gas. Store solution in labeled containers away from children.
Troubleshooting Common Electrolysis Issues
Resolve these frequent problems to ensure complete rust removal without damaging your pan.
“Why Isn’t My Pan Cleaning Properly?”
Verify these three critical factors:
– Polarity: Pan must connect to negative terminal (cathode)
– Anode size: Should equal or exceed pan surface area
– Solution concentration: Add more washing soda if bubbles diminish
Cold solutions conduct poorly—move setup to room temperature area if processing slows.
“Why Is My Anode Disintegrating Too Fast?”
Reduce amperage on your power supply—high current accelerates anode corrosion. Increase anode surface area by adding more stainless steel pieces. Never use aluminum anodes—they create toxic fumes and ineffective cleaning.
Electrolysis Versus Other Restoration Methods
Choose the right approach for your specific restoration needs.
Vinegar Soak Limitations
While vinegar dissolves rust through acid action, it causes pitting if left too long and requires 12-24 hours of soaking. Vinegar also removes metal rather than just rust, altering the pan’s surface profile. Unlike electrolysis, it cannot reach into crevices effectively.
Mechanical Cleaning Drawbacks
Wire brushing and sanding damage seasoning grooves that give cast iron its non-stick properties. Steel wool leaves microscopic metal fragments that rust later. Power tools remove significant metal, potentially weakening vintage pieces. These methods work best as preliminary steps before electrolysis.
Expert Tips for Cast Iron Electrolysis Success
Implement these professional techniques for flawless restoration results.
Solution Maintenance Secrets
Strain used solution through mesh filter between uses to remove sediment. Replenish with fresh washing soda instead of replacing entire batch. A single solution can process 5-10 pans before replacement. Label and store in airtight container away from sunlight.
Flash Rust Prevention Protocol
Have your oil and drying setup ready before disconnecting power. Work in a dry environment—humidity above 60% dramatically increases flash rust risk. For problematic pans, apply a light vinegar rinse (1:10 vinegar:water) before oiling to neutralize alkaline residue.
Frequently Asked Questions About Cast Iron Electrolysis
“Can electrolysis damage my vintage cast iron?”
When performed correctly with proper settings, electrolysis preserves rather than damages cast iron. It’s gentler than mechanical methods. However, never use on enameled cast iron—the process damages the enamel coating.
“Why does my pan develop black sludge during electrolysis?”
This normal residue consists of released carbon deposits and iron particles—not a problem with your setup. Continue treatment until bubbles subside, then rinse thoroughly. The sludge indicates effective contaminant removal.
“How soon can I cook in my restored pan?”
After completing 3-5 seasoning layers, your pan is ready for gentle cooking (simmering, frying eggs). Avoid acidic foods (tomatoes, wine) for the first month while seasoning develops full durability. Regular use improves seasoning—don’t baby your newly restored pan.


