
Polo shirts present a unique ironing challenge that leaves many people frustrated. Unlike dress shirts with their smooth surfaces and consistent fabric, polo shirts feature textured weaves, buttoned plackets, structured collars, and often delicate fabric blends that react poorly to standard ironing techniques. Many well-intentioned attempts result in shiny patches on dark fabrics, melted plastic buttons, or flattened collars that ruin the shirt’s professional appearance. Learning how to iron a polo shirt properly ensures you maintain that crisp, polished look without damaging your wardrobe essentials. This guide delivers specific techniques for every fabric type and construction detail, transforming a frustrating chore into a quick process that yields professional results.
The distinctive construction of polo shirts demands specialized attention during ironing. That buttoned placket requires careful navigation around each fastener, while the structured collar needs precise pressing to maintain its shape without becoming stiff. Different fabrics—from traditional cotton pique to modern performance blends—respond dramatically differently to heat and moisture. With the right approach, you can eliminate wrinkles while preserving your polo shirt’s intended silhouette and texture. By the end of this guide, you’ll know exactly how to iron a polo shirt regardless of its fabric composition or design details.
Essential Tools for Flawless Polo Shirt Ironing
Having the right equipment makes polo shirt ironing significantly easier and produces better results. While you can technically iron a polo with just an iron and any flat surface, proper tools transform the experience from a struggle into a quick, satisfying process.
A quality steam iron with adjustable temperature settings forms the foundation of your ironing toolkit. Steam irons work particularly well for polo shirts because the moisture helps relax fabric fibers more effectively than dry heat, allowing wrinkles to release more completely. Look for an iron with a smooth soleplate that won’t snag knit fabrics, and ensure the temperature dial offers clear settings for different fabric types. The steam burst function becomes invaluable for stubborn wrinkles, while the vertical steam feature helps refresh shirts without full ironing.
Your ironing board deserves equal consideration. A stable board with a clean, padded cover provides the smooth surface necessary for effective pressing. Boards with sleeve board attachments prove especially useful for polo shirts, as the narrow surface makes pressing those short sleeves much more manageable than trying to work around the board’s wider dimensions. If your board wobbles or has a worn cover, replacing it creates a much more efficient ironing experience.
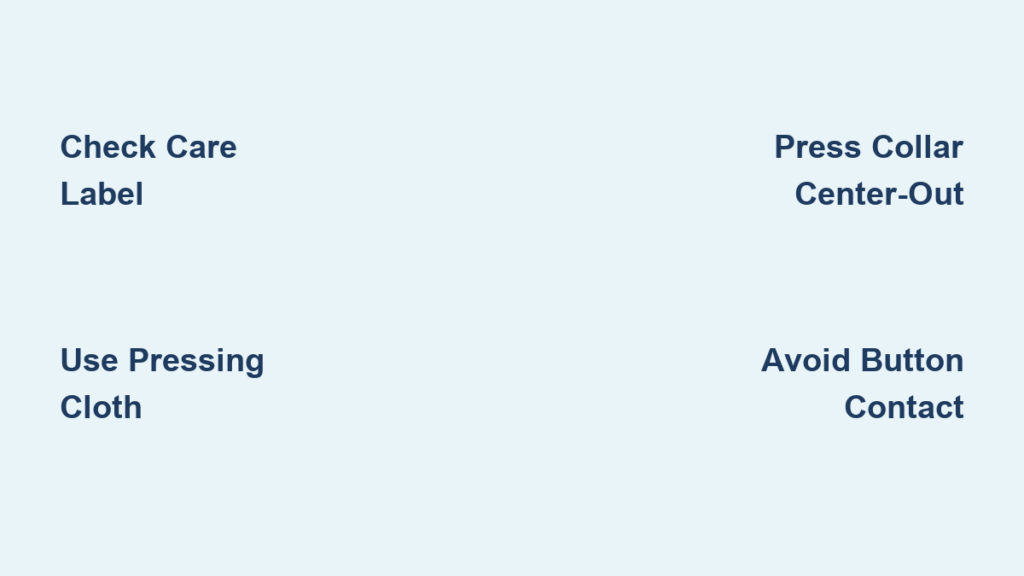
A pressing cloth represents an inexpensive tool that protects your polo shirts from heat damage. This thin cotton cloth—often a clean handkerchief or dedicated pressing cloth—acts as a barrier between your iron and the fabric. Pressing cloths prevent shine marks on dark colors, protect synthetic blends from scorching, and distribute steam more evenly across the fabric. They become essential for performance fabrics and any polo shirt where you want to avoid direct heat exposure.
Setting Perfect Temperature for Cotton, Polyester, and Performance Fabrics
One of the most critical factors in successful polo shirt ironing is matching your iron’s temperature to the fabric type. Using excessive heat damages fibers, creates permanent shine marks, and can melt synthetic components or buttons.
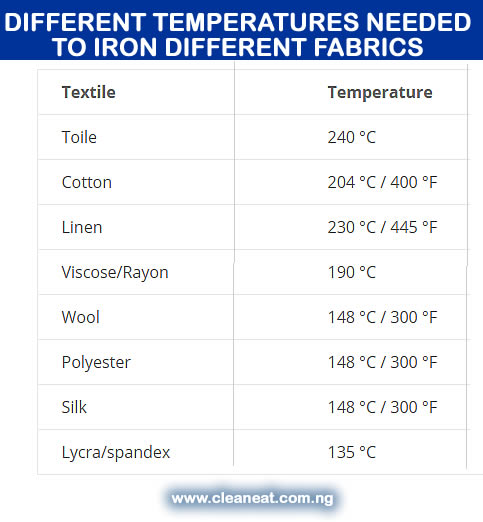
Cotton polo shirts, the most common type, handle medium to high heat effectively. Set your iron between 400-450°F (200-230°C) and use the high steam setting. Cotton holds heat well and responds beautifully to steam, releasing wrinkles quickly under firm pressure. However, pure cotton wrinkles easily, so you may need to press more thoroughly than with wrinkle-resistant blends.
Polyester-cotton blends dominate modern casual and athletic polo shirts, combining wrinkle resistance with comfort. These blends require significantly lower temperatures, typically 300-350°F (150-175°C), because synthetic fibers melt or deform under high heat. Use medium steam settings and expect slightly longer pressing times since polyester doesn’t conduct heat as efficiently as cotton. Never skip the temperature test on these blends—even a few seconds too long at high heat can cause permanent damage.
Performance and technical fabrics demand the most cautious approach, with temperatures at 250-300°F (120-150°C) and always with a pressing cloth between iron and fabric. These moisture-wicking materials were never designed for ironing and respond poorly to direct heat. Consider whether a simple steam refresh might achieve acceptable results without any direct iron contact.
Pre-Ironing Checklist: 5 Critical Steps Before You Start
Taking a few minutes to prepare your polo shirt prevents poor results and potential damage. Proper preparation ensures more effective pressing and protects both the garment and your equipment.
Always check the care label first, despite general fabric guidelines. Manufacturers know their specific fabric blends and treatments best, and their instructions override general recommendations. Look for the iron symbol with dots indicating heat levels—one dot means low heat, two dots medium, and three dots high. An iron with an X through it means do not iron at all, requiring alternative approaches like steaming.
Inspect the shirt thoroughly for stains before ironing. Heat sets stains permanently into fabric fibers, transforming a potentially removable mark into a permanent fixture. Treat any visible stains according to the fabric type, wash the shirt if necessary, and ensure it’s completely clean before pressing.
Determine whether your shirt needs additional moisture. Polo shirts iron best when slightly damp—dry fabric doesn’t release wrinkles as effectively, while overly wet fabric stretches and loses shape. Completely dry shirts benefit from a light misting with a spray bottle or using your iron’s steam function.
Empty all pockets completely, checking for pens, coins, lip balm, or other items that could leak, stain, or damage your iron. Button the shirt fully, including all placket buttons and any collar buttons, ensuring the garment lies flat and maintains its intended shape during pressing.
Step-by-Step: Ironing the Collar Without Losing Its Structure
The collar defines a polo shirt’s appearance and demands your closest attention during ironing. A poorly pressed collar undermines all your other efforts, while a crisp, well-shaped collar elevates the entire garment.
Begin by laying the shirt flat with the collar fully extended and facing up. Starting at the collar’s center point, press outward toward each point using firm, lifting motions rather than sliding strokes. Sliding the iron stretches fabric and creates new wrinkles—pressing and lifting maintains shape while releasing existing creases. Work methodically from center to edge, ensuring even coverage across the entire collar surface.
Flip the collar and repeat the process on the underside, which many people neglect but which significantly impacts the final appearance. The underside often shows through lighter fabrics and contributes to the collar’s overall structure. Press thoroughly, maintaining the same center-to-edge technique.
For the sharpest results, fold the collar as it would be worn and press along the folded edge. This creates the crisp crease that distinguishes professionally pressed polo shirts from home-ironed efforts. Hold the iron in place for several seconds to set the fold, then allow the collar to cool before moving the shirt.
Navigating the Buttoned Placket Without Melting Buttons

The buttoned placket distinguishes polo shirts from regular t-shirts and requires careful technique to press effectively without damaging buttons or creating an uneven appearance.
Lay the shirt flat with the placket fully buttoned, ensuring the fabric lies smooth and flat on either side of the buttons. Beginning at the top, press along one side of the placket using the iron’s tip to navigate between buttons. Work methodically from top to bottom, pressing the fabric between each button rather than trying to iron over the buttons themselves.
Never iron directly over buttons, especially plastic ones which melt or deform under high heat. Metal buttons can conduct heat and scorch surrounding fabric. Instead, press around each button, using the iron’s tip to access the fabric beneath and between fasteners. This patient approach takes slightly longer but prevents costly damage.
For the cleanest results, unbutton the placket after pressing while the fabric is still warm and re-button carefully. This prevents the buttoned placket from developing new wrinkles as it cools in a buttoned position.
Avoiding 7 Costly Ironing Mistakes That Ruin Polo Shirts
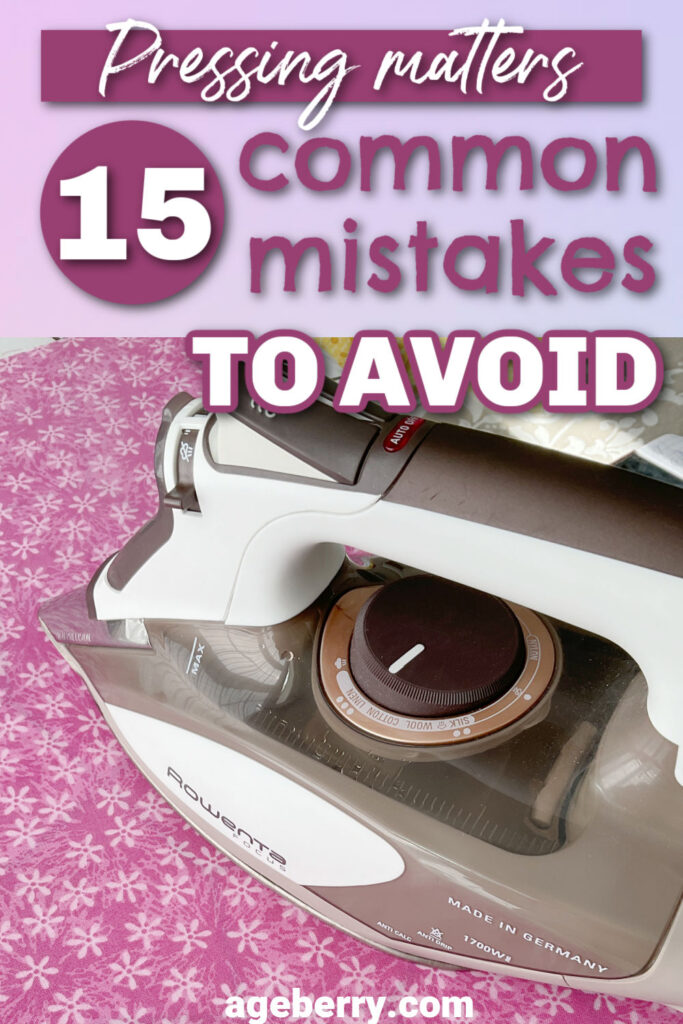
Understanding common errors helps you sidestep the problems that ruin polo shirts and frustrate ironing efforts.
Temperature errors cause the most damage. Starting with excessive heat rather than beginning low and increasing as needed leads to scorch marks, melted fibers, and ruined buttons. Always test temperature on an inconspicuous area first, and when in doubt, err toward lower heat with longer pressing time.
Ironing over buttons seems convenient but causes immediate and permanent damage. Plastic buttons melt, leaving deformed fasteners that won’t close properly. Metal buttons conduct heat and scorch fabric. Take the extra few seconds to press around each button—your shirts last significantly longer.
Sliding instead of pressing stretches fabric and creates new wrinkles. The lifting and pressing motion maintains fabric shape while releasing existing wrinkles. This technique takes getting used to but produces superior results once mastered.
Neglecting the underside of the collar and placket halves your effectiveness. Pressing only the visible side leaves the underside wrinkled and can cause the fabric to lie unevenly. The few extra seconds spent on the backside dramatically improve final results.
Ironing dirty shirts sets stains permanently. Even seemingly clean shirts may have invisible oils, deodorant buildup, or skin products that heat sets into permanent marks. Clean shirts before pressing—always.
Skipping pocket checks leads to ink stains, iron damage from hard objects, and mysterious damage you can’t explain. Empty every pocket every time before ironing.
Pressing too quickly prevents heat from properly penetrating fabric. Allow 3-5 seconds of consistent pressure per area rather than rushing through the process.
Proper Post-Ironing Care to Maintain Crisp Appearance
How you handle your freshly pressed polo shirt determines how long those crisp results last. Proper cooling, hanging, and storage preserve your ironing work.
Allow the shirt to cool completely before moving or hanging it. Warm fabric continues moving and reshaping itself—hanging too soon allows wrinkles to re-form before the fabric sets. Typically five to ten minutes of flat cooling suffices, though thicker fabrics may need longer.
Button the top button and one or two additional buttons when hanging. This maintains collar shape and prevents the garment from stretching or distorting on the hanger. Use a sturdy hanger with rounded shoulders—wire hangers create impressions in the shoulders that become permanent over time.
For shirts that develop minor wrinkles throughout the day, hanging them in a steamy bathroom for 10-15 minutes often releases wrinkles without re-ironing. The steam relaxes fabric fibers, allowing them to return to their pressed shape. This touch-up method extends the time between full ironing sessions and maintains your shirt’s polished appearance.
Mastering how to iron a polo shirt transforms a frustrating chore into a quick process that elevates your entire wardrobe. By selecting appropriate temperatures for your specific fabric, using the right tools, and following the systematic approach outlined here, you’ll achieve crisp, professional results that last. Remember to always check care labels, use a pressing cloth for protection, and press rather than slide your iron across the fabric. With these techniques, your polo shirts will maintain their structured appearance wash after wash, looking sharp without the damage that comes from improper ironing techniques.


