
Few things elevate a man’s wardrobe quite like a crisp pair of perfectly pressed khakis. Whether you’re dressing for the office, a casual Friday, or an evening out, wrinkle-free khakis project confidence and attention to detail. Yet many men struggle with achieving that clean, professional press at home, often ending up with shine marks, stubborn creases, or uneven results. Learning how to iron khakis properly is a skill that pays dividends every time you get dressed, saving you both time and the frustration of dealing with wrinkled trousers.
The good news is that ironing khakis doesn’t require professional tailoring skills or expensive equipment. With the right technique, a few basic tools, and about ten to fifteen minutes, you can transform wrinkled khakis into a polished, ready-to-wear garment. This guide walks you through everything from gathering the right supplies to executing each ironing step with precision. By the end, you’ll know exactly how to achieve that crisp, professional press that makes your khakis look brand new.
Gather Your Ironing Essentials
Before you begin ironing khakis, having the right tools readily available makes the process smoother and more effective. The iron itself is obviously essential, but selecting the appropriate type and setting up your workspace properly will significantly impact your results.
Start with a good quality steam iron with adjustable temperature settings. Irons with a stainless steel or ceramic soleplate glide smoothly across fabric and distribute heat evenly, which helps prevent those unwanted shine marks that can appear on khaki fabric. Your iron should also have a water reservoir for generating steam, as the moisture helps relax fabric fibers and remove stubborn wrinkles more effectively than dry heat alone.
You’ll need a clean, flat ironing board covered with a cotton cover or pressing cloth. The board should be stable and properly padded to provide a firm surface for pressing. If your board wobbles or has thin padding, consider investing in a better one—this single upgrade dramatically improves ironing results across all garments, not just khakis.
Gather these additional items before starting: a spray bottle filled with plain water, a clean white cotton cloth (for pressing and protecting sensitive areas), and possibly a pressing cloth if your khakis contain synthetic blends. Having everything within arm’s reach prevents interruptions during the ironing process, which is important because khaki fabric cools and re-wrinkles quickly if not handled properly. For frequent ironing, consider adding a fabric shaver to your kit to remove any pills that might distract from your clean press.
Prepare Your Khakis for Ironing
Proper preparation before touching the iron to your khakis ensures better results and protects your trousers from damage. Taking a few minutes to prep your fabric pays off in the quality of your finished press.
Check the care label inside your khakis waistband for specific ironing instructions. Most khakis made from cotton or cotton-blend fabrics can tolerate medium to high heat, but fabrics with polyester, spandex, or synthetic fibers require lower temperatures to prevent melting or shine damage. If the care label is missing or illegible, err on the side of caution and start with a lower heat setting.
Empty all pockets and close any zippers or buttons. Coins, pens, and other pocket items can leave impressions or damage your iron’s soleplate, while open zippers create uneven surfaces that make smooth ironing difficult. Turn your khakis inside out if you’re uncertain about the fabric’s sensitivity—ironing on the reverse side protects the visible exterior from potential shine marks or heat damage, especially for darker khaki shades.
Examine your khakis for stains, spots, or heavily soiled areas. Ironing sets stains into fabric permanently, so treat any problem areas with an appropriate stain remover before pressing. Allow the treated area to dry completely before applying heat. For heavily wrinkled khakis that have been stuffed in a drawer or suitcase, hang them in a steamy bathroom for ten minutes first—this relaxes the fibers and makes ironing significantly easier.
Set Up Your Iron Correctly
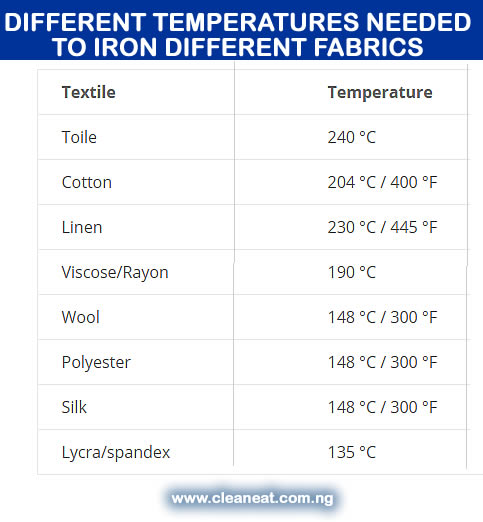
Temperature selection represents the most critical decision when learning how to iron khakis, as incorrect heat settings can damage your trousers permanently. Cotton khakis generally require temperatures between 300°F and 400°F, which typically corresponds to the “linen” or “cotton” setting on most irons. Polyester blends or performance khakis need cooler temperatures around 250°F to 300°F, equivalent to the “synthetic” or “polyester” setting.
Fill your iron’s water reservoir to the indicated level with distilled water rather than tap water. Distilled water prevents mineral buildup inside your iron that can eventually spit rusty water onto your khakis, leaving stains that are difficult to remove. If your tap water is very hard, using distilled becomes even more important for protecting both your iron and your clothing.
Allow your iron to fully heat up before beginning. Most irons take two to three minutes to reach temperature, and starting too early means you’re essentially ironing with a cold tool—which accomplishes nothing and may even push wrinkles deeper into the fabric. Many irons have indicator lights that signal when they’ve reached the correct temperature; wait for the light to stabilize and then give it an additional thirty seconds for good measure. Test your iron on an inconspicuous area like the inside of a pocket before committing to full ironing.
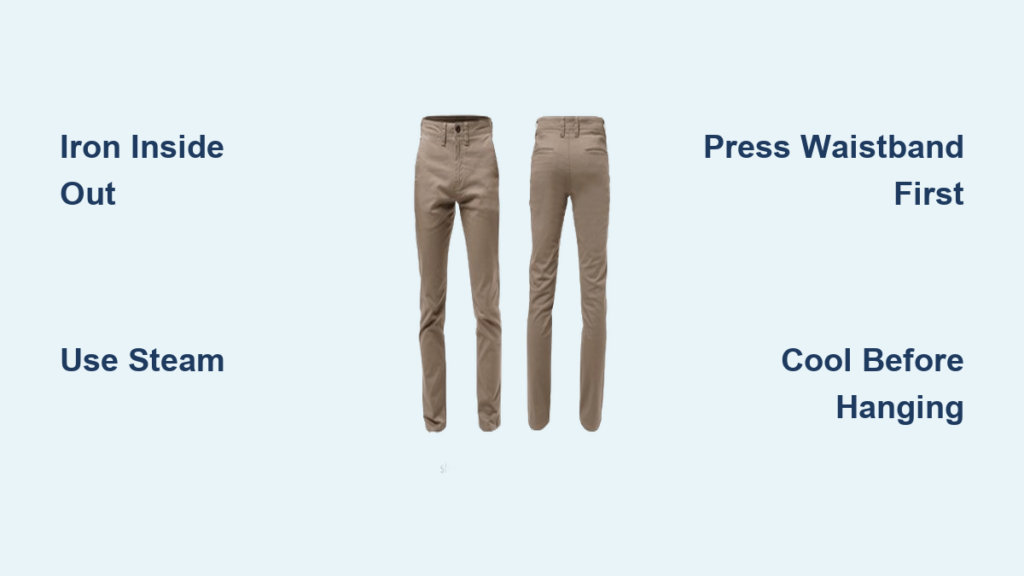
Iron the Waistband First
Beginning with the waistband establishes a foundation for the rest of your ironing and ensures this prominent area receives your full attention. The waistband sets the visual tone for your entire pair of khakis, so starting here guarantees it gets the care it deserves.
Lay your khakis flat on the ironing board with the waistband facing up. For the inner waistband—the side that touches your shirt—press carefully using a lower heat setting if the fabric is synthetic-blended. Fold a pressing cloth over any areas that seem particularly delicate or prone to shine. Apply the iron with moderate pressure, holding each section for five to eight seconds before moving to the next area.
For the outer waistband—the visible portion when wearing your khakis—work even more carefully to prevent shine marks. Use the steam function generously, as the moisture helps lift the fabric fibers without crushing them. If you notice any stubborn creases near the belt loops, pay extra attention to these areas by lifting and pressing rather than dragging the iron across them. Belt loops often collect wrinkles that resist simple horizontal strokes, so address each loop individually for best results.
Press the Pockets and Fly Area
The pocket seams and fly area require patient, methodical attention because these high-stress areas accumulate wrinkles and often contain multiple layers of fabric that behave differently during ironing. Rushing through this section leads to half-pressed khakis that look unfinished.
Turn your khakis so one leg is flat on the ironing board, then press the pocket interior and the surrounding seam allowance. For flat-front khakis, this area is relatively straightforward—just ensure you press the pocket lining smoothly without creating new creases. For pleated khakis, you’ll need to press each pleat individually, using your fingers to guide the fabric into crisp alignment before applying the iron.
The fly area typically consists of multiple fabric layers that can trap heat and develop shine marks easily. Press this area with a pressing cloth between the iron and your khakis, using short, gentle strokes rather than prolonged pressure. Work from the waistband down toward the crotch, lifting the iron straight up between strokes rather than sliding it across this sensitive area. This technique prevents the fly layers from shifting and creating bulges or impressions. Pay special attention to any button plackets, which can create uneven surfaces if not properly smoothed before ironing.
Press the Legs and Seams
The legs represent the largest surface area of your khakis and where you’ll spend most of your ironing time. Working systematically from top to bottom ensures you don’t miss any areas and prevents re-wrinkling sections you’ve already pressed.
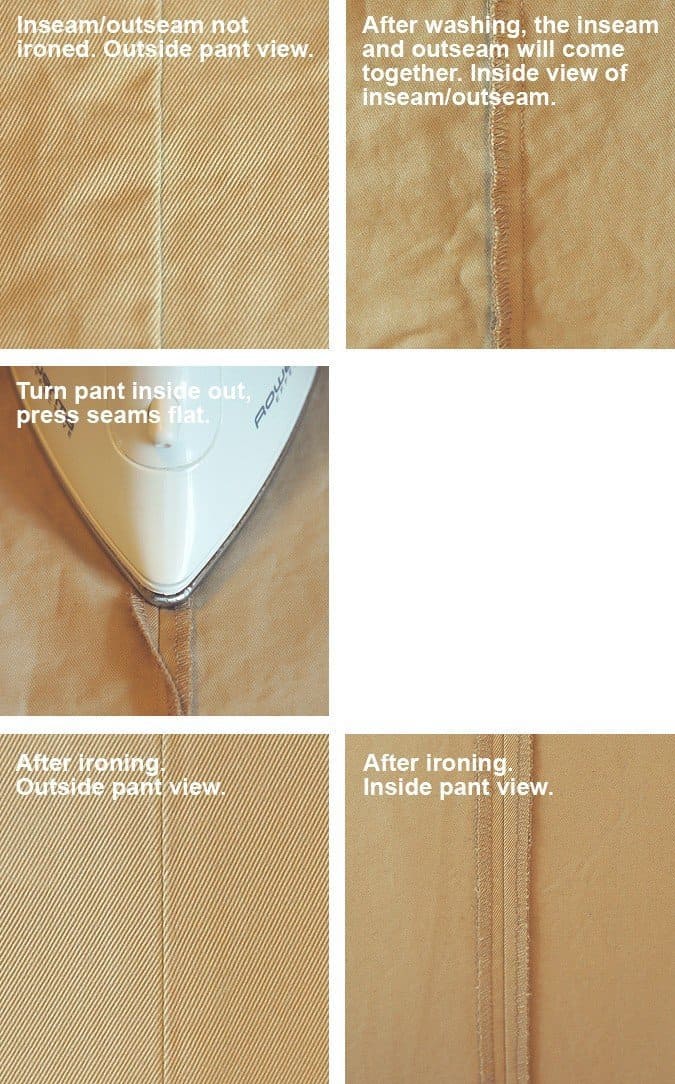
Lay one leg flat on the ironing board, smoothing the fabric with your hand before pressing. Start at the waist and work your way down toward the hem, using long, overlapping strokes that cover the entire width of the leg. Apply steam generously, especially for cotton khakis that respond well to moisture. For the inseam and outseam—the vertical lines running down each side of the leg—position the iron carefully along these creases and press firmly to establish sharp, clean lines.
Turn your khakis over and repeat the process on the reverse side of the same leg. This step is optional for khakis in good condition but makes a noticeable difference for heavily wrinkled pairs or when you want a truly professional press. Flip the khakis to address the second leg, following the same systematic approach of pressing front, then back, working from waist to hem.
Pay special attention to the hem area, which often collects stubborn wrinkles from sitting and walking. Use the tip of your iron to work into the hem’s creases, applying extra steam and pressure. If your khakis have reinforced hem edges common in workwear styles, reduce heat slightly in this area as the multiple fabric layers can retain heat and develop shine.
Handle Common Khaki Ironing Problems

Even with proper technique, certain challenges frequently arise when ironing khakis. Knowing how to address these problems quickly prevents frustration and protects your trousers from damage.
Shine marks appear as shiny patches on khaki fabric, usually caused by excessive pressure, too-high heat, or ironing over seams and zippers without protection. To remove shine marks, dampen a pressing cloth with white vinegar and place it over the affected area. Press with a cool iron for ten to fifteen seconds, then allow the fabric to cool completely before lifting the cloth. The vinegar solution relaxes the crushed fibers and restores the fabric’s matte appearance.
Stubborn wrinkles that resist your iron often result from fabric that was bone-dry when you started or wrinkles that set for extended periods. The solution is simple: apply more steam and let the iron dwell longer on the problem area. For really stubborn creases, lay a damp towel over the wrinkle and press through the towel—the trapped steam penetrates more deeply than direct iron steam.
Impressions from underwear bands or previous folds sometimes transfer through to the exterior of khakis. To remove these, turn the khakis inside out and press the impression from the back side while applying steam. The heat and moisture relax the fibers from underneath, causing the impression to disappear from the front.
Water spots from mineral deposits can mar your khakis if you’ve used tap water in your iron. To prevent this, always use distilled water. If spots appear, simply dampen the area with clean water and press again with a dry iron to evaporate the moisture.
Cool Down and Store Properly
The way you handle your khakis immediately after ironing significantly impacts how long your pressed results last. Fabric needs time to cool and set, and improper handling can undo all your work in seconds.
After completing the ironing process, hang your khakis immediately on a sturdy hanger with padded shoulders if possible. Allow them to cool completely before moving them—this typically takes five to ten minutes. During this cooling period, the fabric fibers set in their new, wrinkle-free position. Folding or sitting on freshly pressed khakis immediately reintroduces creases that become much harder to remove.
Store your pressed khakis properly to maintain their crisp appearance between wearings. Hanging is preferable to folding because it prevents new wrinkles from forming. If you must fold khakis for storage, make clean, single folds rather than multiple creases, and smooth the fabric carefully before folding. Consider storing khakis in a garment bag to protect them from dust and inadvertent wrinkling.
Avoid packing khakis tightly in drawers or suitcases, as this crushes the carefully pressed seams and creates new wrinkles. If traveling with khakis, roll them carefully rather than folding, or use packing cubes that allow the fabric some breathing room. For business trips, consider packing khakis in a garment bag that can hang in your hotel room—this minimizes wrinkling during transit.
Pro Tips for Wrinkle-Free Khakis
Mastering the fundamentals of how to iron khakis opens the door to advanced techniques that elevate your results from good to exceptional. These professional tips separate amateur pressing from truly polished results.
Invest in a quality pressing cloth for protecting sensitive areas and achieving better steam distribution. Pressing cloths—typically made of muslin or cotton organza—create a barrier between your iron and khaki fabric that prevents shine marks while allowing steam to penetrate. Use the pressing cloth on belt loops, pockets, seams, and any areas where your iron might contact multiple fabric layers simultaneously.
Master the art of the “press and lift” technique rather than dragging your iron across khaki fabric. Dragging stretches khaki fibers and can distort the garment’s shape, especially in areas like the thighs and knees where fabric already experiences stress during wear. Press the iron down firmly, hold for several seconds, then lift straight up and move to the next section. This technique produces sharper creases and more even results.
Schedule your ironing sessions strategically for maximum efficiency. Iron khakis when they’re slightly damp from the dryer or after a steamy bathroom treatment—this reduces the time needed for steam to penetrate fibers and means less work overall. Ironing khakis immediately after washing and drying, while they’re still warm, often requires just a quick touch-up rather than a complete press.
Consider the frequency of ironing in your overall khaki care strategy. Wearing khakis multiple times between washings, spot-cleaning rather than full washing when possible, and proper storage all reduce the frequency of ironing sessions needed. Some men find that rotating between several pairs of khakis and hanging them properly after each wear eliminates the need for ironing entirely except after storage or travel.
A well-pressed pair of khakis makes a subtle but powerful statement about your attention to detail and personal presentation. By following these techniques consistently, you can achieve professional-quality results at home that rival what you’d get from an expensive dry cleaner. The investment of ten to fifteen minutes per pair pays dividends every time you wear your khakis, projecting the polished, put-together image that opens doors in professional and social settings alike.


