
The sizzle of dough hitting a blazing hot cast iron pan creates an unmistakable symphony that signals pizza perfection is underway. This cooking method delivers a crust with the ideal combination of crispiness and chewiness that most home ovens struggle to achieve. Cast iron’s superior heat retention creates that coveted charred, blistered bottom while keeping the interior tender—a texture that elevates your homemade pizza from ordinary to extraordinary.
Whether you’re tired of soggy delivery pizza or frustrated with inconsistent results from baking sheets, mastering cast iron pan pizza unlocks restaurant-quality results without expensive equipment. The technique leverages your stovetop’s direct heat to create a crust that rivals professional wood-fired ovens, all within 30 minutes. This guide provides the precise steps and insider knowledge needed to transform your cast iron skillet into the ultimate pizza-making tool, delivering consistently impressive results that will make you the envy of friends and family.
Choose the Right Cast Iron Pan

Your pan selection directly impacts crust quality and cooking success. A standard 10 to 12-inch cast iron skillet delivers optimal results for individual pizzas, with the 12-inch size offering slightly larger surface area for generous toppings while the 10-inch creates a thicker, more substantial crust. Avoid smaller pans that restrict crust development and make topping placement difficult.
Weight significantly affects performance—traditional thick-walled cast iron (6-8 pounds for a 12-inch pan) provides superior heat retention but requires careful handling. While enameled options offer easier maintenance, they often fail to reach the extreme temperatures needed for that signature blistered crust. Stick with traditional seasoning-ready cast iron, as its slightly textured surface actually enhances crust formation.
Proper seasoning makes or breaks your pizza experience. Apply a thin layer of high-smoke-point oil like flaxseed or canola, heat for 1-2 hours, and cool completely. Repeat this process 3-4 times for optimal non-stick properties. A well-seasoned pan appears dark, smooth, and slightly shiny—essential for preventing dough from tearing during release.
Why Pan Size Matters for Crust Development
The 12-inch skillet creates the ideal crust-to-topping ratio with enough space for crispy edges while maintaining structural integrity. The larger surface area allows for more even heat distribution, preventing hot spots that cause uneven browning. When measuring your pan, include the entire cooking surface from rim to rim, not just the flat bottom portion.
Seasoning Troubleshooting Tips
If your pizza sticks despite proper oiling, your pan likely needs additional seasoning. Focus on building layers gradually—rushing the process creates a sticky, uneven surface. After each use, clean while warm, dry thoroughly, and apply a light oil coating to maintain and improve your seasoning over time.
Prepare Pizza Dough for Pan Cooking
Dough quality separates good pizza from great pizza. While store-bought dough works in a pinch, homemade or pizzeria dough delivers superior results with proper hydration (60-65%) and gluten development. Bread flour’s higher protein content creates the chewy texture essential for pan pizza, while precise hydration prevents dough from becoming too dry or unmanageably sticky.
Cold fermentation dramatically improves flavor and texture—prepare dough 24-48 hours ahead and refrigerate. The slow fermentation develops complex flavors and creates more extensible dough that stretches easily. Before cooking, remove dough from refrigeration 30-60 minutes to warm slightly and become pliable.
Proper Dough Stretching Technique
Avoid pressing directly on the edges when shaping—this preserves the airy CO2 bubbles that create characteristic large, irregular holes in the crust. Instead, gently stretch from the center outward, letting gravity assist. If resistance occurs, rest the dough for five minutes before continuing. Aim for a quarter-inch thickness throughout with slightly thicker edges.
Preheat Your Pan Correctly
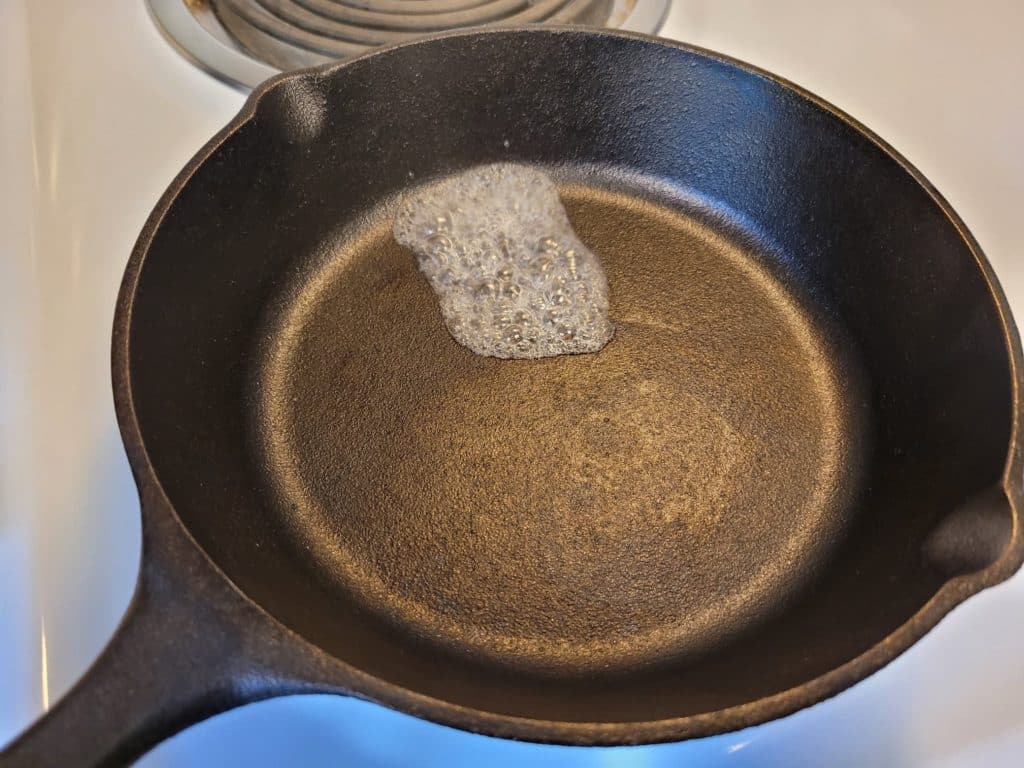
Temperature control represents the most critical—and often overlooked—aspect of cast iron pan pizza. Preheat your skillet over medium-high to high heat for 10-15 minutes until a water drop evaporates instantly. This superheated surface creates immediate steam release that lifts the dough and begins browning within seconds.
Maintain high heat throughout stovetop cooking—reducing heat traps steam beneath the crust, causing sogginess. Electric stoves require longer preheating due to slower heat response, while gas and induction offer more immediate adjustability. The pan should be hot enough that oil shimmers but doesn’t smoke excessively before adding dough.
Oil the Pan for Perfect Release
The oil layer between dough and cast iron serves multiple critical functions: preventing sticking, promoting browning, and creating a crispy, almost fried texture on the bottom crust. Use 1-2 tablespoons of high-smoke-point oil for a standard 12-inch pan—extra-virgin olive oil adds flavor while neutral oils like canola provide cleaner results.
Pour oil into the preheated pan and swirl to coat the entire cooking surface, including sides. The oil should flow easily and shimmer slightly from heat. If it smokes immediately, reduce heat slightly and wait for stabilization. Some cooks brush additional oil around dough edges after placement to encourage gradual release and golden-brown finishing.
Shape and Transfer Dough Without Tears
Moving raw pizza dough to a screaming-hot pan requires confidence. The window stretch method helps gauge readiness—lightly flour your surface and stretch a small piece as thin as possible without tearing. Translucent dough before ripping indicates proper fermentation.
To transfer, gently stretch dough over your knuckles, creating a slight dome. Lower it carefully into the hot oiled pan, then release to settle. The dough should immediately begin sizzling and puffing slightly. If it doesn’t make full contact, gently lift and adjust. Once settled, use fingertips to press toward the pan’s edges, creating dimples that collect sauce and toppings.
Apply Sauce and Toppings Strategically
Strategic layering ensures perfect crust-to-topping ratios. Use 3-4 tablespoons of sauce for a 12-inch pizza, spreading thinly while leaving a half-inch border. Strain excess liquid from canned sauce or simmer briefly to reduce water content.
Cheese placement matters significantly—grate fresh and distribute evenly directly over sauce. The cheese acts as a protective layer preventing sogginess while conducting heat to toppings above. Reserve some cheese for the final minutes if you prefer a browned, crispy cheese crust.
Topping density requires restraint. Spread in a single layer without crowding, avoiding placement too close to edges where burning occurs. Partially cook heavier toppings like meatballs or thick vegetables before adding, while delicate ingredients like fresh basil go on immediately after cooking.
Cook on Stovetop Until Crust Forms
The stovetop phase creates the foundation—typically taking 4-6 minutes. Listen for active, consistent sizzling indicating vigorous steam release beneath the crust. Visual indicators become more informative as cooking progresses: crust edges turn from pale dough color to golden brown with small dark spots.
Shake the pan occasionally for even cooking and to prevent sticking. Gently rotate in small circles, allowing the pizza to shift and make fresh contact with different cooking surface areas. Avoid pressing down on the crust, which compresses air bubbles and creates dense, tough texture.
Finish Under the Broiler for Perfect Cheese
The two-stage cooking method mimics wood-fired ovens. Preheat your broiler while pizza cooks on the stovetop, positioning the oven rack 4-6 inches from the element. Slide partially cooked pizza onto a baking sheet for transfer—the crust should be set with golden-brown coloring but not fully cooked on top.
Place under preheated broiler and watch constantly—the difference between perfect and burnt happens in under a minute. Broiling typically takes 90 seconds to three minutes until cheese bubbles actively with golden-brown spots. Remove slightly before ideal appearance as residual heat continues cooking.
Troubleshoot Common Problems
Soggy bottoms usually indicate insufficient preheating or wet toppings. Ensure full 15-minute preheating and drain watery ingredients thoroughly. Crust sticking despite oiling often results from under-proofed or cold dough—always let refrigerated dough warm to room temperature.
Burning on bottom while top remains pale suggests excessive stovetop heat with insufficient broiler time. Reduce stovetop temperature slightly and extend broiling time. Tough, chewy crust typically comes from over-handling dough or using bread flour with too high protein content—handle minimally during shaping.
Maintain Your Cast Iron Pan
Proper care extends your pan’s lifespan. Clean while still warm using hot water and a stiff brush—avoid soap which can strip seasoning (though small amounts occasionally won’t ruin a well-seasoned pan). For stubborn residue, sprinkle coarse salt as a gentle abrasive.
Dry immediately and completely to prevent rust. Place on a warm burner briefly to evaporate moisture, then apply thin oil layer while still warm. Store in a dry location with air circulation—place a paper towel between stacked pans to absorb moisture and protect seasoning.
Mastering cast iron pan pizza transforms ordinary ingredients into extraordinary meals through proper technique and attention to detail. The crispy, caramelized crust combined with perfectly melted cheese creates an experience that rivals professional pizzerias. Start with these fundamentals, then experiment with different dough hydration levels, broiler positions, and topping combinations. Each pizza teaches something new, and with consistent practice, you’ll develop the intuition needed to create consistently impressive results that make cast iron pan pizza one of home cooking’s most rewarding pursuits.


