
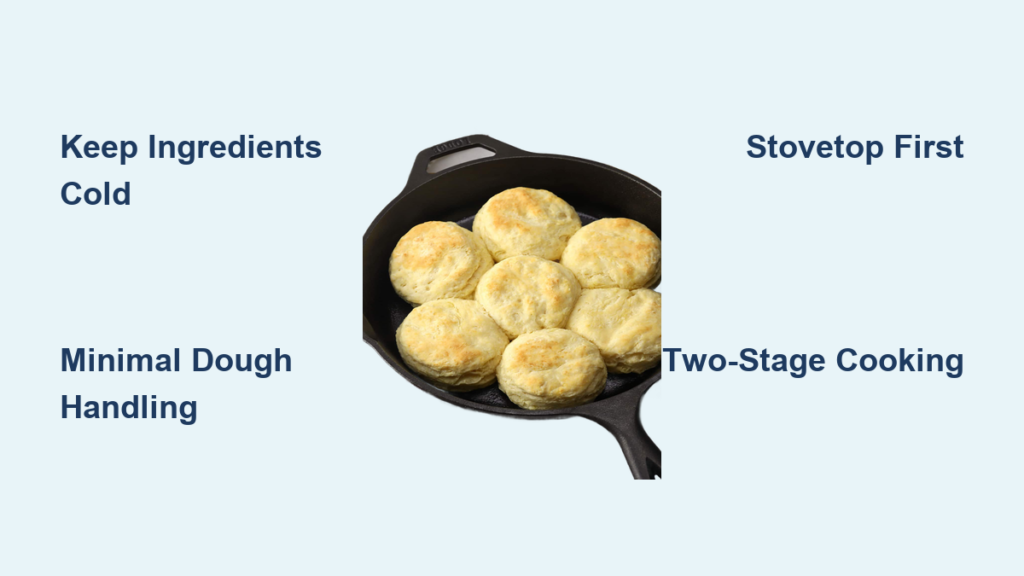
There’s something magical about the way cast iron transforms simple biscuit dough into golden-brown perfection with crispy edges and impossibly tender layers. Cast iron buttermilk biscuits deliver that irresistible contrast between a crunchy exterior and pillowy interior that makes them a beloved staple in kitchens across America. Whether you’re serving them alongside a hearty breakfast, using them for shortcake, or simply enjoying them warm with butter and honey, mastering this classic recipe will elevate your baking game significantly.
The beauty of cast iron buttermilk biscuits lies in their elegant simplicity. With just flour, cold butter, buttermilk, and a few leavening agents, you can create something extraordinary. However, achieving biscuit perfection requires understanding key principles: keeping ingredients properly chilled, handling the dough minimally, and knowing how to preheat and maintain your cast iron pan. This guide walks you through every step to create bakery-quality biscuits that will have everyone asking for seconds.
Why Cast Iron Creates Superior Biscuits
Cast iron’s exceptional heat retention ensures your biscuits cook evenly across the entire surface, eliminating hot spots that plague thinner pans. Unlike stainless steel or non-stick alternatives, a well-seasoned cast iron skillet develops a natural non-stick surface that improves with each use while adding subtle flavor complexity to your baked goods. The thermal mass of cast iron enables a unique two-stage cooking process that’s essential for perfect biscuits.
Start your biscuits on the stovetop to develop that signature crispy, caramelized bottom crust, then finish them in a hot oven to ensure the interior cooks through without burning the exterior. This combination creates the distinctive texture biscuit lovers crave—crisp edges giving way to tender, flaky layers that pull apart effortlessly. No other cooking method quite replicates this result, which is why serious biscuit enthusiasts swear by cast iron.
Beyond superior cooking performance, cast iron is remarkably durable and cost-effective. A well-maintained skillet can last generations, becoming better seasoned and more naturally non-stick with each use. For something you’ll use regularly, investing in quality cast iron pays for itself quickly, and the versatility extends far beyond biscuits to include searing, frying, and baking cornbread.
Essential Ingredients and Equipment Checklist
Creating perfect cast iron buttermilk biscuits starts with assembling the right ingredients before you begin. You’ll need all-purpose flour as your foundation—bread flour works if you want a slightly chewier texture, but all-purpose produces the classic tender bite most people expect. Cold, unsalted butter is essential, and you should keep it refrigerated until the moment you’re ready to incorporate it into the flour.
Buttermilk brings tanginess and moisture while the acid activates the baking soda, creating that characteristic rise and tender crumb. For leavening, use a combination of baking powder and baking soda. The double-acting baking powder provides initial rise while the baking soda, activated by the acidic buttermilk, gives additional lift and contributes to the beautiful golden color. Don’t skip the salt—it enhances all other flavors and creates that satisfying savory-sweet balance.
For equipment, a 10-inch cast iron skillet is the gold standard. You’ll also need a box grater for the butter (faster and more effective than cutting by hand), a large mixing bowl, a pastry cutter or two forks, and a sharp biscuit cutter or clean glass. A bench scraper helps transfer biscuits without handling the dough too much, and oven mitts are essential when working with a screaming hot cast iron pan.
Keep Everything Cold for Maximum Flakiness
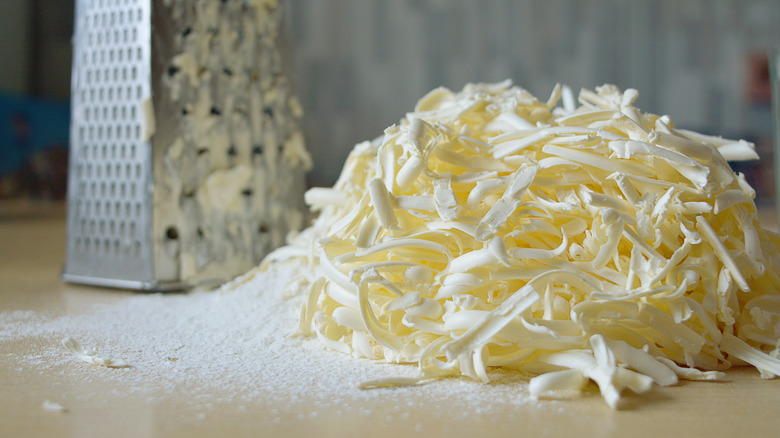
The single most critical factor in achieving flaky, layered biscuits is maintaining cold ingredients throughout the process. When cold butter hits the hot cast iron, the moisture inside turns to steam, pushing layers apart and creating airy pockets. If your butter softens prematurely, you’ll end up with tough, dense biscuits instead of light and airy ones.
Place your mixing bowl, pastry cutter, and grater in the refrigerator for about 15 minutes before starting. Measure flour into the chilled bowl, then grate your butter directly into the flour using the large holes of your box grater. Work quickly—the warmth from your hands will begin softening the butter as soon as it touches your skin. Some bakers freeze their butter for 20 minutes before grating for extra insurance against softening.
Once incorporated, the butter should look like coarse crumbs with visible pea-sized pieces remaining. These chunks of cold butter create steam and layers during cooking, so don’t overwork the mixture. Make a well in the center of your dry ingredients and pour in your cold buttermilk all at once. Stir gently just until the dough comes together—it will look shaggy and slightly undermixed, which is exactly what you want.
Shape and Cut Without Overworking the Dough
When shaping cast iron buttermilk biscuits, remember: less handling equals better results. Overworking develops gluten strands, creating tough, chewy texture instead of tender, flaky layers. Once your dough comes together, turn it out onto a lightly floured surface and gently pat it into a rectangle about 1-inch thick. Avoid using a rolling pin if possible—the pressure can warm and soften the butter.
Fold the dough into thirds, like a letter, then pat or roll it out again to 1-inch thickness. This simple fold-and-roll technique creates additional layers. Repeat this process one more time for maximum flakiness. Now cut your biscuits using a sharp 2-inch cutter and press straight down without twisting. Twisting seals the edges and prevents proper rising. Place cut biscuits with sides touching in the cast iron skillet; this support helps them rise taller.
Gather scraps and gently re-pat to cut additional biscuits, but limit this to once or twice maximum. Each subsequent reroll creates tougher biscuits as gluten develops and butter warms from repeated handling.
Perfect the Two-Stage Cooking Technique

The two-stage cooking method—stovetop first, then oven finish—is what gives cast iron buttermilk biscuits their distinctive texture. Preheat your oven to 425°F while finishing shaping. Place your empty cast iron skillet on the stovetop over medium-high heat for about 5 minutes until very hot (a drop of water should sizzle immediately).
Arrange biscuits in the hot skillet with edges touching. Cook for 2-3 minutes until bottoms turn deep golden brown and edges begin to set. At this point, carefully transfer the entire skillet to your preheated oven—use oven mitts on both hands. Bake for 12-15 minutes until tops are golden brown.
This stovetop sear creates that crispy, caramelized bottom crust while the oven heat gently cooks the interior. If you skip the stovetop step, you’ll miss that distinctive texture. Similarly, if you leave them on the stovetop too long, the bottoms will burn before centers cook through. Watch for that golden color and listen for the sizzling to quiet down as butter fully renders.
Fix Common Biscuit Problems Before They Happen
Dense, heavy biscuits usually indicate overworked dough, warm ingredients, or insufficient leavening. Check that your baking powder is fresh—old leavening agents lose potency. Ensure your buttermilk was cold and that you worked quickly with minimal handling.
Biscuits that spread flat instead of rising tall often mean the butter melted into the dough before cooking. This happens when ingredients are too warm, when dough sits too long before baking, or when the pan isn’t hot enough initially. If you notice butter pooling in the skillet during the stovetop step, your pan wasn’t hot enough.
Tough or chewy biscuits result from over-mixing or over-kneading. Handle the dough as little as possible and stop mixing the moment wet and dry ingredients combine. Check your flour measurement—scooping directly from the bag compacts flour and leads to using too much, resulting in denser dough. Use the spoon-and-level method for accurate measurements.
Serve Immediately or Store Properly for Later
Cast iron buttermilk biscuits are best served immediately while still warm. Split them open and serve with butter, honey, jam, or sausage gravy depending on your preference. If serving a crowd, keep baked biscuits wrapped in a clean kitchen towel—this keeps them soft while maintaining exterior crispness for about 30 minutes.
For storage, allow completely cooled biscuits to sit at room temperature in an airtight container for up to 2 days. To reheat, wrap in foil and warm at 300°F for 10-12 minutes, or split and toast in a dry skillet until crispy again. Avoid microwaving, which makes the exterior soggy and interior tough. Biscuits can be frozen before or after baking—freeze shaped biscuits on a baking sheet, then transfer to a freezer bag. Bake from frozen, adding 5-7 minutes to cooking time.
Maintain Your Cast Iron Skillet for Consistent Results
After making biscuits, let your skillet cool slightly, then wipe out crumbs with a paper towel. If needed, wash quickly with hot water and a stiff brush, avoiding soap which can strip seasoning. Dry immediately and thoroughly to prevent rust.
Re-season periodically by rubbing a thin layer of neutral oil over the entire surface. Place it upside down in a 450°F oven for one hour, letting the oil polymerize into a hard, protective layer. This process is especially important for newer pans or any skillet showing signs of rust or dullness.
Avoid cooking acidic foods in your well-seasoned biscuit pan, as acid can break down seasoning over time. Never soak your cast iron or put it in the dishwasher, as prolonged moisture causes rust. With proper care, your cast iron will last generations and produce consistently perfect cast iron buttermilk biscuits for decades to come.


