That unmistakable burnt hair smell coming from your curling iron is more than just unpleasant—it’s a clear signal that your styling tool needs attention. Whether you’ve noticed it immediately after use or detected it during storage, this odor typically indicates hair product accumulation, trapped debris, or heat damage that’s affecting your device’s performance. The good news is that most causes are fixable with simple cleaning and maintenance, though some situations may require professional assessment or device replacement.
Understanding why your curling iron emits this smell helps you address the root cause rather than just masking the odor. The burning smell usually originates from three main sources: residual hair products baking onto the barrel, accumulated dead hair fibers trapped in the iron’s crevices, or damaged internal components struggling to maintain consistent heat. Each cause requires a different approach, and recognizing the signs early prevents permanent damage to your curling iron or—more importantly—your hair.
This guide walks you through the most common reasons your curling iron smells like burnt hair, provides step-by-step solutions for each scenario, and offers practical prevention strategies to keep your styling tools fresh and functional. By the end, you’ll know exactly what to check, how to clean your device properly, and when it might be time to invest in a replacement.
Burnt Product Residue on the Barrel
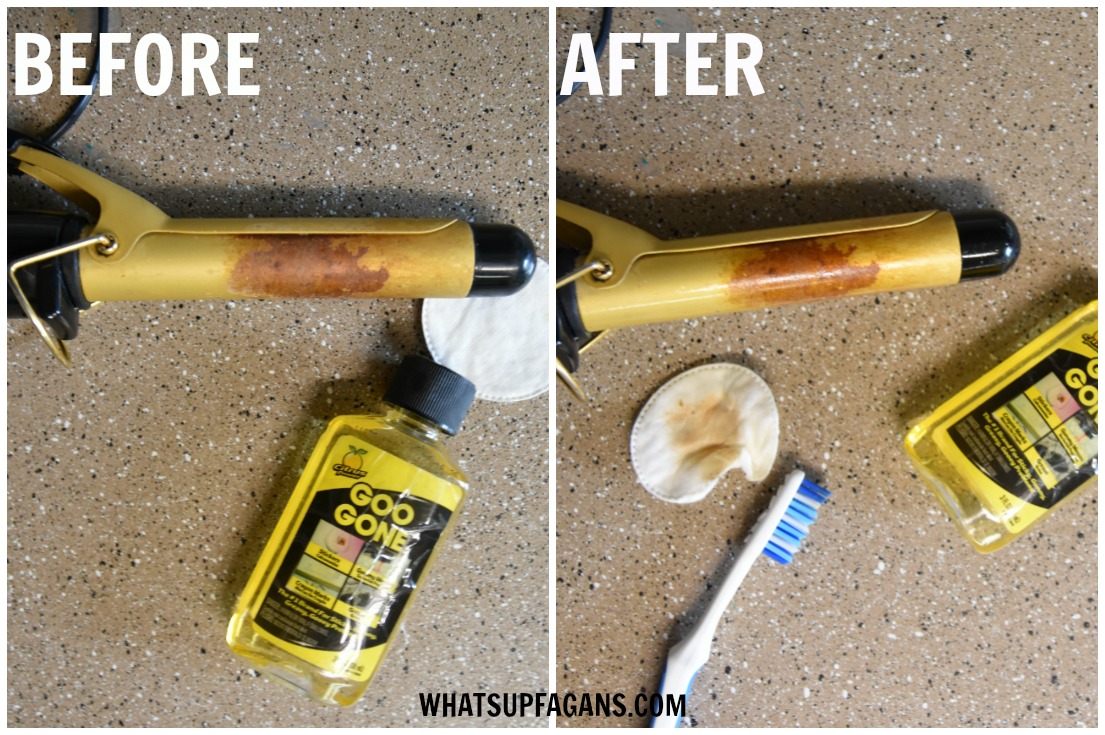
The most frequent culprit behind that burnt hair smell is accumulated styling product residue on your curling iron’s barrel. When you apply heat-resistant sprays, serums, mousses, or other styling products before curling, some of these substances transfer to the iron’s surface. As the temperature rises during use, these residues heat beyond their smoke point and begin to burn, releasing that characteristic unpleasant odor.
Styling products contain various ingredients—silicones, alcohols, polymers, and oils—that can leave behind stubborn buildup when exposed to high heat repeatedly. Unlike simple dust or hair accumulation, product residue tends to bake onto the barrel, creating a thin, invisible film that continues to burn with each subsequent use. This buildup not only causes odor but can also transfer back onto your hair during styling, creating a vicious cycle of damage and smell.
How to Clean Burnt Product Residue Effectively
The solution involves deep cleaning your curling iron’s barrel with appropriate methods based on its surface material. For ceramic or tourmaline barrels, mix equal parts water and white vinegar, then apply the solution with a soft cloth while the iron is cool—never clean a hot iron. For chrome or metal barrels, a small amount of mild dish soap on a damp cloth works effectively.
Allow the solution to sit for several minutes to penetrate the buildup, then wipe clean with a cloth dampened in plain water. For stubborn residue, you may need to repeat this process two or three times, and in extreme cases, a paste of baking soda and water applied gently with a soft toothbrush can help lift persistent buildup. Always finish by drying thoroughly with a clean microfiber cloth to prevent moisture damage.
Dead Hair and Debris Accumulation
Even with regular use, dead hair strands, dust, and environmental debris find their way into the small crevices around your curling iron’s barrel, heating elements, and clamp mechanism. These organic materials burn readily when exposed to high temperatures, producing that distinctive burnt hair smell that seems to permeate your bathroom every time you style.
Dead hair accumulation is particularly common in the hinge area and along the edges where the clamp meets the barrel. Hair strands get pinched during the curling process and, if not removed regularly, become trapped and scorched during subsequent uses. Over time, this trapped hair becomes increasingly brittle and flammable, creating more intense burning smells with each styling session.
Removing Trapped Hair Without Damage
To address debris accumulation, start by unplugging your curling iron and allowing it to cool completely. Use a soft, dry toothbrush or a clean, dry paintbrush to gently dislodge hair and debris from the hinge mechanism, barrel edges, and any visible crevices. For compressed or stubborn buildup, a slightly damp cloth can help loosen the material, followed immediately by drying with a clean cloth.
Pay special attention to the area where the power cord meets the iron, as this junction often collects dust and debris that can overheat during use. Establishing a routine of brushing out your curling iron after each use prevents significant accumulation and eliminates the burnt hair smell before it starts.
Heat Damage to Your Hair

Sometimes the burnt hair smell isn’t coming from the curling iron itself—it’s coming from your hair. When styling tools are used incorrectly or on compromised hair, the extreme heat can actually singe or burn the hair strands, particularly if the iron is too hot, if it’s held in place too long, or if the hair is already damaged from previous heat styling or chemical treatments.
Why Your Hair Might Be Burning During Styling
Heat-damaged hair has a compromised cuticle structure that makes it more susceptible to burning. When you apply a curling iron to already-porous, over-processed hair, the high temperature can cause the proteins within the hair shaft to break down and burn, releasing sulfur compounds that smell distinctly like burnt hair or eggs. This damage isn’t just olfactory—it’s visible as well, often appearing as frizz, discoloration, or hair that breaks easily when touched.
Preventing heat damage to your hair requires adjusting your styling practices. Always use the lowest effective heat setting for your hair type—fine or damaged hair typically requires temperatures below 300°F, while thicker or coarser hair may need up to 400°F. Invest in a quality heat protectant spray or serum and apply it evenly throughout your hair before using any hot styling tool.
Proper Heat Styling Technique
Limit the amount of time the iron remains in contact with any single section of hair to no more than 10-15 seconds. If your hair smells burnt during or immediately after styling, reduce your heat setting and consider giving your hair a break from heat styling for several days to recover. For best results, work in small sections and glide the iron smoothly without stopping in one spot for too long.
Thermostat and Heating Element Problems
When your curling iron smells like burnt hair consistently—even after thorough cleaning—the issue may lie deeper within the device’s electrical components. Over time, the thermostat that regulates heat output can malfunction, causing the iron to overheat beyond its intended temperature. Similarly, aging heating elements can develop hot spots or fail to distribute heat evenly, creating areas that burn whatever contacts them.
Warning Signs of Electrical Component Failure
Electrical component issues often present with additional warning signs beyond just smell. You might notice inconsistent curling results, unusual sounds like clicking or buzzing during operation, visible smoke rather than just smell, or the iron taking unusually long to heat up or failing to maintain temperature. These symptoms indicate a problem that goes beyond simple cleaning and may require professional repair or device replacement.
Before assuming your curling iron needs replacing, try resetting the thermostat if your model includes this feature—consult your manufacturer’s instructions for specifics. Unplug the iron, allow it to cool completely, then plug it back in and attempt to use it at the lowest heat setting to see if it regulates properly. If the burning smell persists or you notice any signs of electrical malfunction such as sparking, unusual noises, or the iron not heating at all, discontinue use immediately.
Cleaning Your Curling Iron Properly
Regular cleaning prevents the burnt hair smell from developing in the first place, but proper technique matters—what you clean with and how often directly impacts your results. Establishing a cleaning routine based on your usage frequency keeps your curling iron performing optimally and extends its lifespan.
Creating an Effective Cleaning Routine
For light maintenance, wipe down the barrel and clamp with a soft, dry cloth after each use to remove surface-level product residue and hair. For weekly deep cleaning, especially if you use styling products regularly, allow the iron to cool completely, then wipe the barrel with a cloth dampened in a 50-50 mixture of water and white vinegar. For stubborn residue on ceramic or tourmaline surfaces, a small amount of rubbing alcohol on a cotton swab works effectively without damaging the coating.
The clamp mechanism requires special attention since hair and product buildup here can be particularly stubborn. Open the clamp fully and use a dry toothbrush to sweep out the hinge area, then follow with a slightly damp cloth on the clamp surfaces. Always ensure your curling iron is completely dry before storing it, as moisture trapped in storage cases or bags promotes mold growth and can damage electrical components over time.
Preventing Future Odor Issues
Prevention is far more effective than cure when it comes to burnt hair smells from your curling iron. Implementing simple habits into your styling routine eliminates the conditions that cause odor in the first place, saving you time on deep cleaning and extending your device’s lifespan.
Essential Prevention Strategies
Always apply heat protectant products before using any hot styling tool, as these create a barrier between your hair’s natural oils, styling product residue, and the iron’s hot surface. Allow any wet styling products like mousses or gels to dry completely before applying heat, as the moisture can cause splattering and uneven heating that leads to burning.
Brush or comb your hair thoroughly before curling to remove loose hairs that could get trapped in the iron. Wipe your curling iron’s barrel with a dry cloth between sections while styling to remove accumulated product transfer—this quick step during your styling routine prevents significant buildup. Proper storage also prevents odor development—never store your curling iron while it’s still warm.
When to Replace Your Curling Iron

Sometimes the burnt hair smell signals the end of your curling iron’s useful life rather than a fixable maintenance issue. Knowing when to replace your device prevents ongoing frustration, potential safety hazards, and unsatisfactory styling results.
Consider replacing your curling iron if cleaning doesn’t resolve the burnt smell after several attempts, as this indicates the odor has penetrated internal components or the heating element itself is degrading. Visible damage to the barrel—such as chips, cracks, or flaking coating—compromises performance and can cause uneven heating that burns hair.
Critical Replacement Indicators
Electrical warning signs demand immediate replacement: flickering indicator lights, sparks when plugging in or turning on, burning plastic odors that intensify with use, or the cord becoming hot to the touch during operation all indicate serious electrical problems. Similarly, if the iron produces smoke (not just steam from damp hair) during normal use, discontinue use immediately and replace the device. The potential fire hazard from a malfunctioning heating appliance far exceeds the cost of a new curling iron.
Final Note: A curling iron that smells like burnt hair usually needs cleaning rather than replacement, but persistent odors after proper maintenance, visible damage, or electrical symptoms indicate it’s time for a new device. Regular cleaning after each use, appropriate heat settings for your hair type, and safe storage practices keep your curling iron functioning properly and odor-free for years of styling. Always prioritize safety—if your curling iron shows any signs of electrical malfunction, discontinue use immediately to prevent potential fire hazards.