When your cast iron radiator stops heating properly, you don’t necessarily need to replace this century-old technology. Learning the fundamentals of fixing cast iron radiators saves homeowners hundreds of dollars while preserving the charm and efficiency of these durable heating systems. Most common issues—from cold spots to minor leaks—can be diagnosed and repaired with basic tools and straightforward techniques. This guide delivers precise solutions for the most frequent radiator problems, empowering you to restore proper heating function without professional help for many common issues.
Cast iron radiators operate on a beautifully simple principle: heated water or steam circulates through their hollow sections, transferring warmth to your living space. When this process breaks down, you experience symptoms like uneven heating, strange noises, or leaks. The good news is that most failures stem from air blockages, valve issues, or minor corrosion—problems you can often fix yourself. By understanding the specific symptoms and applying targeted repairs, you’ll keep your vintage heating system functioning efficiently for decades to come.
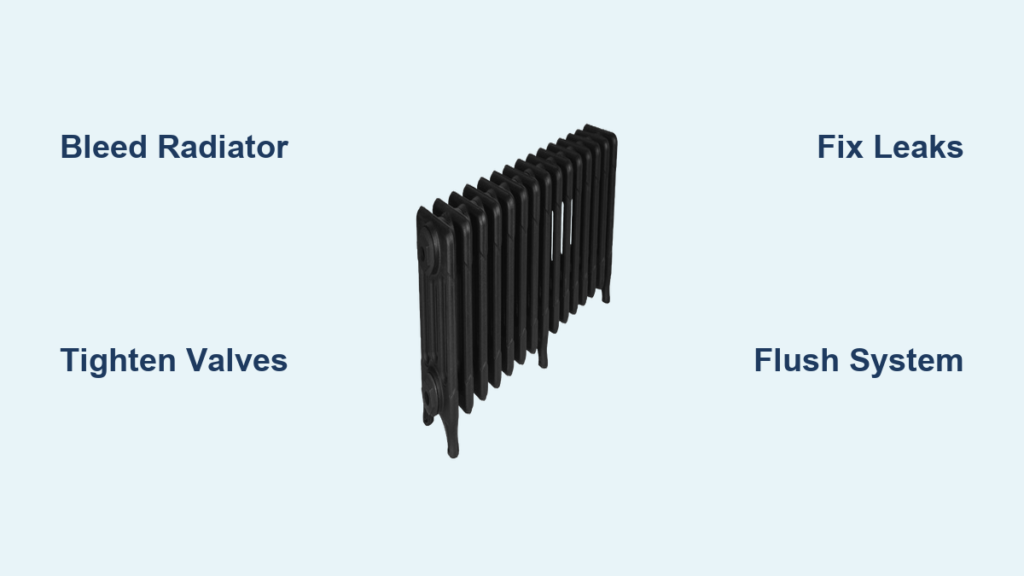
Diagnose Heating Problems First
Accurate diagnosis prevents wasted effort and unnecessary parts purchases. Before grabbing tools, spend five minutes identifying exactly why your radiator isn’t performing. Most heating failures fall into three distinct categories with specific solutions.
Cold Top with Warm Bottom
This classic symptom signals trapped air blocking proper water circulation. As air naturally rises, it accumulates at the radiator’s highest point, preventing heated water from filling that section completely. You’ll notice the bottom feels warm while the top remains cool to the touch. This is the most frequent issue encountered when fixing cast iron radiators and fortunately the easiest to resolve. The solution requires bleeding the radiator—a process that takes less than fifteen minutes with basic tools. Don’t ignore this problem, as persistent air pockets accelerate internal corrosion by exposing metal surfaces to oxygen.
Complete Radiator Coldness
When an entire radiator stays cold while others function normally, check both valves before assuming major system failure. First, verify the control valve is fully open by turning it counterclockwise until it stops. If the valve turns freely without resistance, internal components have likely failed. Equally common is accidental isolation—someone may have closed both the lock shield valve (often hidden behind a decorative cover) and the control valve during previous maintenance. Test neighboring radiators; if they’re also cold, the issue likely lies with your boiler or system pump rather than the individual radiator.
Radiator Making Noises
Different sounds indicate specific problems requiring distinct solutions. Loud banging or knocking (“water hammer”) occurs when steam or water changes direction too rapidly, often due to improper radiator pitch or valves opening too quickly. Gentle clicking during heating cycles is normal thermal expansion, but persistent loud clicking suggests loose mounting brackets or failing steam traps in steam systems. Whistling noises typically indicate partially blocked valves restricting water flow. Identifying the exact sound pattern directs you to the appropriate repair method and prevents misdiagnosis.
Bleed Your Radiator Correctly
Bleeding releases trapped air that prevents complete water circulation—a critical step when fixing cast iron radiators with uneven heating. Begin by turning off your heating system and allowing the radiator to cool completely. Working on hot radiators risks scalding from escaping steam or hot water.
Locate the bleed valve, usually a small square nut on the radiator’s top end opposite the valves. Place a rag or small container beneath it to catch drips. Insert your bleed key and turn counterclockwise one-quarter to half a turn—you’ll hear air escaping with a hiss. Continue until a steady stream of water flows, then tighten the valve clockwise until snug. Wipe away moisture and check for leaks. For steam radiators, bleed only during initial system startup for two to three seconds maximum—excessive bleeding wastes energy and reduces efficiency.
Repair Leaking Radiators
Leaks range from minor drips to serious failures requiring immediate attention. Identifying the leak’s origin determines whether you can safely repair it yourself or need professional help.
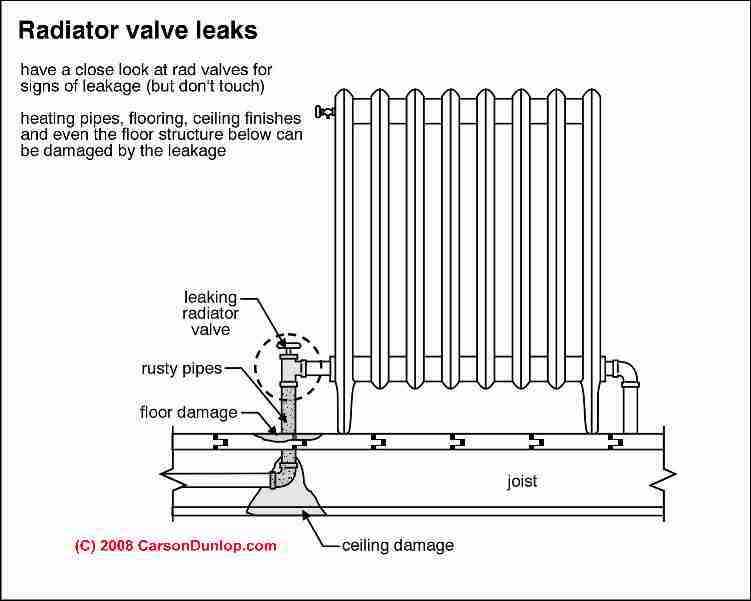
Valve Fitting Leaks
Most leaks occur at valve connections where fittings loosen over time or internal washers deteriorate. First, try tightening the connection with an adjustable wrench—turn clockwise just until resistance increases. Overtightening can crack cast iron, creating a much worse problem. If tightening doesn’t stop the leak, replace the valve’s internal washer or the entire valve assembly. Drain the radiator first by opening both the bleed valve and drain valve, then disconnect the faulty valve using two wrenches (one to hold the radiator fitting steady). Apply pipe thread sealant to clean threads before installing the replacement.
Pinhole Leaks and Corrosion
Small pinhole leaks through the radiator body indicate advanced internal corrosion. While temporary fixes exist, these leaks typically signal end-of-life failure. For immediate relief, clean the area thoroughly with sandpaper, dry completely, and apply epoxy putty designed for radiator repair. Extend the putty at least half an inch beyond the leak in all directions and allow full curing time (24-48 hours) before refilling. This stopgap measure usually provides several months of service, giving you time to budget for replacement while maintaining heat.
Replace Faulty Valves and Components
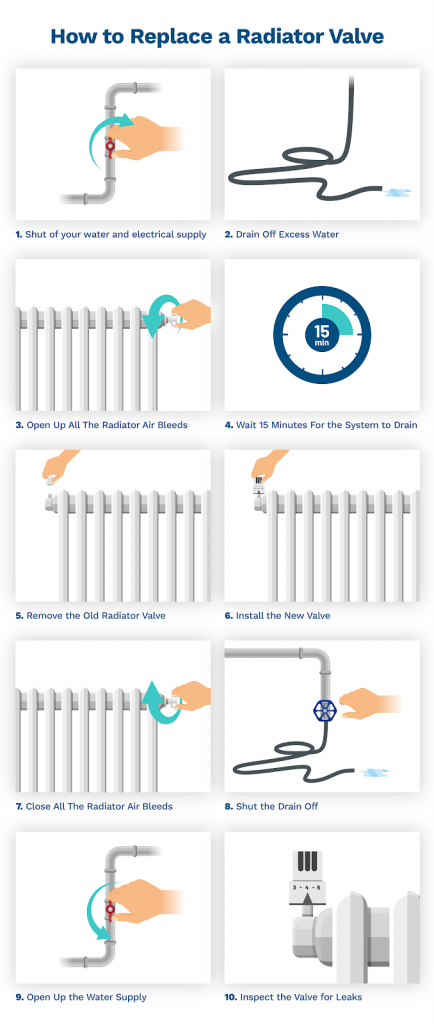
Valve failure causes most complete radiator shutdowns. Control valves regulate heat output, while lock shield valves (typically hidden) balance system flow. A valve that won’t turn, spins freely, or fails to heat despite being open needs replacement.
Before replacing, try “backseating” the valve by turning it fully counterclockwise and then clockwise several times—this often redistributes mineral deposits causing stiffness. If this fails, drain the radiator completely and remove the old valve. Measure connection size before purchasing replacements; most residential radiators use half-inch fittings but verify to avoid returns. Consider upgrading to thermostatic radiator valves (TRVs) during replacement—they automatically regulate room temperature and can reduce heating costs by 15-20% through precise temperature control.
Address Rust and Corrosion
Rust affects both appearance and performance. External rust is primarily cosmetic, while internal corrosion restricts water flow and eventually causes leaks—making it critical when fixing cast iron radiators.
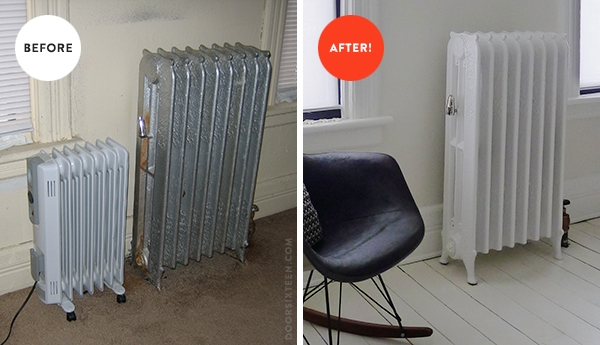
External Rust Treatment
Remove surface rust with a wire brush until bare metal appears. Clean the area with mineral spirits to remove debris and neutralize remaining rust particles. Apply rust-inhibiting metal primer followed by heat-resistant radiator paint—standard wall paint will peel and discolor from heat exposure. For best results, paint during summer when heating isn’t needed, allowing full curing time before system restart.
Internal Corrosion Flushing
Flush systems older than ten years to remove internal sludge that reduces efficiency. Connect a garden hose to the drain valve and flush water through in reverse direction of normal flow. For stubborn deposits, use heating-system-specific chemical flushers following manufacturer instructions precisely. After flushing, refill with fresh water and corrosion inhibitor to protect against future deterioration.
Maintain Radiators for Longevity
Preventative maintenance prevents 80% of issues requiring fixing cast iron radiators. In early fall, inspect all radiators for rust, leaks, and valve condition. Test valves by cycling through full range of motion. Ensure proper mounting—uneven radiators create stress points leading to cracks. Vacuum dust from fins regularly; accumulated dust reduces heat output by up to 30% and creates fire hazards. Check system pressure on closed-loop systems; low pressure indicates water loss requiring professional leak detection.
Cast iron radiators represent one of the most repairable heating technologies available, with most problems solvable using basic tools and materials. By understanding common issues and their solutions, homeowners can maintain these reliable systems for decades. Regular maintenance and prompt attention to minor problems prevent major repairs that eventually lead to replacement. When problems exceed your comfort level—such as major leaks, steam system complications, or multiple pinhole leaks—consult a qualified heating professional who can restore your system to proper operation. With proper care, your cast iron radiators will continue providing reliable, comfortable heat for generations to come, preserving both historical charm and heating efficiency.