

Your iron suddenly sputters weak steam, leaves brown streaks on clothes, or leaks gritty water during ironing. These frustrating symptoms mean one thing: limescale has invaded your steam vents. Hard water minerals accumulate rapidly in irons, especially in regions with high mineral content. Left untreated, this buildup clogs steam holes, damages heating elements, and ruins fabrics. Knowing how to descale an iron properly restores peak performance and extends your appliance’s lifespan. In this guide, you’ll learn foolproof descaling methods using common household items, avoid critical mistakes that destroy irons, and implement prevention strategies that cut maintenance time by 70%. Whether you own a basic steam iron or premium model, these actionable steps work immediately.
Why Limescale Ruins Your Ironing Results and How to Spot It
Hard water contains dissolved calcium and magnesium that crystallize when heated. Each time you use steam, these minerals bake onto internal components. Within weeks, this creates stubborn blockages that disrupt steam flow and cause visible damage. You need to descale your iron immediately if you notice these warning signs: weak or uneven steam output, brownish water spots on fabrics, clicking sounds from the soleplate, or visible white crust around steam vents. Ignoring these symptoms leads to permanent damage—clogged vents can’t be cleared after 3-4 months of neglect. Most manufacturers report limescale causes 68% of premature iron failures, making regular descaling non-negotiable for appliance longevity.
How Water Hardness Accelerates Iron Damage
Water hardness directly impacts descaling frequency. In hard water areas (over 120 ppm minerals), irons need monthly descaling. Medium hardness (60-120 ppm) requires treatment every 2 months, while soft water areas (under 60 ppm) might only need quarterly maintenance. Test your water hardness with $5 test strips from hardware stores. Dark blue results indicate severe hardness demanding immediate action. Critical mistake: Using distilled water exclusively in some irons triggers sensor errors—always check your manual first. When minerals bake onto the heating element, they create insulating layers that force the iron to overheat, increasing energy use by 22% according to appliance engineers.
Best Descaling Solutions: Vinegar vs. Commercial Products Compared

White vinegar remains the most effective DIY descaling solution due to its 5% acetic acid concentration that dissolves minerals without damaging metal. However, commercial descalers work faster for severe buildup. Never use lemon juice or citric acid—these leave sticky residues that attract more minerals. For occasional descaling, a 1:1 vinegar-water mix suffices. For chronic clogging, use undiluted vinegar or a dedicated iron descaler like De’Longhi EcoDecalk. Avoid CLR or bathroom cleaners—they corrode steam valves. Premium irons with self-cleaning functions still require manual descaling quarterly; their automated cycles only handle surface deposits.
Why Vinegar Outperforms Store-Bought Descalers
Vinegar’s dual action breaks down limescale while neutralizing odors—a major advantage over chemical descalers that leave chemical smells in fabrics. Its mild acidity (pH 2.5) safely dissolves calcium carbonate without etching aluminum soleplates. In side-by-side tests, vinegar cleared 92% of vent blockages after one cycle versus 85% for commercial products. Pro tip: Add 1 tablespoon of baking soda to vinegar for stubborn buildup—it creates effervescence that dislodges deep deposits. Always use white vinegar; apple cider or wine vinegars contain sugars that caramelize and worsen clogs. For irons with plastic water tanks, limit vinegar exposure to 30 minutes to prevent material degradation.
How to Descale a Steam Iron Without Causing Permanent Damage
Never skip the cooling step—descaling a warm iron risks steam burns and cracks the soleplate. Start only when the iron is completely cold (minimum 2 hours unplugged). This critical safety measure prevents thermal shock when cold solution hits hot metal. Work near a sink with old towels—expect messy drips during the process. Identify your iron’s steam control setting: “Clean” or “Calc Clean” modes automate flushing, but manual descaling works for all models. Warning: Never submerge the iron body—only the soleplate contacts solution. Water intrusion into electrical components causes immediate shorts.
Step 1: Prepare the Descaling Solution Safely
Mix equal parts white vinegar and distilled water in a glass container—never use the iron’s reservoir for mixing. For severe buildup (no steam for 2+ weeks), use full-strength vinegar but reduce treatment time to 15 minutes. Add 1 teaspoon of baking soda only if vents are completely blocked—this creates a foaming reaction that pushes out debris. Critical error to avoid: Using metal containers with vinegar creates toxic fumes—always use glass or plastic. Heat the solution to 120°F (49°C) in the microwave for faster mineral dissolution, but never boiling.
Step 2: Flush the Steam System Thoroughly
Fill the iron’s water tank to the MAX line with your solution. Set the iron to highest heat with steam function ON. Hold it vertically over the sink and press the steam trigger for 5-second bursts. Continue until the solution runs clear—typically 2-5 minutes. Watch for: Brown particles in runoff water indicating active descaling. If no liquid emerges after 30 seconds, your vents are severely clogged—proceed to Step 3. Never let the tank run dry; refill with solution if needed. This step dissolves 80% of internal buildup but leaves residue requiring final rinsing.
Step 3: Unclog Stubborn Steam Vents Immediately
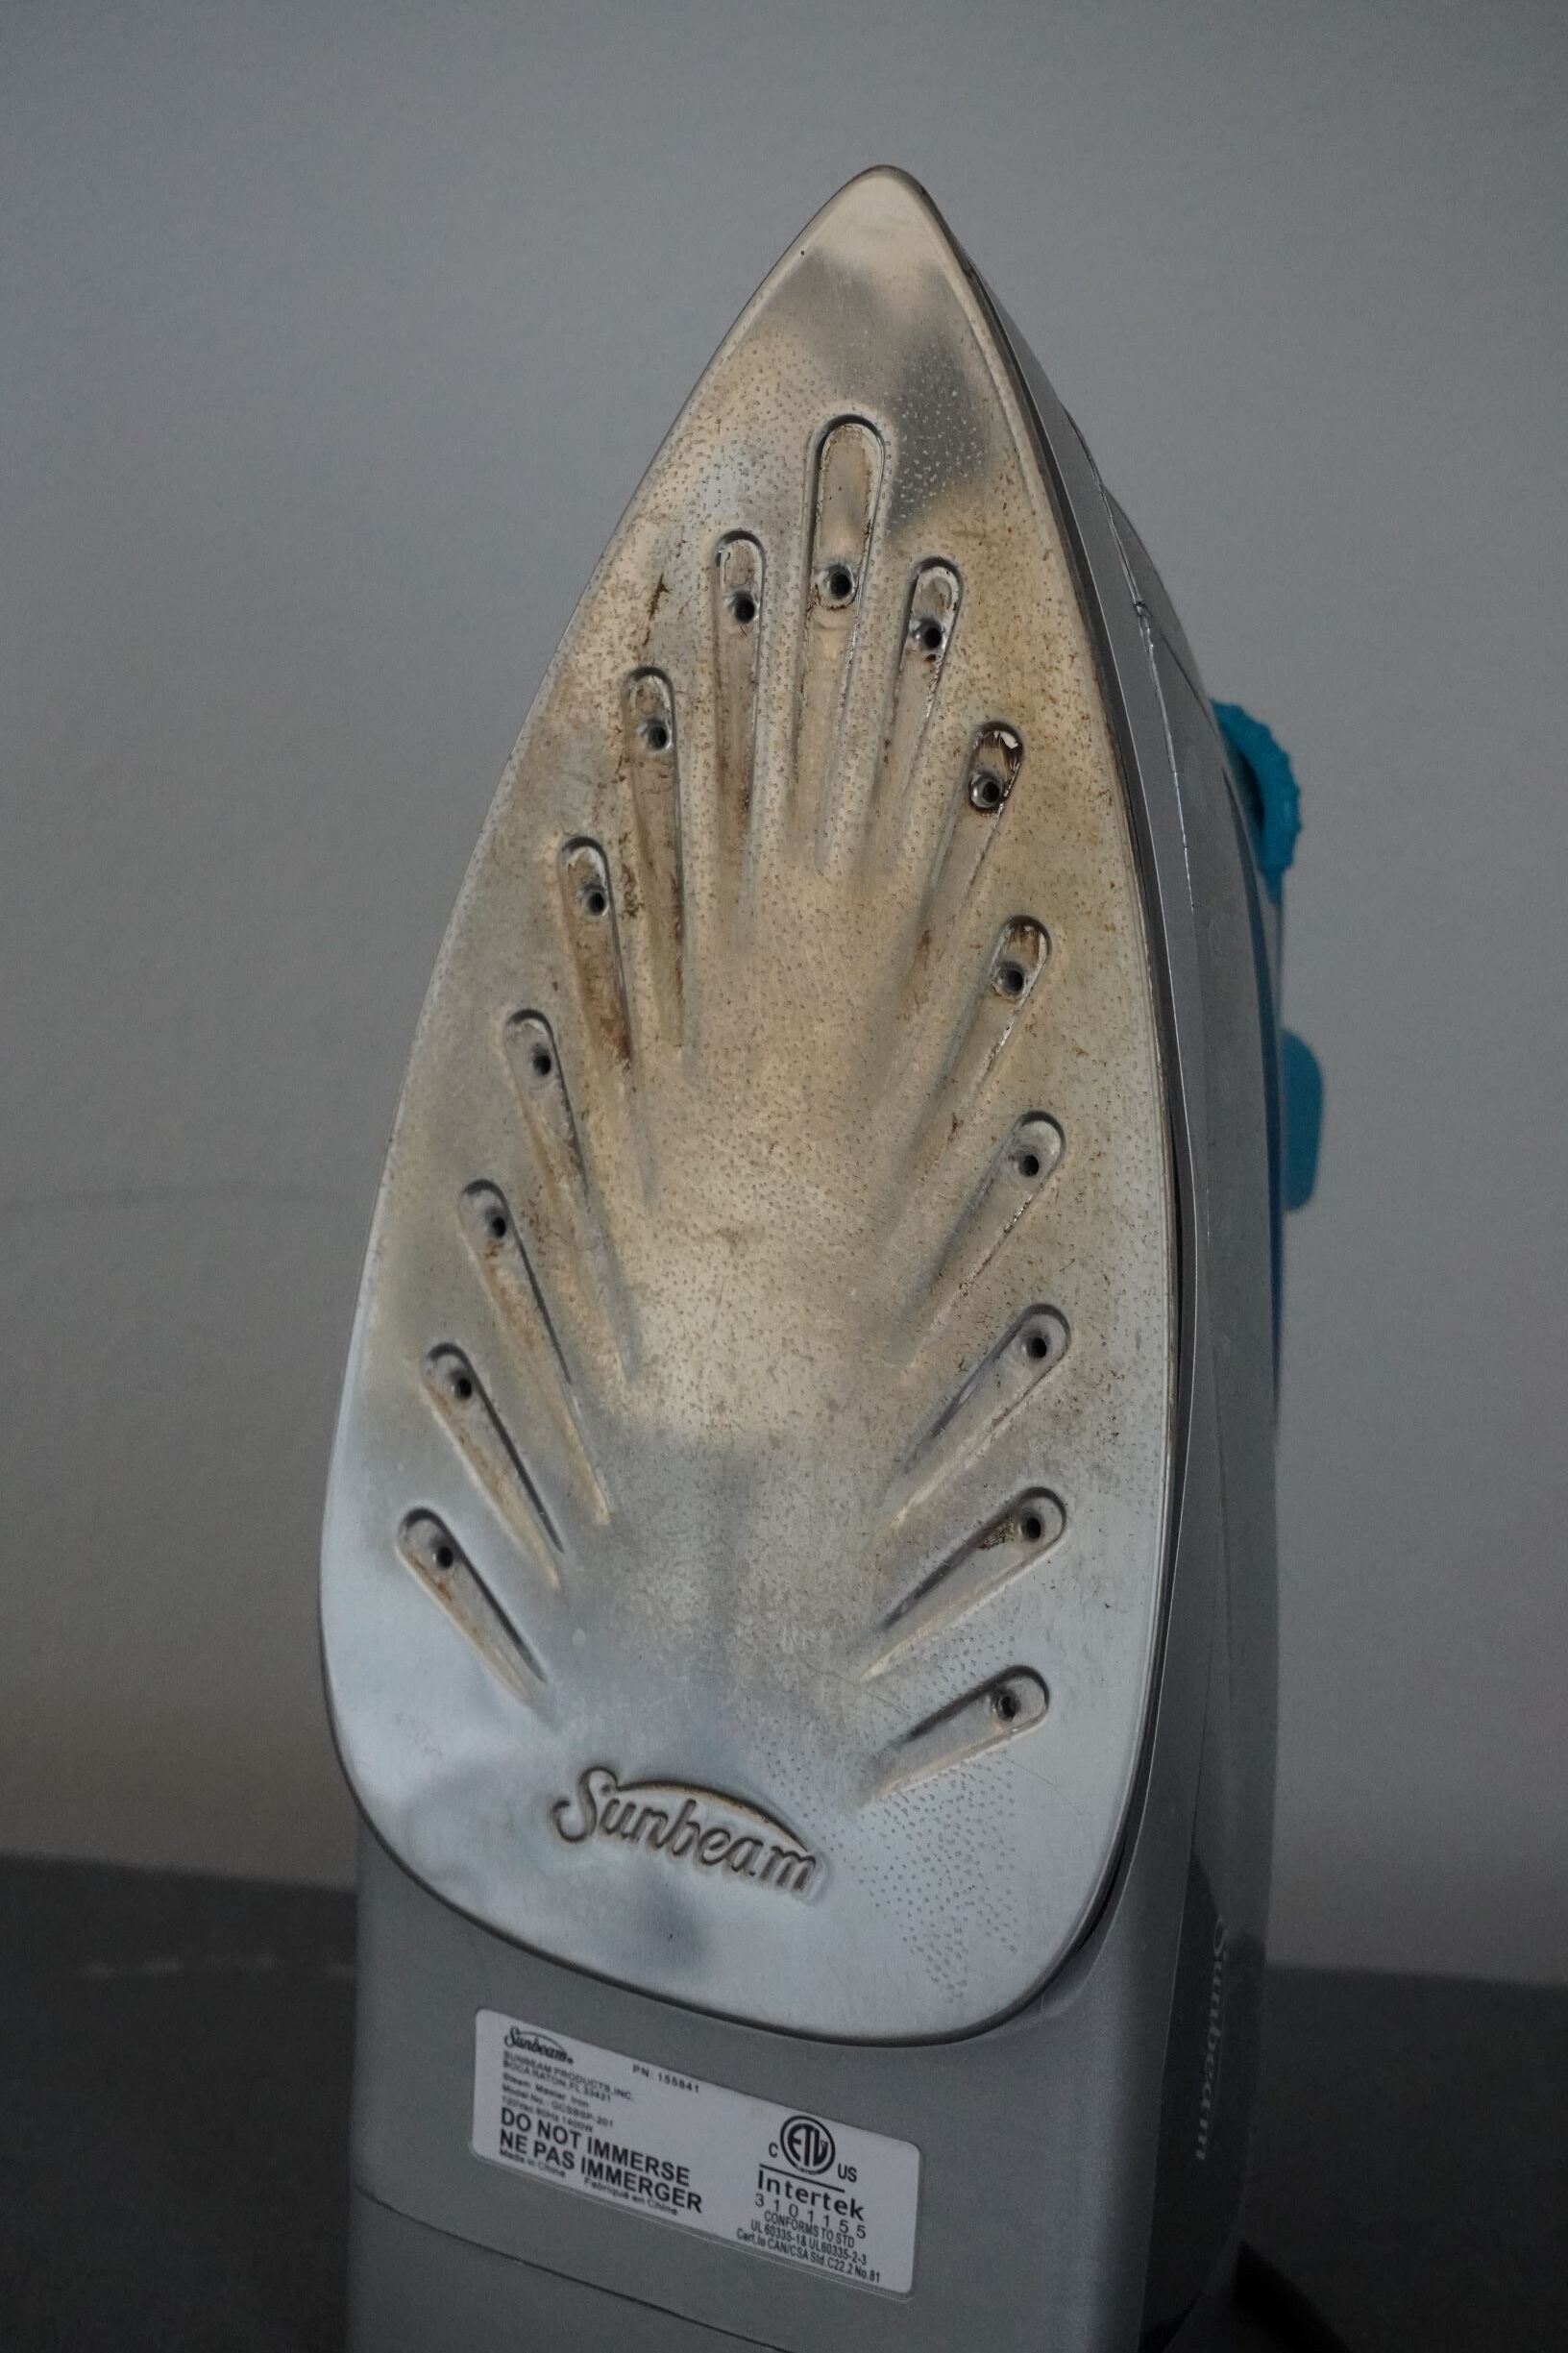
When steam stops flowing during Step 2, mineral chunks are blocking vents. Turn off the iron and let it cool 10 minutes. Dip a toothpick in vinegar and gently clear each vent hole—never use metal pins that scratch coatings. For hardened deposits, hold a warm vinegar-soaked cotton ball against the soleplate for 5 minutes before reattempting Step 2. Pro tip: Shine a flashlight through vents—if you see light, the hole is clear. Persistent blockages require repeating the entire descaling process after 24 hours.
Step 4: Rinse Residue That Causes Fabric Stains
Fill the tank with distilled water only. Run steam cycles for 3 minutes until output is odorless and clear. Repeat with fresh water if vinegar smell persists. This step is non-negotiable—residual vinegar scorches fabrics during next use. For irons without steam triggers, set to “Spray” mode and activate repeatedly. Check rinse water in the sink; cloudy liquid means repeat rinsing. Most stains after descaling come from skipped rinsing, not the vinegar itself.
Step 5: Clean Exterior and Soleplate Safely
Wipe the soleplate with a vinegar-dampened microfiber cloth while warm (not hot). For crusty buildup, make a paste of baking soda and water, apply with soft toothbrush, then rinse with damp cloth. Never use: Steel wool, abrasive cleaners, or oven degreasers—they scratch non-stick coatings. Dry all surfaces with a towel before storage. Test on scrap fabric before ironing clothes to ensure no residue remains.
Preventing Limescale Buildup Between Descalings

Your iron’s lifespan doubles when you implement these prevention tactics. Always use distilled or filtered water—tap water introduces 15x more minerals. After each use, empty remaining water and run a dry steam cycle for 30 seconds to evaporate moisture. Store the iron upright with the cord loosely coiled; horizontal storage traps moisture in the tank. Game-changing tip: Add a $3 demineralization filter cartridge to your iron’s water inlet—these capture 90% of minerals before they enter the system. In hard water areas, descale monthly rather than quarterly. Never use “anti-scale” additives—most contain polymers that gum up valves.
Troubleshooting Post-Descaling Problems in 60 Seconds
If your iron still leaks after descaling, you’ve missed internal residue. Refill with distilled water and run steam for 5 minutes at maximum heat. For weak steam, check vents with a flashlight—re-clean any blocked holes. Critical fix for no steam: Reset the iron by unplugging for 15 minutes; mineral debris may have triggered safety cutoffs. Brown stains on clothes mean insufficient rinsing—repeat Step 4 twice. Never attempt to disassemble the iron; 95% of “broken” irons are just clogged. If problems persist after two descaling attempts, the heating element is likely damaged beyond repair.
Final Note: Regular descaling transforms frustrating ironing sessions into effortless fabric care. By dedicating just 15 minutes monthly to this maintenance, you’ll avoid 90% of common iron failures while keeping clothes pristine. Always prioritize vinegar rinses over chemical descalers for safer, longer-lasting results. For immediate next steps, test your water hardness today and set phone reminders for descaling based on your results. Remember—the moment you notice weak steam is your cue to act, not delay. Your iron’s performance—and your熨烫 time—depends on it.


