

Few household tasks feel as frustrating as trying to iron a fitted bed sheet. The elastic corners, the continuous fabric, and the tendency for wrinkles to reappear the moment you fold it all combine to make this seemingly simple chore surprisingly challenging. Yet there’s nothing quite like sliding into a bed with freshly ironed sheets—the smooth, crisp feel against your skin transforms your bedroom into a luxury hotel experience. Mastering this skill eliminates one of the most common household frustrations while elevating your everyday comfort.
Whether you’re preparing for guests, refreshing your own bedroom, or simply prefer the tidy appearance of properly pressed linens, knowing how to iron a fitted bed sheet properly is essential. This comprehensive guide walks you through every step of the process, from preparation and temperature settings to advanced techniques that will have you achieving professional-quality results in less time than you might expect. No more wrestling with elastic corners or watching your hard work vanish the moment you make the bed.
Gather Your Ironing Supplies Before Starting
Before you begin ironing your fitted bed sheet, having the right tools and workspace set up makes the difference between a frustrating struggle and a smooth, efficient process. Start by ensuring your iron is clean and functioning properly—mineral buildup or debris on the soleplate can transfer to your sheets and create unwanted stains or marks that are difficult to remove.
Select a sturdy, flat ironing board that provides adequate space for handling the large surface area of a fitted sheet. If your board feels wobbly or too small, consider placing a thick towel over a clean, flat surface as an alternative. You’ll also want a spray bottle filled with clean water nearby, as misting the fabric slightly can help stubborn wrinkles release more easily without risking scorching.
Keep clean, dry hands available throughout the process, and consider wearing a lightweight apron or old clothing if you’re working with freshly laundered sheets that might pick up skin oils or lotions. Having a flat, clean area nearby where you can lay the freshly ironed sheet temporarily prevents it from re-wrinkling before you make the bed. A small clothesline or drying rack can serve as an excellent holding area for sections you’ve completed.
What to Check on Your Iron Before Beginning
Examine your iron’s soleplate for any residue or discoloration that could transfer to your sheets. Run the iron over a scrap piece of white fabric to ensure it’s clean and not leaking any brown residue. Verify that the steam function works properly and that the water reservoir is filled with distilled water to prevent mineral buildup. Check that the temperature dial moves smoothly between settings and that the automatic shut-off feature is functioning correctly for safety.
Set the Correct Temperature for Your Fabric Type
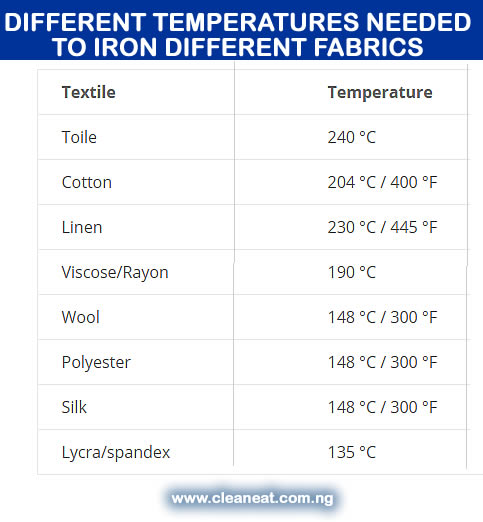
One of the most critical factors in successfully ironing a fitted bed sheet without damaging it is selecting the appropriate heat setting for the fabric type. Each material responds differently to heat, and using too high a temperature can cause scorching, shine marks, or permanent damage to the fibers that cannot be reversed.
For cotton fitted sheets, which represent the most common sheet material, set your iron to the cotton or “high” setting, typically between 350°F and 400°F. This temperature range allows the natural fibers to release wrinkles effectively while maintaining the fabric’s integrity. If your iron doesn’t have specific fabric settings, the cotton position usually corresponds to the highest regular heat setting before the linen or synthetic options.
How to Determine Your Sheet’s Fabric Content
Check the care label sewn into the sheet’s hem for specific fabric composition and ironing instructions. When no label exists, perform a small test on an inconspicuous area: start with a medium heat setting and gradually increase if needed. Natural fibers like cotton and linen can handle higher temperatures, while synthetic blends require lower heat. A simple burn test (with extreme caution) can help identify fabric type—natural fibers smell like burning paper and leave soft ash, while synthetics melt and produce a chemical odor.
Prepare the Sheet for Ironing Properly
Remove your fitted sheet from the dryer while it’s still slightly damp, as this moisture content makes wrinkle removal significantly easier than attempting to iron completely dry fabric. If you’ve stored a dry sheet and need to iron it, lightly mist the entire surface with clean water using a spray bottle, then allow it to rest for five minutes so the moisture distributes evenly throughout the fibers.
Inspect the sheet for any stains, spots, or problem areas that might require pretreatment before ironing—heat can permanently set stains into fabric, making them much more difficult to remove later. Address any soiled areas with an appropriate stain remover and wash the sheet if necessary before proceeding with the ironing process.
The Best Way to Position Your Sheet on the Ironing Board
Lay the fitted sheet flat on your ironing surface with the printed or decorated side facing down, which protects any delicate patterns or embellishments from direct heat and pressure. Smooth out any major creases or folds by hand before turning on your iron, as starting with a relatively flat surface makes the ironing process far more efficient. Some people find it helpful to temporarily turn the elastic corners inside out to access hidden wrinkles at the seam connections.
Master the Ironing Technique for Elastic Corners
Begin ironing the large central panels of the fitted sheet first, working in long, sweeping strokes that follow the grain of the fabric rather than against it. Apply moderate pressure and maintain continuous movement—holding the iron in one spot for too long can create shine marks or scorch the fabric, especially on darker colors or synthetic blends.
For the challenging corner sections with elastic, work methodically from the flat fabric toward the elastic edge, smoothing each corner seam carefully before moving to the next. Stretch the corner taut over the narrow end of the ironing board to create a flat surface that makes quick work of stubborn creases. Some professionals recommend ironing the elastic channel itself with the iron held vertically to prevent the elastic from shrinking.
How to Avoid Re-Wrinkling Sections You’ve Already Ironed
As you complete each section, lift and shift the sheet rather than dragging it across the board, which can reintroduce wrinkles into already-smoothed areas. Periodically flip the sheet and check your progress from different angles, as lighting conditions and perspective can reveal wrinkles that aren’t visible from your primary working position. Complete one entire side of the sheet before flipping it to work on the reverse side, ensuring consistent results throughout.
Prevent Common Ironing Mistakes That Damage Sheets
/how-to-remove-ironing-scorch-marks-2146664-19-d278b5a163da4144842f2ed424c91ccc.jpg)
Scorch marks represent one of the most common and disappointing mistakes when ironing bed sheets, appearing as yellowish or brownish discolorations that often prove impossible to remove. Prevent this catastrophe by always checking your iron’s soleplate for discoloration before each use, and never iron over buttons, snaps, or decorative elements that can create hot spots.
Shiny marks, particularly problematic on darker synthetic fabrics, occur when excessive pressure and heat compress the fibers in one direction. Avoid this issue by using lower heat settings on synthetics, reducing pressure, and periodically lifting and repositioning the iron rather than applying prolonged downward force. If you notice a shiny spot developing, allow the area to cool completely, then try gently brushing with a soft fabric brush to restore the natural texture.
Alternative Methods for Wrinkle Removal Without Traditional Ironing
If traditional ironing feels too time-consuming or challenging, consider investing in a garment steamer, which can effectively remove wrinkles from fitted sheets without the need for a flat surface or careful technique. Simply hang the sheet, pass the steamer over it in sweeping motions, and allow the steam to relax the fibers into smoothness. This method works particularly well for linen and cotton sheets, though it may require more time than ironing for thick or heavily wrinkled fabrics.
For those who dislike ironing but prefer pressed sheets, explore spray starch or fabric sizing products specifically designed for bed linens. Lightly mist the sheet after washing, then smooth and stretch it on the bed before it dries completely—the starch helps fibers hold their smooth shape and resist future wrinkling, reducing how frequently you’ll need to iron.
Maintain Your Sheets Between Ironing Sessions
Proper storage significantly reduces how frequently you’ll need to iron your fitted sheets. Always ensure sheets are completely dry before storing, as any retained moisture encourages mildew growth and makes wrinkles set into the fibers. Fold sheets neatly and store them flat rather than stuffed into tight spaces, which crushes the fabric and creates deep creases.
Consider keeping a set of sheets on your bed and rotating between three or more sets, which allows each set to “rest” between uses and reduces the frequency of washing and ironing. This rotation extends the overall lifespan of your linens while ensuring you always have fresh, smooth sheets available.
How to Reduce Ironing Frequency Through Proper Washing
When washing fitted sheets, avoid overloading the washing machine, which creates excessive wrinkles that become permanent through the heat of the dryer. Use appropriate fabric softener or a quarter cup of white vinegar in the rinse cycle to help fibers remain supple and wrinkle-resistant, making your next ironing session considerably easier. Remove sheets from the dryer while still slightly damp and smooth them out immediately to minimize wrinkles.
Ironing fitted bed sheets doesn’t have to be the dreaded household chore many people make it out to be. With the right preparation, proper temperature settings, and methodical technique, you can transform this task from a frustrating battle into a quick, satisfying routine that leaves your bed looking professionally made. The key lies in understanding your fabric, working while the material is still slightly damp, and taking your time with the challenging corner sections. Once you master these fundamentals, you’ll wonder why you ever avoided this simple way to add a touch of luxury to your everyday life. By following these specific techniques rather than generic advice, you’ll achieve crisp, smooth results that last through multiple nights of comfortable sleep.


