

Felt is one of the most versatile craft materials available, but its unique structure makes ironing it a delicate task. Unlike woven fabrics with interlocking threads, felt consists of compressed fibers that can shrink, melt, or become misshapen when exposed to excessive heat. Whether you’re working on a sewing project, smoothing out creases in a felt hat, or flattening layered felt pieces for applique, knowing the proper technique protects your material and achieves professional results. This guide walks you through every step of safely ironing felt, from selecting the right temperature to avoiding common mistakes that ruin projects.
Mastering felt ironing opens up possibilities for cleaner seams, flatter embellishments, and more professional-looking craft projects. The key lies in understanding felt’s composition and treating it with the patience it deserves. By following these techniques, you’ll transform wrinkled, bunched felt into smooth, workable material without damage.
Why Felt Needs Special Ironing Care
Felt’s structure sets it apart from conventional fabrics and demands a different approach to heat application. Traditional woven materials like cotton or linen have thread grids that maintain their shape even under stress, but felt lacks this internal framework. When you apply high heat improperly, the fibers can bond together permanently in distorted positions, leaving you with a puffy, warped piece that ruins your project.
Most felt contains wool or synthetic fibers like polyester that respond differently to heat. Wool felt begins to shrink and felt further at temperatures above 300°F, while polyester-based felt can actually melt and develop shiny, damaged spots under excessive heat. This means the “high” setting on your iron is essentially a disaster waiting to happen for most felt projects. The compression that gives felt its durability also makes it susceptible to heat damage that cannot be reversed.
Beyond fiber damage, excessive heat can cause felt to lose its shape entirely. Projects like hats, bags, and structured ornaments rely on the material maintaining precise dimensions. One session with a too-hot iron can shrink a piece by ten percent or more, throwing off all your measurements and forcing you to start over. Understanding these risks explains why experienced crafters treat felt ironing as a specialized skill requiring lower temperatures and gentle handling.
Select the Correct Iron Temperature
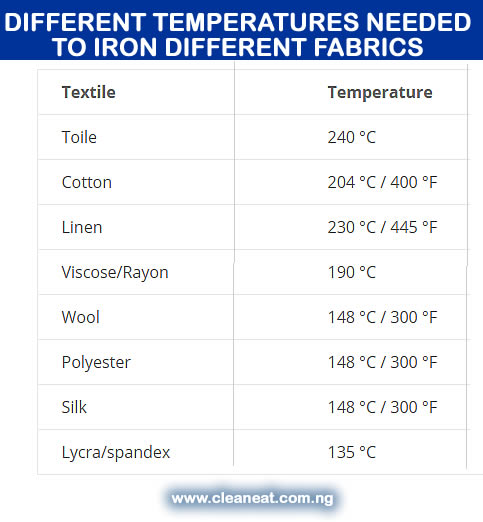
Choosing the right heat setting is the most critical decision when ironing felt, and it starts with identifying your felt’s fiber content. Wool felt requires the lowest temperatures, typically corresponding to the “wool” or “synthetic” setting on your iron, which usually ranges from 250°F to 300°F. Acrylic and polyester felt can tolerate slightly higher temperatures, but you should still stay below 350°F to prevent melting. Blended felt falls between these ranges, so when uncertain, always start lower and increase gradually if needed.
Modern irons display settings with symbols or fabric names, but these labels don’t always match actual temperature requirements. The “synthetic” setting typically hovers around 275°F, which works well for most synthetic felts. The “wool” setting usually reaches 300°F, suitable for pure wool felt when used correctly. Skip the “cotton” and “linen” settings entirely for felt projects—these exceed 400°F and will damage your material regardless of fiber type.
Investing in an iron with adjustable temperature controls gives you precision that preset dial settings cannot match. Some crafters use dedicated low-temperature irons specifically for sensitive materials, eliminating guesswork entirely. If your iron lacks fine temperature control, use the lowest setting and accept that you’ll need more time and possibly multiple passes to achieve smoothing. Patience with lower heat always produces better results than rushing with temperatures that damage your felt.
Set Up Your Ironing Station Properly
A proper workspace makes felt ironing safer and more effective. Start with a clean, flat ironing board covered with a pressing cloth or clean cotton fabric—never iron felt directly on the board’s textured surface, as this can create imprints and uneven pressure. Ensure your ironing surface is stable at a comfortable height to prevent shifting the felt during movement.
Gather essential supplies before beginning: a spray bottle filled with distilled water, a pressing cloth made of muslin or cotton, and possibly a pressing sheet of parchment paper for sticky or delicate projects. Having these tools within reach prevents mid-project interruptions that could lead to uneven cooling and potential distortion. Keep a clean, dry cloth nearby to blot any moisture that might escape from the pressing cloth.
Consider lighting in your workspace as well. Good illumination reveals creases, wrinkles, and texture inconsistencies that might otherwise go unnoticed until after you’ve finished. Position your ironing station near natural light or use bright task lighting. Additionally, ensure adequate ventilation, especially when working with synthetic felts that may release faint odors under heat. A well-prepared station streamlines the process and reduces the likelihood of mistakes caused by fumbling for supplies mid-project.
Perform a Hidden Test First
Before committing to ironing visible areas of your felt project, always conduct a test on a hidden section or scrap piece of the same material. This precaution reveals how your specific felt responds to heat and pressure, preventing disasters on prominent surfaces. Cut a small swatch from the project seam allowance or keep sample pieces from your felt purchase specifically for testing purposes.
Set your iron to the intended temperature and allow it to fully heat. Place the test piece face-down on your pressing cloth, then apply the iron with gentle pressure for five to ten seconds. Lift the iron straight up—don’t slide it across the test piece—and allow the felt to cool completely before examining the results. Look for shine, warping, shrinkage, texture changes, or any visible damage that indicates the temperature is too high.
Repeat this test at progressively higher temperatures if the initial attempt shows no adverse effects. Document the successful temperature setting and duration for reference on your main project. Some felts, particularly wool blends, may require multiple brief applications rather than sustained pressure. This testing phase adds a few minutes to your project but provides invaluable confidence that your technique won’t damage visible surfaces.
Master the Proper Ironing Technique
Iron felt using a gentle lifting motion rather than the gliding stroke common with woven fabrics. Place the preheated iron on the felt, hold it stationary for five to ten seconds, then lift straight up and move to the adjacent area. This technique allows heat to penetrate the fibers without dragging them out of alignment. Overlapping each placement by about half the iron’s width ensures even coverage without cold spots.
Protect the felt’s surface with a pressing cloth between the iron and your material. This barrier prevents direct heat contact that causes shine and protects against any mineral deposits or residue on your iron soleplate. Dampen the pressing cloth slightly for additional steam, which helps relax fibers more gently than dry heat alone. The cloth should be thin enough to transmit heat effectively but thick enough to buffer direct pressure.
Work from the center of your piece outward toward the edges, which prevents creases from forming at the margins as you smooth the material. Apply only light to medium pressure—felt doesn’t require the firm pressing that cotton projects benefit from. For thick or layered felt pieces, consider ironing from both sides, allowing adequate cooling time between flips. Patience throughout this process produces results that rushed techniques simply cannot match.
Prevent Common Ironing Mistakes
Several recurring errors plague felt ironing projects, and recognizing them beforehand saves both material and frustration. Applying heat too quickly without testing is the most frequent mistake, followed closely by using temperatures appropriate for cotton rather than felt’s lower requirements. Sliding the iron across felt rather than lifting and placing it causes fiber distortion that manifests as waviness or uneven thickness throughout the piece.
Neglecting the pressing cloth invites surface damage, particularly on darker felts where shine becomes immediately visible. Similarly, leaving the iron in one position too long creates burn marks or imprints that cannot be repaired. Even at correct temperatures, sustained pressure for more than fifteen to twenty seconds can begin bonding fibers into distorted configurations. Short, repeated applications prove safer than longer single exposures.
Allowing the felt to cool while compressed beneath a pressing cloth creates “cold press” marks that appear as temporary indentations. Always lift everything away and allow the material to cool freely in its natural position. Additionally, ironing felt that’s too damp introduces inconsistent drying that can cause puckering. Ensure your material is at most lightly damp from steam, not wet from direct water application.
Rescue Over-Heated or Damaged Felt

If you’ve accidentally damaged felt with excessive heat, assess the severity before deciding whether to salvage or replace the piece. Minor shine from light scorching often disappears with careful steaming and brushing against the nap. Hold the affected area over steam from a boiling kettle for thirty seconds, then gently brush with a soft-bristled brush in one direction to lift flattened fibers.
Moderate shrinkage from overheating presents greater challenges. Soaking the felt in lukewarm water with a small amount of gentle soap can help relax fibers, followed by blocking the piece flat to dry. Place the damp felt on a flat surface, gently stretch it back toward original dimensions, and secure the edges with pins or weights. This technique works best with wool felt and may not fully recover synthetic varieties.
Severely melted, warped, or burned felt typically cannot be restored to usable condition. The fibers have undergone permanent chemical changes that no amount of soaking or reshaping can reverse. In these cases, cutting away damaged sections and replacing them or redesigning the project becomes necessary. This outcome underscores why prevention through proper technique remains far more effective than attempting repairs after damage occurs.
Store and Maintain Ironed Felt Properly
Once you’ve successfully ironed felt, proper storage preserves your work until the project is complete. Store flat pieces on clean surfaces away from direct sunlight, which can fade colors and dry out natural fibers. Roll felt around a cardboard tube rather than folding it to prevent creases that require re-ironing. If folding is unavoidable, place tissue paper between layers to minimize compression marks.
Keep stored felt in breathable containers like cotton bags or cardboard boxes rather than sealed plastic, which traps moisture and can promote mildew growth on natural fiber felts. Add cedar blocks or lavender sachets to deter moths, particularly for wool felt stored for extended periods. Periodic inspection during long-term storage catches pest problems before they cause significant damage.
Clean your iron regularly to prevent residue buildup that transfers to felt during ironing. Mineral deposits from water and fabric fibers from previous projects can create scratches or marks on subsequent materials. Wipe the soleplate with a damp cloth while warm after each session, and periodically use a dedicated iron cleaning solution for thorough maintenance. A clean iron performs more consistently and poses less risk to your felt projects.
Achieve Professional Results Every Time
Ironing felt successfully requires respecting the material’s unique properties while applying heat with intention and patience. The lower temperatures, lifting motion, and protective pressing cloth form the foundation of technique that protects your projects from damage. Testing on hidden areas before committing to visible surfaces, working systematically across the piece, and allowing adequate cooling time between applications all contribute to consistently smooth results.
Remember that felt responds to heat differently than woven fabrics, and methods that work beautifully for cotton may ruin your felt projects. When uncertainty arises, choose lower temperatures and longer processing times. The investment in proper technique pays dividends in professional-looking finished pieces and materials that maintain their intended dimensions and texture. With practice, ironing felt becomes second nature, transforming what initially seems challenging into a straightforward step that elevates your crafting results.


