

Wrinkled leather jackets, creased handbags, and folded wallets can ruin the sleek appearance of your favorite leather items. While many people instinctively reach for an iron when they see wrinkles, using this common household tool on leather requires special care—get it wrong, and you could permanently damage your treasured possessions with melted finishes, scorch marks, or shrunken fibers. Learning how to iron leather properly means understanding that this delicate material needs a completely different approach than your cotton shirts or linen tablecloths. This guide reveals the exact temperature settings, protective barriers, and techniques that will safely smooth wrinkles from your leather garments and accessories without causing irreversible harm.
Before you even plug in your iron, recognize this critical fact: leather is essentially treated animal skin, making it vulnerable to heat damage just like your own skin. Direct high heat causes leather fibers to contract and shrink, while moisture can create unsightly water stains that penetrate deep into the material. The secret to successful leather ironing lies in creating multiple protective layers between the heat source and your leather, using the lowest effective temperature, and working in brief, controlled intervals. Whether you’re dealing with a vintage leather jacket that developed wrinkles in storage or a designer handbag that got creased during travel, these proven methods will restore smoothness while preserving your item’s natural texture and value.
Why Direct Ironing Ruins Leather Items
Ironing leather without proper precautions creates irreversible damage through three primary mechanisms. When the iron’s hot plate makes direct contact with leather, surface temperatures can exceed 300°F—well above the 150°F threshold where leather fibers begin to shrink and distort. This heat exposure causes the natural oils in leather to evaporate rapidly, leaving fibers brittle and prone to cracking. Additionally, steam functions introduce moisture that penetrates the material unevenly, creating water stains that become permanent as the leather dries.
Different leather types respond uniquely to heat exposure. Full-grain and top-grain leathers with protective finishes tolerate low heat better than unfinished varieties, but all genuine leather risks damage from direct iron contact. Bonded leather—which consists of leather scraps fused with adhesive—will delaminate when heated, causing the surface to bubble and peel. Suede and nubuck leathers present special challenges as their delicate nap gets permanently flattened by even moderate heat, destroying their characteristic texture.
Never attempt to iron these leather items:
– Suede or nubuck materials (the nap will flatten permanently)
– Leather with peeling finishes or existing damage
– Items containing rubberized coatings or plastic elements
– Bonded or reconstituted leather products
– Vintage or antique leather with unknown treatments
Essential Tools for Safe Leather Ironing
Gathering the right equipment before you begin prevents rushed decisions that lead to heat damage. Your primary defense against leather destruction is a reliable protective barrier that distributes heat evenly while absorbing excess temperature.
Non-negotiable protective materials:
– 100% cotton press cloth (no synthetics that could melt)
– Parchment paper (acts as additional heat buffer)
– Clean white pillowcase (alternative to press cloth)
– Avoid colored fabrics that might bleed dye when heated
Iron requirements:
– Adjustable temperature settings (essential for precision)
– Dry heat capability (steam function must be disabled)
– Smooth soleplate without scratches or debris
– Digital temperature display preferred over dial settings
Supporting items:
– Leather conditioner (to restore oils after ironing)
– Soft microfiber cloths (for post-ironing care)
– Flat, heat-resistant surface (not an ironing board)
– Heavy books or weights (for alternative flattening method)
Correct Temperature Settings for Different Leathers
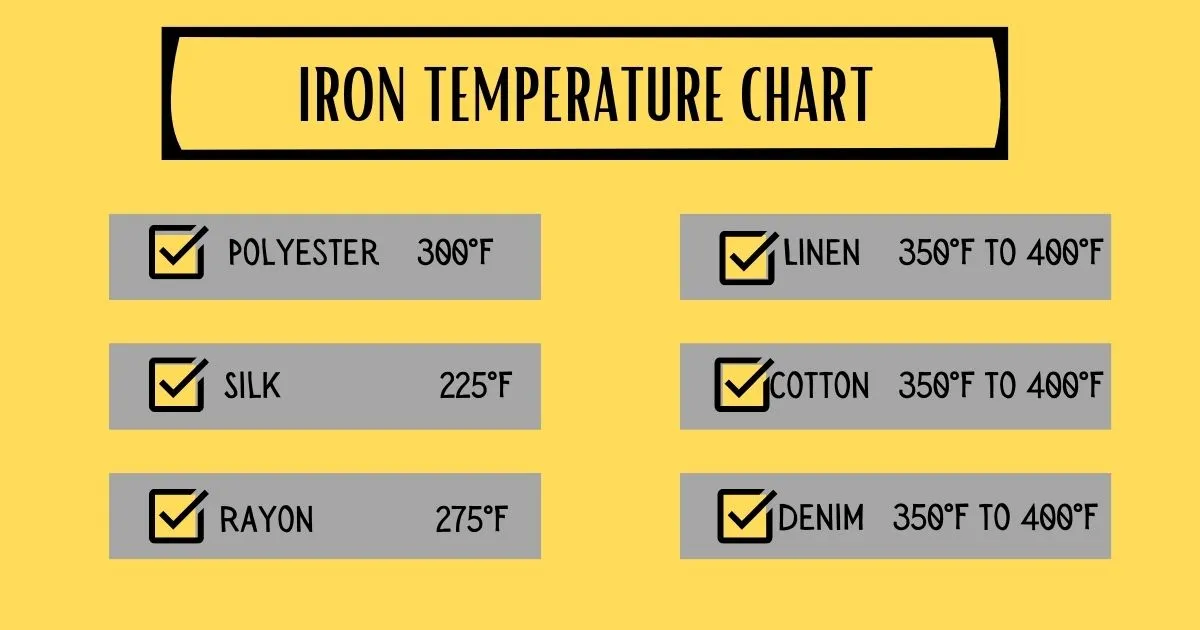
Temperature control represents the most critical factor in successful leather ironing. Start with your iron set to the lowest possible setting—typically labeled “synthetic” or “nylon” (250-275°F). Genuine leather can sometimes tolerate temperatures up to 325°F, but only when properly protected and applied in extremely brief intervals. Always perform a hidden test first: place your protective cloth over an inconspicuous area like an inside seam and apply heat for three seconds. Check for any discoloration, shine marks, or texture changes before proceeding to visible areas.
Temperature guidelines by leather type:
– Finished leather (jackets, bags): 275-300°F with double protection
– Faux leather/vinyl: 300-325°F (synthetics tolerate slightly higher heat)
– Thin leather (wallets, gloves): 250°F maximum with parchment paper layer
– Suede/nubuck: Do not iron—use alternative methods only
Step-by-Step Ironing Technique for Wrinkle Removal
Mastering the proper ironing motion prevents the most common leather damage. Lay your leather item flat on a clean, heat-resistant surface with the wrinkled area fully exposed. Place your cotton press cloth over the wrinkle, ensuring complete coverage without folds. For extra protection on valuable items, add a sheet of parchment paper between the cloth and leather.
Apply heat in strictly controlled intervals: press the iron down firmly for exactly three seconds, then lift completely off the surface. Never slide the iron back and forth—that creates uneven heat distribution and increases damage risk. After each application, lift the cloth and examine the leather’s condition. Repeat this press-and-lift motion three times maximum, then allow the leather to cool completely for at least 10 minutes before continuing. This cooling period lets fibers set in their new position—handling warm leather simply recreates wrinkles.
For stubborn creases, repeat the entire cycle (three applications followed by 10-minute cooling) up to four times. If wrinkles persist after multiple attempts, stop immediately—further heat exposure will damage the leather without improving results.
Alternative Wrinkle Removal Methods for Delicate Leather

When ironing seems too risky or proves ineffective, these alternative approaches safely smooth leather without heat exposure. For mild wrinkles in leather bags or jackets, try weighted flattening: lay the item flat, cover wrinkles with a cotton cloth, then place heavy books over the area for 24-48 hours. The constant gentle pressure gradually relaxes fibers without heat damage.
The bathroom steam method works well for garments: hang the leather item in your bathroom while running a hot shower for 15 minutes. The ambient steam relaxes fibers enough to reshape the item manually, but avoid direct water contact. After steaming, reshape the leather and let it dry naturally away from heat sources. For valuable or delicate items, professional leather steaming provides controlled heat application that home methods cannot match—many dry cleaners offer this service for under $25.
Post-Ironing Care to Prevent Damage
Ironing draws natural oils from leather fibers, leaving them vulnerable to drying and cracking. Within two hours of ironing, apply a quality leather conditioner using a soft microfiber cloth. Work the product in circular motions with light pressure, focusing on ironed areas, then let it absorb for 30 minutes before buffing with a clean cloth. This restores protective oils and prevents the leather from becoming brittle.
Store treated items properly to maintain results: hang jackets on wide, padded hangers to preserve shoulder shape, stuff bags with acid-free tissue paper to retain structure, and never fold leather items for storage. Condition leather every three months to keep fibers supple and prevent future wrinkling. For valuable vintage pieces or items with significant damage, consult a leather restoration professional rather than risking further harm through home treatments.
Critical Mistakes That Destroy Leather During Ironing
Understanding what not to do prevents costly errors that professionals cannot fix. Direct iron contact creates immediate shine marks that permanently alter leather’s appearance—always use at least one protective layer. Excessive heat application (more than five seconds per press) causes irreversible fiber damage that appears as darkened patches or stiff areas. Skipping the mandatory cooling period between applications wastes your efforts, as warm leather fibers simply re-wrinkle when handled.
Steam functions introduce moisture that creates water stains impossible to remove—disable steam completely before starting. Ironing over zippers, buttons, or seams creates pressure points that imprint hardware shapes onto the leather surface. Most importantly, never attempt to rush the process—leather responds best to patient, methodical treatment rather than aggressive heat application.
When to Skip Ironing and Seek Professional Help
For certain leather items, professional assistance provides the only safe solution. Vintage leather with unknown treatments, designer pieces with delicate finishes, or items showing existing damage require expert handling. If your leather has already developed heat damage from previous attempts, a professional restorer might salvage it—but further home treatment will only worsen the problem.
The small investment in professional leather care often proves worthwhile for valuable items. Many leather specialists offer wrinkle removal services for less than the cost of replacing a damaged jacket or handbag. When in doubt about your ability to safely iron an item, consult a professional—their expertise could save you from making an expensive mistake that ruins your treasured leather possession forever.


