
Tired of struggling with an ill-fitting or wobbly store-bought ironing board that doesn’t match your height or space constraints? Building your own ironing board solves these common frustrations while giving you complete control over dimensions, materials, and aesthetics. With the right guidance, you can create a professional-quality ironing surface tailored specifically to your body height, available space, and ironing needs—all for a fraction of the cost of high-end commercial models. Whether you need a space-saving wall-mounted unit for your tiny apartment, a sturdy standing board for regular household use, or a compact tabletop version for occasional pressing, this guide shows you exactly how to make an ironing board that performs better than store-bought alternatives while reflecting your personal style through custom fabric choices and dimensions.
Select Your Ironing Board Type Based on Space and Needs

Choosing the right ironing board design ensures your DIY project solves your specific pain points rather than creating new storage or usability challenges. Each type serves different household situations with distinct advantages.
Standing ironing boards deliver the traditional ironing experience with height adjustability and fold-flat storage. These typically measure 53-62 inches long and 13-18 inches wide, providing ample space for sheets and large garments. The telescoping leg design accommodates users of different heights, while the cross-frame construction ensures stability during vigorous ironing. If you frequently iron full-sized bedding or have dedicated laundry room space, this design offers the most versatile solution despite requiring more complex construction.
Tabletop ironing boards solve space constraints in apartments, RVs, or small homes where floor space is precious. Measuring just 24-36 inches long and 12-15 inches wide, these compact boards fit neatly on existing surfaces like kitchen counters, sturdy tables, or even the edge of a bed. The simplified construction requires minimal woodworking skills and fewer materials, making this the fastest and most budget-friendly option. Perfect for occasional ironing needs or as a secondary board for quick touch-ups.
Wall-mounted ironing boards maximize floor space by folding flush against your wall when not in use. These can be built to standard dimensions (54″ x 15″) or customized to fit inside a closet or cabinet space. Some advanced designs incorporate a decorative cover that doubles as wall art when folded up. Installation requires locating wall studs and mounting heavy-duty hardware, but the space-saving benefits make this ideal for laundry closets or multi-purpose rooms where every square foot counts.
Gather Materials Specific to Your Ironing Board Design
Selecting appropriate materials ensures your ironing board withstands regular heat exposure while providing a smooth, responsive pressing surface that protects your garments.
Plywood selection determines your board’s stability and longevity. For standing and wall-mounted boards, use ½-inch to ¾-inch thick furniture-grade plywood to prevent warping under heat and pressure. Tabletop versions can use thinner ⅜-inch material since they receive less stress. Cut your plywood to precise dimensions—54 inches long and 15 inches wide is standard for full-sized boards—with a smoothly rounded nose end that makes sleeve ironing easier. Sand all edges thoroughly with 220-grit paper to prevent fabric snags.
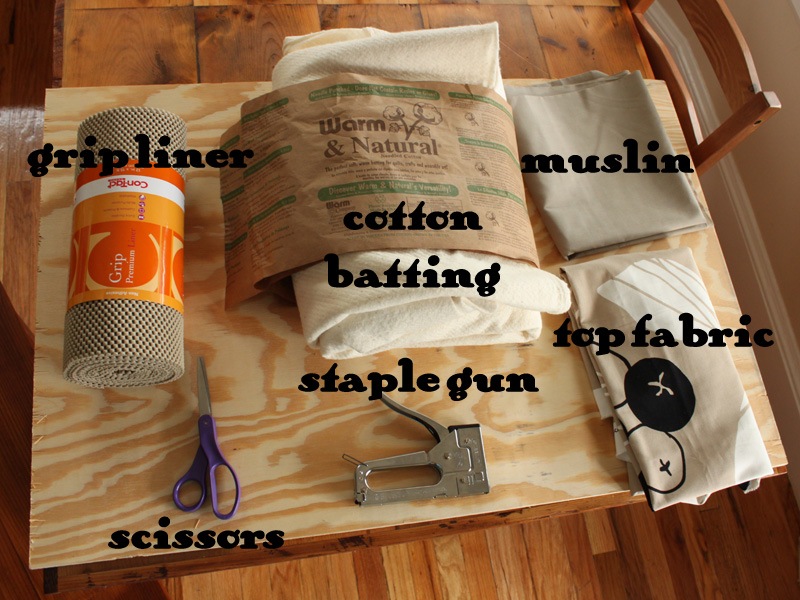
Padding that withstands heat and pressure requires strategic layering. Start with ½-inch high-density foam rubber as your primary cushion layer, ensuring even coverage across the entire board surface. Add a layer of cotton batting beneath the foam for superior heat distribution and garment protection. Avoid low-density padding that compresses quickly, creating uneven pressing zones that show through on finished fabrics. The ideal padding combination provides firm support that rebounds quickly between iron strokes.
Heat-resistant cover fabric must endure direct contact with hot irons without melting or scorching. Silicone-treated cotton duck cloth performs exceptionally well, offering heat reflection while allowing steam penetration. Heavy canvas or purpose-made ironing board covers provide excellent durability. Measure carefully—you’ll need enough fabric to wrap completely around the board with 3-4 inches of overhang on all sides for secure attachment underneath. Choose colors or patterns that complement your space since this visible element defines your board’s aesthetic.
Cut and Prepare Your Ironing Board Components
Precision cutting creates the flat, stable foundation essential for professional ironing results without frustrating wobbles or uneven surfaces.
Measure and mark your plywood using a carpenter’s square and pencil, adding ½ inch to your final dimensions to allow for sanding adjustments. For standard boards, mark a 54-inch length with a 15-inch width, tapering the nose end to 12 inches for better maneuverability around collars and cuffs. Use a jigsaw with a fine-tooth blade to cut the rounded nose, following your pencil line slowly for smooth curves. Support the plywood fully during cutting to prevent tear-out on the top surface.
Sand all edges with progressively finer grits—start with 80-grit to remove splinters, then 120-grit for smoothness, finishing with 220-grit for a silky edge that won’t catch fabric. Round the top edges slightly where they meet the surface to prevent fabric snags during use. For standing boards, cut your cross-frame from 1×2 or 1×3 pine, ensuring it extends 2-3 inches beyond the board edges to provide secure leg attachment points.
Apply Padding and Cover Fabric Properly
Correct padding installation transforms your plywood base into a responsive, heat-diffusing surface that protects delicate fabrics while providing optimal iron glide.
Center your cotton batting over the board surface, smoothing out all wrinkles with your hands before trimming excess material. Spray a light adhesive on the board surface to prevent shifting during foam application. Position your ½-inch foam layer carefully, pressing firmly from the center outward to eliminate air pockets that would create uneven pressing zones. Trim foam precisely to the board edges using a sharp utility knife.
Stretch your cover fabric smoothly over the padded surface, starting at one end and working toward the opposite side while maintaining even tension. Pull fabric snug but not drum-tight—excessive tension compresses padding and creates visible stretching. Staple every 2-3 inches along the underside edges using ¼-inch staples, folding the fabric edges under at corners for a professional finish. Trim excess fabric to 1 inch beyond the staple line, then reinforce the attachment with heavy-duty fabric tape along all edges to prevent tearing during folding.
Build and Install Your Support System Correctly
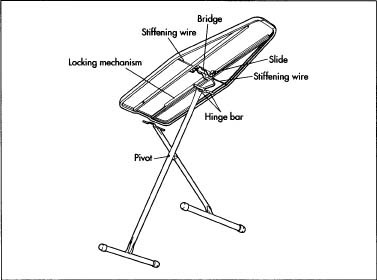
Your ironing board’s stability and usability depend entirely on proper support system construction—whether legs, brackets, or wall mounts.
For standing boards with cross-frame design, attach the frame to the board underside using 1¼-inch wood screws driven through pre-drilled holes. Position leg brackets at each frame end, ensuring they allow full folding range without interference. Install telescoping legs with spring-loaded locking pins that engage securely at your ideal working height—typically 32-36 inches from floor to board surface for standing ironing.
Wall-mounted boards require heavy-duty French cleat hardware attached directly to wall studs. Mount the cleat system at your optimal height (36-42 inches for standing ironing), ensuring it’s perfectly level. Test the mounting system with your fully assembled board before finalizing installation—wall-mounted boards must support 15-20 pounds without sagging.
Tabletop boards need only simple rubber feet or non-slip pads attached to the underside corners. Use adhesive-backed rubber bumpers that won’t slide on smooth surfaces while protecting your existing tabletop from scratches.
Add Essential Safety and Convenience Features
Critical finishing touches protect your garments, prevent accidents, and transform a basic board into a professional ironing station.
Install iron rests at both ends using 1½-inch wooden blocks covered in the same fabric as your board. Position them 2 inches from the edge to catch sliding irons while keeping the hot soleplate away from padding. Secure with wood glue and small brads for permanent attachment.
Create a cord management system by attaching a small fabric loop or plastic hook to the board underside near the edge. This keeps your iron’s power cord organized and prevents accidental pulls that could send your iron flying. For wall-mounted boards, add a small storage pocket for your iron that folds flat against the wall when not in use.
Apply a light coat of furniture wax to all exposed wood edges to protect against moisture from steam irons. Avoid finishes on the top surface that might create slippery conditions or interfere with fabric grip during ironing.
Maintain Your Custom Ironing Board for Longevity
Proper care extends your DIY ironing board’s service life while maintaining optimal performance for professional results.
Inspect cover fabric weekly for scorch marks or thin spots that compromise heat protection. Small burns can be covered with decorative fabric patches, while larger damage requires complete re-covering. Clean fabric surfaces with a damp cloth after heavy use, avoiding harsh chemicals that degrade heat-resistant treatments.
Check all hardware monthly for tightness—folding mechanisms and leg locks gradually loosen with regular use. Apply a drop of light machine oil to hinges and moving parts to maintain smooth operation without attracting dust.
Store standing boards completely folded against a wall, while wall-mounted versions should remain in the upright position between uses. Keep your board in a dry location away from direct sunlight to prevent fabric fading and padding deterioration.
Building your own ironing board costs just $30-$75 in materials compared to $100+ for comparable commercial models, while delivering personalized dimensions that match your height and space requirements. The satisfaction of using a tool you created specifically for your needs transforms a chore into a pleasure, with every smooth ironing stroke reminding you of this simple yet impactful DIY achievement. With proper construction following these specific steps, your custom ironing board will deliver years of reliable service while outperforming store-bought alternatives in both function and form.


