
Achieving perfect curls without a dedicated curling iron is possible with the flat iron you already own. Many people don’t realize their straightening tool can create beautiful, long-lasting curls that often outperform traditional curling irons. The dual heated plates of a flat iron actually smooth the hair cuticle while reshaping it into curls, resulting in shinier, more defined waves that maintain their shape longer. Whether you’re preparing for a special occasion or just want to switch up your everyday look, mastering how to make curly hair with flat iron techniques opens up endless styling possibilities without cluttering your vanity with extra tools.
The frustration of flat, lifeless hair disappears when you learn this versatile styling method. Unlike curling irons that can create uniform ringlets that look artificial, flat iron curls offer customizable texture from tight spirals to loose beach waves. Plus, since most households already have a flat iron, this technique saves valuable counter space while delivering professional-looking results. This comprehensive guide walks you through everything you need to know—from selecting the right temperature and preparing your hair to executing flawless curl techniques and making your style last all day.
Select Your Ideal Flat Iron for Curling

Choosing the right flat iron makes a dramatic difference in your curling results. Not all flat irons perform equally well for creating curls, and the wrong selection can lead to frustration with inconsistent results or unnecessary heat damage.
Ceramic plates provide the most consistent heat distribution for curling, making them ideal for beginners and those with finer hair. Their smooth glide prevents snagging while sealing the cuticle for enhanced shine. Look for infrared ceramic technology that penetrates hair shafts evenly without surface scorching. Tourmaline-infused ceramic plates offer an extra advantage by generating negative ions that neutralize frizz-causing positive ions, resulting in polished, frizz-free curls that maintain definition longer.
Plate width directly impacts your curl pattern and size. Narrow ¾ to 1-inch plates create defined spiral curls that work well for short to medium-length hair. For shoulder-length or longer hair, consider a 1.25 to 1.5-inch plate that offers versatility between tighter curls and looser waves. If you frequently switch between straightening and curling, a tapered plate design (narrower at the tip) provides the flexibility to create both precise curls at the roots and soft waves at the ends with a single tool.
Precise temperature control is non-negotiable for healthy curls. Digital displays allow you to monitor exact heat levels rather than guessing with numbered settings. Look for irons with 10-degree increments between 250°F-450°F. Professional models with automatic heat recovery maintain consistent temperature even when passing through thick sections, preventing the half-curled, half-straight sections that plague cheaper models. Consider investing in a dual-voltage iron if you travel frequently—it ensures consistent performance regardless of electrical standards.
Perfect Hair Preparation for Long-Lasting Curls
The foundation for stunning flat iron curls begins long before the plates touch your hair. Proper preparation protects against heat damage while dramatically improving curl retention and definition.
Start with properly cleansed, completely dry hair. Residual moisture creates steam when exposed to high heat, causing bubble hair (small white nodules along the hair shaft) that leads to breakage. After washing, gently squeeze water from your hair with a microfiber towel—regular towels create friction that lifts cuticles and increases frizz. If blow-drying, use a diffuser attachment on low heat until hair is 100% dry. Pay special attention to the hairline and nape areas where moisture often lingers unnoticed.
Heat protectant application requires technique, not just product. Spray protectant 8-10 inches from dry hair, focusing on mid-lengths and ends where damage occurs most. For thick hair, divide into sections and apply product directly to the palm, then rake through with fingers for even coverage. Look for formulas containing silicones (dimethicone, cyclomethicone) that create a thermal barrier and humectants (glycerin) that maintain moisture balance. Avoid products with alcohol near the top of ingredients, as these dry out hair and cause frizz.
Strategic product layering enhances curl memory. After heat protectant, apply a lightweight mousse to damp hair before drying—it creates internal structure that helps curls hold shape. For extra definition, mist fine hair with light-hold hairspray or apply a tiny amount of styling cream to thicker hair. The key is using the minimum product necessary; too much weighs down curls and creates crunchy texture. Test your product combination on a small section before styling your entire head.
Sectioning Techniques for Professional Results
Working with properly sectioned hair transforms flat iron curling from frustrating to foolproof. Professional stylists always section hair before heat styling, and this simple step makes the biggest difference in achieving salon-quality results at home.
Create strategic horizontal sections by dividing hair at the crown and securing the top portion with a claw clip. Begin styling at the nape of your neck with the bottom layer, then work upward. This approach prevents missing sections and ensures consistent heat application throughout. For thick hair, further divide each horizontal section vertically into smaller subsections for more precise curling.
Optimal section size depends on your desired curl pattern. For tight ringlets, use sections no wider than ½ inch. Medium-sized waves look best with 1-inch sections, while beachy waves require slightly larger 1.5-inch sections. The golden rule: if your section is wider than your flat iron plates, it won’t curl evenly. When in doubt, go smaller—tiny sections create more defined curls that blend beautifully when released.
Use proper clipping tools that won’t damage hair. Metal clips with plastic coating provide the best hold without creasing, while duck-bill clips work well for fine hair. Avoid rubber-band-tipped clips that pull and break delicate strands. Work methodically through each section, checking that hair lies completely flat without twists before clamping your flat iron—any tangles or twists will create uneven, frizzy curls that fall out quickly.
Master the Three Essential Curling Techniques
Understanding how to manipulate your flat iron determines your curl pattern. Each technique creates distinctly different results, and mastering all three gives you complete control over your final look.
The Twist Method for Effortless Beach Waves
This technique creates relaxed, natural-looking waves that frame the face beautifully. Start by taking a 1-inch section and clamping the flat iron at the ends. Twist the iron away from your face while slowly gliding upward at a 45-degree angle. The twist wraps hair around the plates as you move, creating soft S-shaped waves. Move deliberately—about one inch per two seconds—to allow heat to properly set the wave. Alternate twist directions throughout your hair for maximum natural variation.
The C-Curve for Face-Framing Movement
Create gentle bends that enhance your features without dramatic curls. Clamp a section near the roots, rotate the iron 180 degrees to form a C-shape, then slowly glide down while maintaining the curve. For an inward curl that frames your face, rotate the iron toward your cheekbone. For outward volume that lifts roots, rotate away from your face. This technique works particularly well for the front sections around your face, creating dimension without overwhelming your features.
The Full Rotation for Defined Spiral Curls
For tight, bouncy curls that last all day, use the full 360-degree rotation method. Clamp a ½-inch section at the ends, rotate the iron a full circle until hair wraps completely around the plates, then hold for 8-10 seconds before releasing. The key is maintaining consistent tension—too loose and curls fall out, too tight and you create dents. Work through each section only once; going over already-curled hair causes cumulative heat damage and frizz.
Temperature Guide for Your Hair Type
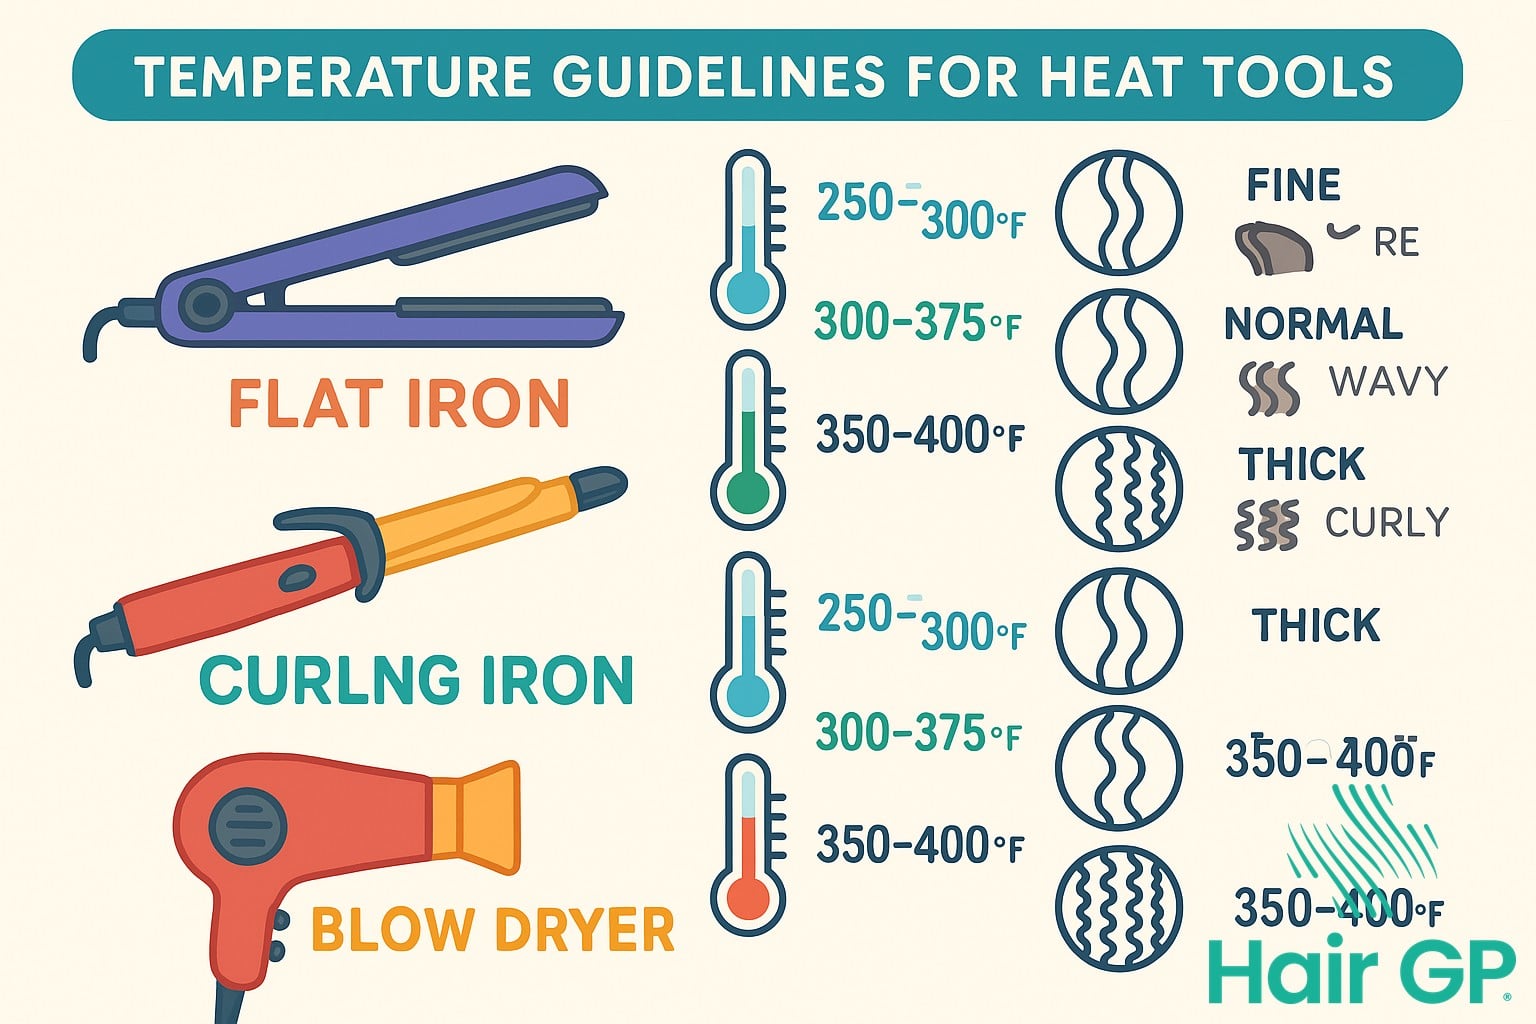
Heat settings make or break your curling results. The right temperature sets the curl without damage, while incorrect settings lead to limp curls or fried hair.
Fine or damaged hair thrives at 280-320°F. This lower range provides enough heat to reshape the hair without causing further damage. Test on a hidden section first—your hair should glide smoothly through the plates without sticking. If curls fall out immediately, increase temperature by 10-degree increments until you find your sweet spot.
Medium or color-treated hair performs best at 320-360°F. This mid-range temperature effectively sets curls while maintaining hair health. Many professionals recommend 340°F as the ideal balance point for most hair types—it’s hot enough to create lasting curls but cool enough to prevent significant damage.
Thick, coarse, or resistant hair typically needs 360-400°F. Start at the lower end and increase only if necessary. If your flat iron has a “turbo” heat button, use it sparingly only on the most stubborn sections. Never exceed 400°F regardless of hair type—this temperature causes immediate, irreversible damage to the hair’s protein structure.
Always allow 30-60 seconds between sections for your flat iron to recover its temperature, especially with cheaper models that fluctuate significantly. Consistent heat application ensures uniform curl formation throughout your entire head.
Pro Tips for Long-Lasting, Healthy Curls
The finishing touches separate amateur results from salon-quality styles. These expert techniques lock in your curls while protecting your hair from damage.
Cooling time is non-negotiable for curl memory. Hold each curled section in your closed hand for 10-15 seconds before releasing—it allows the hair to cool in the curled position, setting the shape. Rushing this step creates curls that stretch out immediately. For extra hold, mist each section with cold water from a spray bottle before cooling.
Strategic product application enhances definition without stiffness. Once all curls are set and cooled, apply a pea-sized amount of curl-enhancing serum to your palms, rub hands together, and gently smooth over the surface of your curls. Focus on ends where frizz appears first. Avoid touching curls excessively during this process—you’ll stretch out the pattern.
Preserve your style overnight with proper technique. Instead of a tight ponytail, loosely gather hair into a “pineapple” on top of your head secured with a silk scrunchie. This position maintains volume while preventing flattening. For straighter hair types that struggle with curl retention, twist sections around foam rollers before bed—they set curls without creating crimps from traditional rollers.
By following these detailed techniques, you’ll discover how to make curly hair with flat iron tools that looks professionally styled yet completely natural. With practice, you’ll develop the confidence to create any curl pattern you desire using just one versatile styling tool.


