
Cast iron cookware has been a kitchen staple for generations, prized for its unmatched heat retention and natural non-stick properties when properly maintained. However, many home cooks feel uncertain about how to clean these durable pans without damaging their seasoning or causing rust. The good news is that scrubbing cast iron doesn’t have to be intimidating. With the right techniques and a few simple tools, you can keep your cast iron in pristine condition for decades. This guide walks you through everything from quick post-cook cleanings to deep scrubbing sessions that restore neglected pans to their former glory.
Understanding the unique nature of cast iron is the first step toward proper care. Unlike stainless steel or non-stick pans, cast iron develops a polymerized oil layer called seasoning that provides its characteristic non-stick surface and protects against rust. Harsh scrubbing methods or improper cleaning can strip this seasoning, leaving your pan vulnerable to damage. The goal of scrubbing cast iron is to remove food residue while preserving that valuable seasoning layer. Whether you’re dealing with light everyday messes or baked-on carbon deposits, the methods outlined below will help you clean effectively while maintaining your pan’s performance and longevity.
Gather Essential Cleaning Tools Before Scrubbing

Before you begin scrubbing, having the right tools on hand makes the process much easier and protects your pan from damage. The supplies you need are likely already in your kitchen, so no special purchases are necessary.
Natural scrubbing options work best for cast iron. A stiff nylon brush or dedicated cast iron cleaning brush with sturdy bristles handles most cleaning tasks without scratching the seasoning. For tougher residue, a chainmail scrubber provides gentle yet effective abrasion that removes stuck-on food without damaging the surface. Plain hot water and a drop of mild dish soap round out your basic cleaning kit. Avoid steel wool or abrasive sponges, as these can strip seasoning and leave your pan prone to rust.
Drying and conditioning materials complete your cleaning routine. Clean, lint-free cotton towels or paper towels work well for initial drying. After cleaning, you’ll need a thin layer of cooking oil or melted shortening to re-season the pan. Simple vegetable oil, canola oil, or dedicated cast iron conditioner all serve this purpose effectively. Having these supplies ready before you start scrubbing prevents interruptions and ensures you can complete the entire cleaning and conditioning process in one session.
Proper Daily Scrubbing Technique for Light Residue
For everyday use, a quick scrub after cooking keeps your cast iron in excellent condition without excessive effort. This routine takes just a few minutes and becomes second nature with practice.
Begin while the pan is still warm (but not scalding hot), as residual heat loosens food residue and makes scrubbing easier. Run warm water over the cooking surface, then apply gentle pressure with your brush or nylon scrubber in circular motions. Work along the surface to lift any stuck-on particles, focusing on areas with visible food residue. If stubborn bits remain, let the pan sit in warm water for five to ten minutes to soften the deposits before returning for a second pass.
For particularly delicate cleaning jobs after cooking eggs or fish, a simple salt scrub works wonders. Sprinkle a generous amount of coarse kosher salt into the warm pan, then use a small amount of water and your brush to create a mild abrasive paste. The salt lifts residue without affecting the seasoning, and it rinses away completely without leaving behind any flavor or residue. This method is especially useful after cooking acidic foods like tomatoes that might affect your seasoning if left sitting.
Rinse thoroughly with warm water to remove all loosened particles and cleaning residue. Inspect the surface closely to ensure no food remains, repeating the scrubbing process if necessary. The goal is a visibly clean surface that feels smooth to the touch, free from any sticky or rough patches that indicate remaining residue.
Effective Deep Scrubbing Methods for Stubborn Buildup
Sometimes regular scrubbing isn’t enough to tackle months of accumulated buildup, baked-on carbon, or residue from neglected use. Deep cleaning restores heavily soiled pans to clean, smooth condition, though it requires more effort and temporarily removes some seasoning.
The salt and oil paste method handles moderate buildup effectively. Mix equal parts coarse salt and water to create a thick paste, or use salt with a small amount of cooking oil for extra lubrication. Working in small sections, use your brush or scrubber to work the paste into problem areas with firm, circular motions. The salt acts as a gentle abrasive that lifts carbonized residue without gouging the metal. Rinse and repeat until the paste comes away clean, indicating the residue has been removed.
For severe buildup, the baking soda treatment provides stronger cleaning power. Create a paste of baking soda and water, applying it generously to affected areas. Let the paste sit for fifteen to twenty minutes to penetrate the carbonized layer, then scrub vigorously with your brush or nylon scrubber. The alkaline nature of baking soda helps break down stubborn deposits while remaining gentle enough to preserve the underlying metal. This method works well for the interior cooking surface and bottom of the pan where residue tends to accumulate most heavily.
When carbonized food won’t budge, try the boiling water method. Fill your pan with enough water to cover the stuck-on areas, bring to a gentle boil, and let simmer for 5-10 minutes. The heat and water loosen the residue, making it easier to scrub away. Once the water has cooled sufficiently, use your brush to remove the softened debris. This technique works especially well for stuck-on cheese or caramelized sugars that resist dry scrubbing.
Critical Drying Steps After Scrubbing Cast Iron
Proper drying is crucial for preventing rust and maintaining your pan’s condition. Cast iron is highly susceptible to moisture damage, making this step non-negotiable for long-term care.
Begin by rinsing your cleaned pan with warm water, removing any remaining cleaning residue or loosened particles. Use your hand or a soft cloth to wipe away water, paying attention to the interior cooking surface where moisture collects most readily. For complete drying, place the pan on a warm stove burner for two to three minutes, allowing residual heat to evaporate any lingering moisture. The metal should feel warm and completely dry to the touch before you proceed to seasoning.
Never air-dry cast iron, as the extended exposure to humidity invites rust formation. Similarly, avoid leaving water sitting in the pan, even for short periods. The combination of iron and moisture creates ideal conditions for oxidation, which can develop quickly and spread beneath your seasoning layer. A few minutes of careful drying protects against weeks of potential rust damage.
After ensuring the surface is dry, perform a quick visual inspection. Any remaining moisture appears as dark spots or droplets, which should be dried immediately. The properly dried pan has a uniform, slightly dull appearance across all surfaces, with no visible water or condensation.
Rebuild Seasoning After Every Scrub Session
Re-seasoning after cleaning protects the bare metal and maintains your pan’s non-stick properties. This thin oil layer replaces what cleaning may have removed and creates the foundation for future cooking performance.
Apply a small amount of oil to the entire cooking surface, inside and out. Use just enough to create a thin, barely-visible layer—too much oil results in sticky residue that becomes gummy during future use. Work the oil into the surface with a clean cloth or paper towel, then wipe away any excess until no visible pooling remains. The goal is a molecular-thin coating that bonds to the metal during heating.
Heat the oiled pan to polymerize the seasoning. Place the pan on a stove burner at medium-high heat for two to three minutes, or until the oil begins to smoke lightly and the surface takes on a slightly darker, glossy appearance. This chemical reaction bonds the oil to the metal, creating the durable, non-stick seasoning layer that makes cast iron so valuable. Allow the pan to cool completely before storing, which takes approximately thirty to forty minutes.
For pans that have been deeply cleaned or stripped entirely, repeat the oil application and heating process two to three times to build up a substantial seasoning layer. Each successive application bonds to the previous one, creating cumulative protection and improved non-stick properties over time.
Prevent Common Cast Iron Cleaning Mistakes
Certain cleaning practices damage cast iron and should be avoided entirely. Knowing these pitfalls protects your investment and prevents unnecessary wear on your cookware.
Never soak cast iron in water for extended periods. The prolonged moisture exposure causes rust that develops beneath the seasoning, requiring extensive restoration. A quick rinse is fine, but leaving the pan submerged—even overnight—creates conditions for rapid oxidation. If you must loosen stubborn residue, use warm water for short periods rather than extended soaking.
Avoid harsh dish soaps that contain strong degreasers. While a small amount of mild soap occasionally won’t destroy seasoning, frequent use of strong detergents strips the protective oil layer and leaves your pan vulnerable. Stick to mild, gentle soaps when soap is necessary, and always re-season afterward to restore protection.
Never put cast iron in the dishwasher. The prolonged moisture, harsh detergents, and high heat combine to destroy seasoning and promote rust within a single cycle. The dishwasher’s environment is fundamentally incompatible with cast iron care, regardless of how well-seasoned your pan may be. Hand washing is the only acceptable method for cleaning cast iron cookware.
Steel wool and abrasive scrubbers strip seasoning and scratch the metal surface. While they remove residue effectively, the damage they cause creates rough spots where food sticks and rust develops. Save these tools for completely stripped pans that need aggressive cleaning before re-seasoning, and use nylon or natural fiber alternatives for regular maintenance.
Restore Neglected Cast Iron Pans in 4 Steps
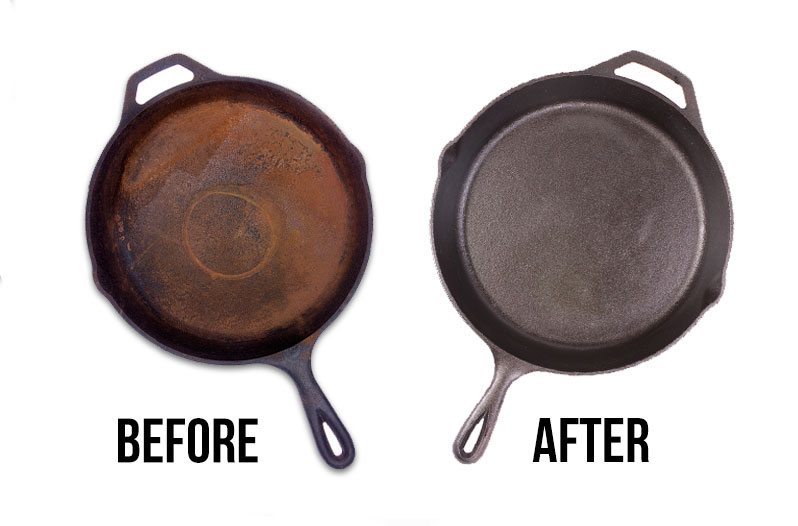
Pans that have been ignored for months or years can often be restored to excellent condition with patience and persistence. The restoration process requires significant effort but saves money compared to replacing the cookware.
Begin by removing loose rust with a wire brush or scraper. Work over the entire surface until loose material falls away. For stubborn rust, use a mixture of white vinegar and water in a one-to-one ratio, applying it to affected areas and letting it sit for fifteen to twenty minutes before scrubbing. The mild acid helps dissolve rust without damaging the underlying iron significantly.
After removing loose material, proceed with deep cleaning methods. The baking soda treatment works well for restoration—apply the paste, let it sit, then scrub thoroughly. Rinse completely and dry immediately on the stovetop. Inspect the surface to ensure all rust and carbon buildup has been removed.
Once clean and dry, apply multiple seasoning layers to rebuild protection. Three to five successive rounds of oil application and heating creates a robust new seasoning layer that restores non-stick properties and prevents future rust. Use your restored pan regularly to continue building and maintaining the seasoning over subsequent weeks and months.
Your cast iron pan will reward you with decades of reliable service and increasingly excellent cooking performance as the seasoning develops. Consistent care, prompt cleaning, proper drying, and regular re-seasoning transform a simple piece of cookware into a cherished kitchen heirloom that improves with age and use.


