
Installing a cast iron tub requires careful planning and execution. These heavy fixtures typically weigh between 300-500 pounds empty and can exceed 1,000 pounds when filled with water. Without proper installation, you risk floor damage, plumbing failures, or serious injury. This guide provides the essential steps you need to safely set your cast iron tub, ensuring years of reliable use and preventing costly mistakes that could damage your home.
Essential Pre-Installation Planning Requirements
Before moving that heavy tub into your bathroom, proper planning prevents the most common installation disasters. Cast iron tubs demand special attention due to their substantial weight and permanent nature once in place.
Determine Floor Structural Integrity First
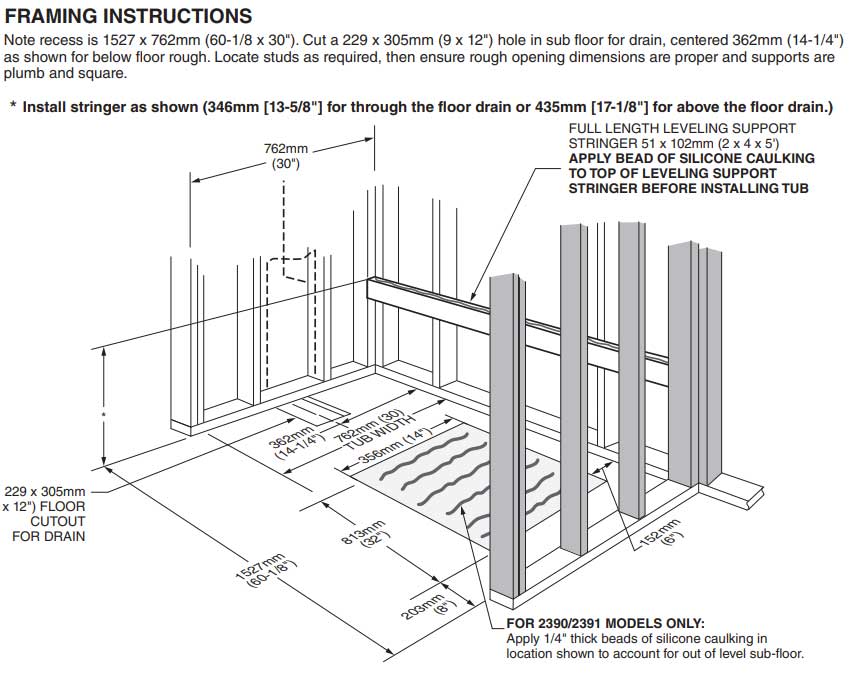
Your subfloor must support at least 100 pounds per square foot for standard installations, but cast iron tubs often require reinforcement. Look for floor bounce or sagging near your intended tub location – these indicate insufficient support. Most building codes require doubled floor joists beneath cast iron tubs, typically needing 2×10 or 2×12 lumber spaced no more than 16 inches apart. If your subfloor lacks this reinforcement, consult a structural engineer before proceeding.
Measure Clearance and Access Points Thoroughly
Cast iron tubs don’t bend or flex when maneuvering through tight spaces. Measure three times before purchasing:
– Doorway widths (standard doors are 28-32 inches)
– Hallway clearances
– Staircase dimensions
– Bathroom entry points
– Final placement area
Many homeowners discover too late that their beautiful clawfoot tub won’t fit through the bathroom door. If your access points are tight, consider professional installation with specialized equipment or plan for temporary removal of doors, trim, or even walls.
Required Tools and Materials Checklist
Essential Equipment for Safe Handling
- Tub dolly with 1,000+ pound capacity (standard furniture dollies won’t suffice)
- 4-6 strong helpers (minimum 3 people for smaller tubs)
- Moving straps with padding (never lift by the rim)
- Wooden blocks and shims (for leveling)
- Laser level (water levels work but are less precise)
- Pipe wrenches and basin wrench (for plumbing connections)
- Silicone caulk and applicator (100% waterproof formula)
Critical Safety Gear You Must Wear
- Steel-toed boots (that tub won’t bounce if it falls on your foot)
- Heavy-duty work gloves (cast iron edges can be sharp)
- Knee pads (you’ll be on the floor frequently)
- Safety glasses (protect against debris during positioning)
Step-by-Step Cast Iron Tub Installation Process
Proper Tub Positioning Technique
- Clear the path completely – remove doors, obstructions, and cover floors with moving blankets
- Position your helpers – two at each end plus one spotter to guide through tight spaces
- Lift using legs, not back – keep the tub as level as possible during transport
- Place on wooden blocks – never set directly on finished flooring during positioning
- Allow 2-3 inches clearance around all sides – for plumbing access and expansion
Pro Tip: Have someone mark the exact tub outline on the floor with painter’s tape before moving the tub into position. This visual guide prevents misalignment when you’re focused on the heavy lifting.
Achieving Perfect Leveling on Uneven Floors
Cast iron tubs require precise leveling to prevent water drainage issues and structural stress:
- Place your laser level across the tub’s rim at multiple points
- Identify high and low spots using shims under the tub feet
- Never force the tub – uneven pressure can crack the enamel
- Check level in both directions (lengthwise and widthwise)
- Recheck after 24 hours – settling may require minor adjustments
Critical Warning: If your floor slope exceeds 1/2 inch over the tub’s length, you need structural modifications before installation. Forcing a tub level on severely uneven floors creates stress points that lead to cracks.
Plumbing Connection Best Practices
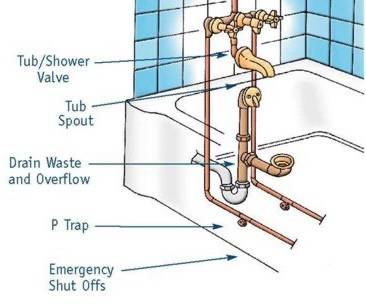
Drain and Overflow Assembly Sequence
- Apply plumber’s putty around the overflow pipe flange
- Connect overflow pipe to drain assembly before positioning tub
- Install strainer basket with silicone sealant on threads
- Hand-tighten connections first, then give 1/4 turn with wrench
- Test for leaks with temporary water source before final positioning
Common Mistake: Overtightening drain connections creates stress cracks in the porcelain finish. Connections should be snug but never forced.
Water Supply Line Installation Tips
- Use flexible supply lines with braided stainless steel covers
- Leave 1-2 inches of slack in supply lines to prevent stress
- Install shutoff valves within easy reach (not behind the tub)
- Apply Teflon tape to all threaded connections (4-5 wraps)
- Test connections at half-pressure before full water flow
Final Positioning and Securing Methods

Permanent Mounting Without Damaging the Finish
- Once perfectly level, trace around each tub foot
- Drill pilot holes through floor (not into tub feet)
- Use rubber washers between floor and mounting hardware
- Attach with stainless steel lag bolts (never overtighten)
- Apply silicone caulk around perimeter where tub meets floor
Expert Note: Never cement or permanently adhere a cast iron tub to the floor. Future repairs may require removal, and some movement is necessary to accommodate house settling.
Testing for Proper Drainage and Stability
- Fill tub to overflow level and monitor drainage speed
- Check for leaks at all connections with paper towels
- Apply pressure to different sides to test stability
- Listen for unusual sounds indicating stress points
- Recheck leveling after first full use
Critical Post-Installation Maintenance
Immediate Care After Installation
Wait 72 hours before regular use to ensure all seals have properly cured. During this period, avoid:
– Full water capacity (start with half-fill tests)
– Abrasive cleaners on new caulk lines
– Excessive pressure on tub edges
– Temperature extremes (no ice-cold followed by hot water)
Long-Term Protection Strategies
- Place a non-slip mat in the tub (prevents scratches from feet)
- Clean with pH-neutral cleaners only (avoid acids)
- Re-caulk perimeter annually (prevents water damage)
- Check mounting bolts every six months for tightness
- Never stand on the rim (concentrated weight causes cracks)
Troubleshooting Common Installation Problems
Addressing Minor Leveling Issues After Installation
If you notice slight unevenness after use:
1. Drain the tub completely
2. Place 1/16 inch shims under low spots
3. Retest with partial water fill first
4. Never adjust more than 1/8 inch at a time
5. Allow 24 hours between adjustments
Warning: Significant leveling problems after installation indicate structural issues that require professional assessment. Don’t keep adding shims as a permanent solution.
Fixing Small Leaks at Connections
For minor drips at plumbing connections:
1. Turn off water supply completely
2. Dry the area thoroughly
3. Apply additional pipe dope or Teflon tape
4. Tighten connection 1/8 turn more
5. Test with slow water flow first
If leaks persist after two attempts, disassemble and inspect for cross-threading or damaged parts.
When to Call a Professional Installer
While DIY installation saves money, certain situations demand professional expertise:
– Second-story installations (structural concerns)
– Historic homes with questionable subfloors
– Integrated plumbing systems requiring wall access
– Any situation where you feel uncertain about safety
– When tub weight exceeds 400 pounds
The average professional installation costs $1,500-$3,000 but provides peace of mind that your valuable investment is properly secured. Consider it an insurance policy against costly water damage or injury.
Final Note: Properly setting a cast iron tub requires patience, proper tools, and respect for the fixture’s weight and permanence. By following these steps carefully, you’ll ensure your beautiful cast iron tub becomes a functional centerpiece rather than a source of headaches. Remember that when dealing with hundreds of pounds of cast iron, taking extra time for proper preparation prevents most installation problems. Always prioritize safety over speed – that antique tub will outlast you if installed correctly.


