
Short hair offers incredible versatility, but many people mistakenly believe flat irons only work for long locks. The truth is that with the right technique, a flat iron can transform your short cut into sleek bobs, textured pixie styles, or beachy waves in minutes. Whether you have a chin-length bob, an edgy pixie, or shoulder-length strands, mastering flat iron styling unlocks countless looks without needing lengthy hair. This guide reveals exactly how to use a flat iron on short hair to achieve professional results at home while protecting your strands from heat damage.
Selecting the Perfect Flat Iron for Short Hair

Why Plate Size Determines Your Styling Success
Short hair requires precision tools, and plate size makes or breaks your styling experience. Standard 1-inch plates work for most short styles, but if you have very short hair or want detailed curls, a ¾-inch plate offers superior maneuverability. Plates larger than 1 inch become unwieldy on short cuts, making it difficult to grab small sections without catching adjacent hair and creating unwanted kinks.
Tourmaline and ceramic plates outperform basic metal plates for short hair. Tourmaline emits negative ions that neutralize static for smoother, shinier results, while ceramic provides even heat distribution to prevent hot spots that damage delicate short strands. Avoid metal plates that heat unevenly and snag hair—especially problematic with the fine ends common in short cuts.
Temperature Control Features You Can’t Skip
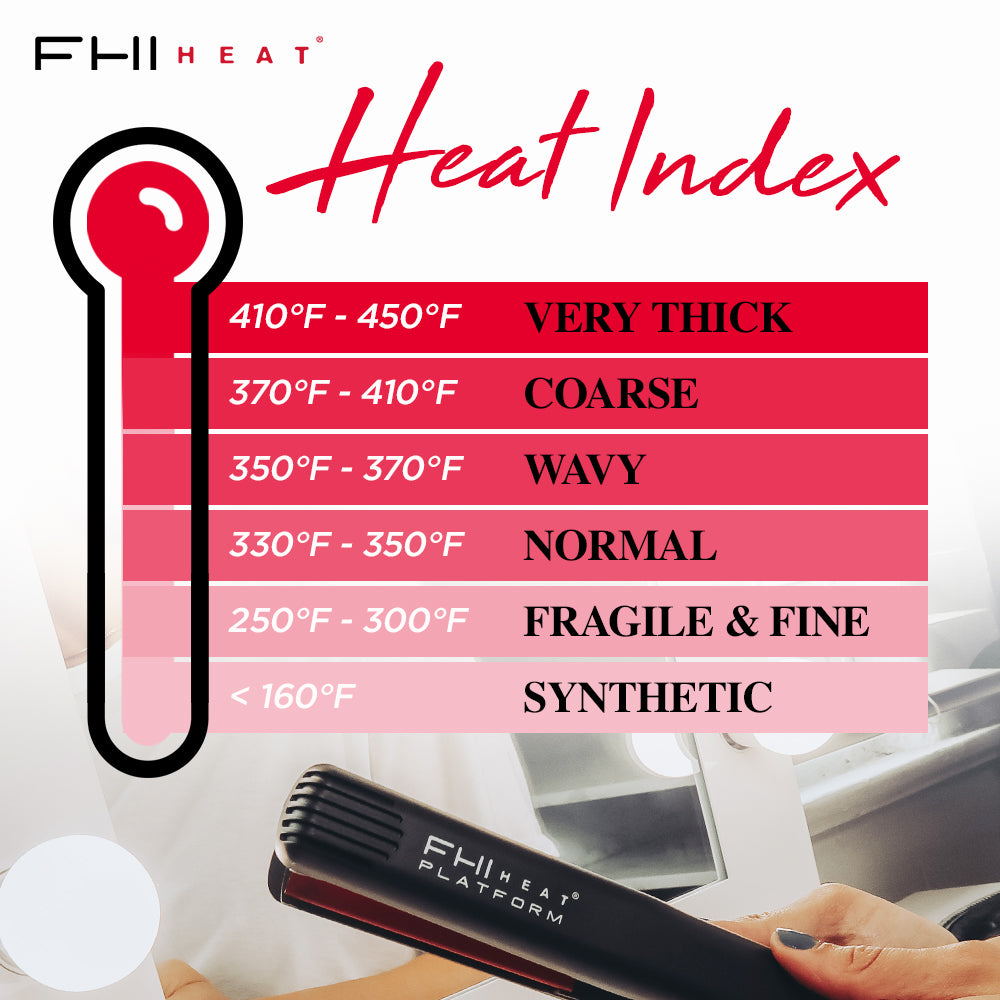
Precise heat settings matter more with short hair because you have less margin for error. Look for flat irons with adjustable temperatures starting at 250°F and reaching at least 450°F. Fine or damaged short hair typically needs 250-300°F, while thicker textures may require 350-400°F.
Digital displays let you select exact heat levels, crucial when experimenting with different styles. Quick heat-up technology (30-60 seconds) saves precious morning time, while automatic shut-off provides peace of mind if you rush out the door. These features transform your short hair styling from frustrating to flawless.
Preparing Short Hair for Heat Styling
The Non-Negotiable Heat Protectant Step
Heat protectant forms a vital barrier that reduces thermal damage by up to 50%—especially critical for short hair that shows damage more prominently. For short styles, you need less product than you’d expect: a dime-sized amount for pixie cuts and up to a quarter-sized amount for chin-length bobs.
Apply through damp hair before blow-drying, focusing on mid-lengths and ends where damage accumulates. Work it through with fingers or a wide-tooth comb for even distribution without weighing hair down. Allow it to dry completely before heat application—applying heat to damp protectant reduces effectiveness and can cause splattering.
Strategic Sectioning for Short Hair Success
Proper sectioning makes the difference between polished results and uneven styling disasters. Divide short hair into four to six main sections—two on each side, one at the crown, and one at the nape. For very short pixie cuts, you may need eight or more tiny sections.
Each working section should be no wider than the flat iron’s plates and no thicker than a pencil. Thin sections heat more evenly, allowing results with fewer damaging passes. Multiple light passes cause less damage than fewer aggressive passes through thick sections where inner layers remain unheated.
Mastering the Basic Flat Iron Technique
The Perfect Pass: Clamping and Gliding
Hold the flat iron with plates facing away from you. Take a small section close to the roots (without touching scalp), clamp firmly but gently, and glide slowly down the shaft in one smooth motion. The entire pass should take 3-5 seconds for a 4-inch section—moving too quickly fails to smooth properly, while moving too slowly overheats strands.
For short hair near the hairline, angle the flat iron slightly to avoid burning your forehead or ears. Some stylists lift hair away from the head before clamping to create root volume while maintaining smoothness. Listen for the subtle hissing sound indicating moisture release—this confirms effective heat transfer.
Avoid These Common Short Hair Mistakes
Never go over the same section multiple times trying to achieve perfection—each pass compounds damage. Instead, accept you may need touch-ups later rather than overworking any single section. Avoid clamping at the ends and releasing without sliding, which creates ugly creases. Similarly, never stop mid-section and reverse direction, as this creates waves and bumps requiring additional passes.
If you see steam or hear sizzling, your hair may be too damp or temperature too high. Stop immediately and let the section cool before continuing. Persistent sizzling indicates active damage occurring.
Creating Different Styles with Short Hair
Sleek Straight Looks That Last All Day
Begin with completely dry, blow-dried hair. Apply smoothing serum to damp hair before drying. When flat ironing, work with natural growth patterns rather than against them. Start at roots and work toward ends in slow passes. For very short areas near the hairline, use the iron’s edge for precision.
For maximum sleekness, make a final pass at a slightly lower temperature to seal the cuticle and add shine without additional damage. Finish with anti-humidity hairspray mist to protect against frizz throughout the day.
Effortless Waves and Curls for Short Hair
To create curls, hold the iron vertically and wrap small sections around it, starting from roots toward ends. Hold for 5-8 seconds before releasing—finer hair needs less time, thicker hair needs the full duration. Alternate curl directions for natural movement.
For beachy waves on short hair, work with larger sections and leave the last inch unwrapped. Try the “S-wave” technique: pinch hair between plates, twist 180 degrees, and slide down in one motion for gentle waves that work beautifully on shoulder-length styles.
Customizing Heat Settings for Your Hair Type
Fine or Thin Hair: Low and Slow Approach
Fine hair damages at lower temperatures, requiring careful management. Stay between 250°F and 300°F. Work with smaller sections and accept that some styles may need multiple light passes rather than aggressive single passes.
Use heat protectants specifically formulated for fine hair—they provide protection without weighing strands down. Avoid heavy oils that can make fine short hair appear greasy and limp.
Medium or Coarse Hair: Finding the Sweet Spot
Medium-textured hair works best between 300°F and 350°F. Start at the lower end and increase only if needed. Most find 320°F-340°F effective for various styles.
Thick, coarse hair requires 350°F-400°F to effectively style. Higher temperatures allow results in fewer passes, which actually reduces overall damage. Coarse hair benefits from intensive heat protection and regular deep conditioning to maintain elasticity.
Protecting Your Short Hair from Damage
The Heat Damage Prevention Strategy
Limit flat iron use to every other day or less, with at least one or two heat-free days weekly. On these days, embrace natural texture or use no-heat methods. Track your styling habits to identify reduction opportunities.
Recognize early warning signs: increased breakage, split ends appearing quickly, rough texture despite conditioning, and loss of shine. If you notice these, reduce heat exposure immediately and focus on repair treatments.
Quick Fixes for Common Styling Mistakes
Fix unintended kinks by slightly dampening the area and making a slow pass at lower temperature. Hold for an extra second to allow resetting. For multiple kinks, restart from roots with smoother, more consistent motion.
Revive flat styles by applying dry shampoo to roots or adding texture through random loose curls. Break them up with fingers for grip that helps style hold longer. Finish with flexible-hold hairspray to lock everything in place.
Final Pro Tips for Short Hair Styling
Always work with completely dry hair—never flat iron damp strands. Test your iron’s temperature on paper before use. Keep plates clean by wiping with a damp cloth after cooling—product buildup snags hair and creates uneven heating.
Experiment with techniques to discover what works for your specific cut. Take progress photos to track successful styles. With practice, you’ll master how to use a flat iron on short hair to create endless looks that turn heads all day long—no lengthy locks required.


