
Short hair offers endless styling possibilities, and a wand curling iron is one of the most versatile tools to transform your look. Whether you have a chic bob, a trendy pixie cut, or shoulder-length locks, mastering the wand curling technique can give you everything from soft, beachy waves to bouncy, defined curls. The single-barrel design of a wand iron creates more natural-looking curls than traditional clamp-style curlers, making it ideal for shorter lengths where visible clamps can leave awkward marks or create uneven results.
Using a wand curling iron on short hair requires a different approach than styling longer hair. The key lies in proper sectioning, controlling your temperature, and mastering the wrapping technique. Short hair can be tricky because there’s less length to work with, but this also means your curls set faster and hold longer. With the right method, you can achieve salon-quality results at home in under 15 minutes. This guide walks you through every step, from heat protection to final styling, so you can create flawless curls that last all day.
Choose the Right Wand Size for Your Specific Short Haircut
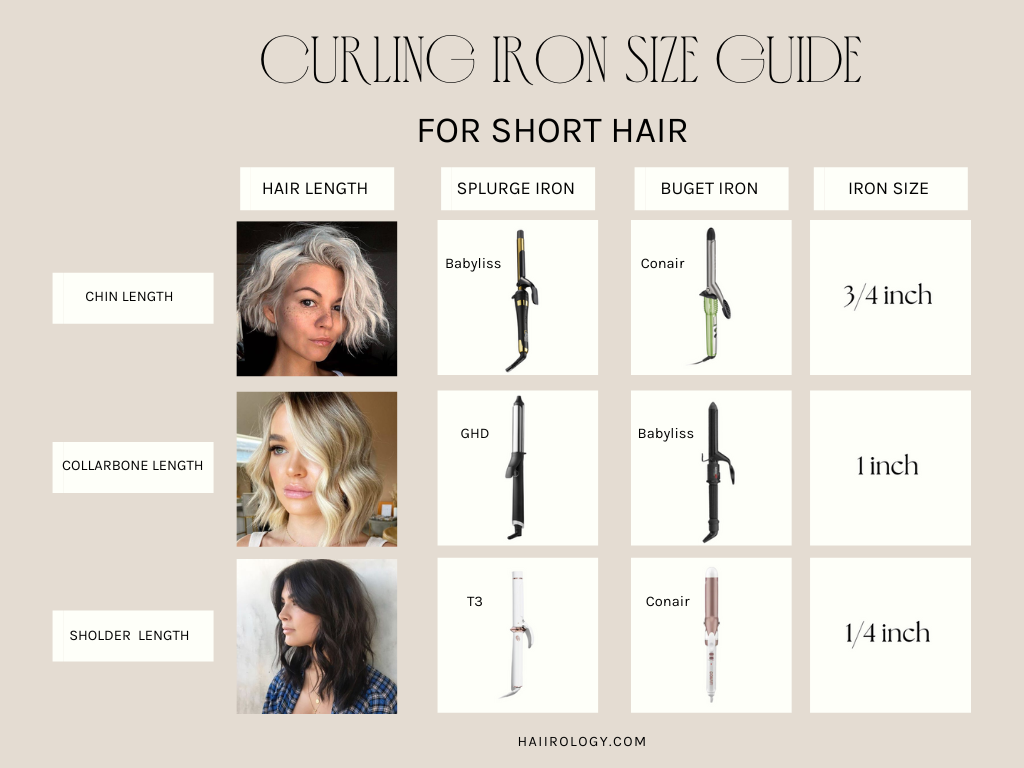
Selecting the appropriate barrel size is the foundation of successful short hair curling. The diameter of your wand directly determines the size and type of curls you’ll achieve, so understanding these options helps you select the right tool for your desired look. Barrel sizes typically range from ½ inch to 2 inches, with each size creating distinctly different results on short hair.
For very short hair like pixie cuts, a ½-inch or ¾-inch barrel works best because it creates tight, defined curls that have enough volume to show on limited hair length. These smaller barrels wrap around short strands easily and generate curls that don’t fall flat immediately. If you’re working with a bob or shoulder-length cut, a 1-inch barrel offers versatility by producing medium curls that can be finger-combed into loose waves. Larger barrels like 1¼-inch to 1½-inch create loose, cascading waves that look glamorous on medium-short hair but may not hold as well on very short strands due to reduced weight distribution.
Pro Tip: If you have an asymmetrical bob, consider using two different barrel sizes—one for the longer side and another for the shorter side—to create balanced, intentional dimension in your style. Consider your hair texture when selecting barrel size as well. Fine hair holds tighter curls better on smaller barrels, while thicker hair may need medium barrels to create lasting definition. If you’re unsure, a 1-inch wand offers the best starting point for most short hair lengths and can achieve multiple looks with different techniques.
Prepare Your Hair Properly for Maximum Curl Hold
Proper preparation significantly impacts how well your curls hold and how much damage your hair endures during heat styling. Short hair often requires less product than long hair, but skipping preparation steps leads to frizz, limp curls, and unnecessary heat damage. Taking a few extra minutes before plugging in your wand pays off in the final result.
Start with clean, dry hair since styling damp hair with a wand causes uneven heating, frizz, and potential damage. Apply a heat protectant spray or serum throughout your hair, focusing on the mid-lengths and ends where most heat exposure occurs. For short hair, a lightweight formula works best because heavy products can weigh down your strands and reduce volume. If your hair tends to be oily, apply heat protection only to the ends rather than near your roots.
Add a lightweight mousse or styling foam to fine or limp hair to boost hold and create a better base for curls to grip. Apply the product when your hair is slightly damp, then blow-dry or air-dry before using the wand. For thicker hair, a texturizing spray applied at the roots can add grip that helps curls set more securely. Allow any products to set for one to two minutes before heating, as this gives them time to activate and create a protective barrier on each strand.
Set the Correct Temperature for Your Short Hair Type
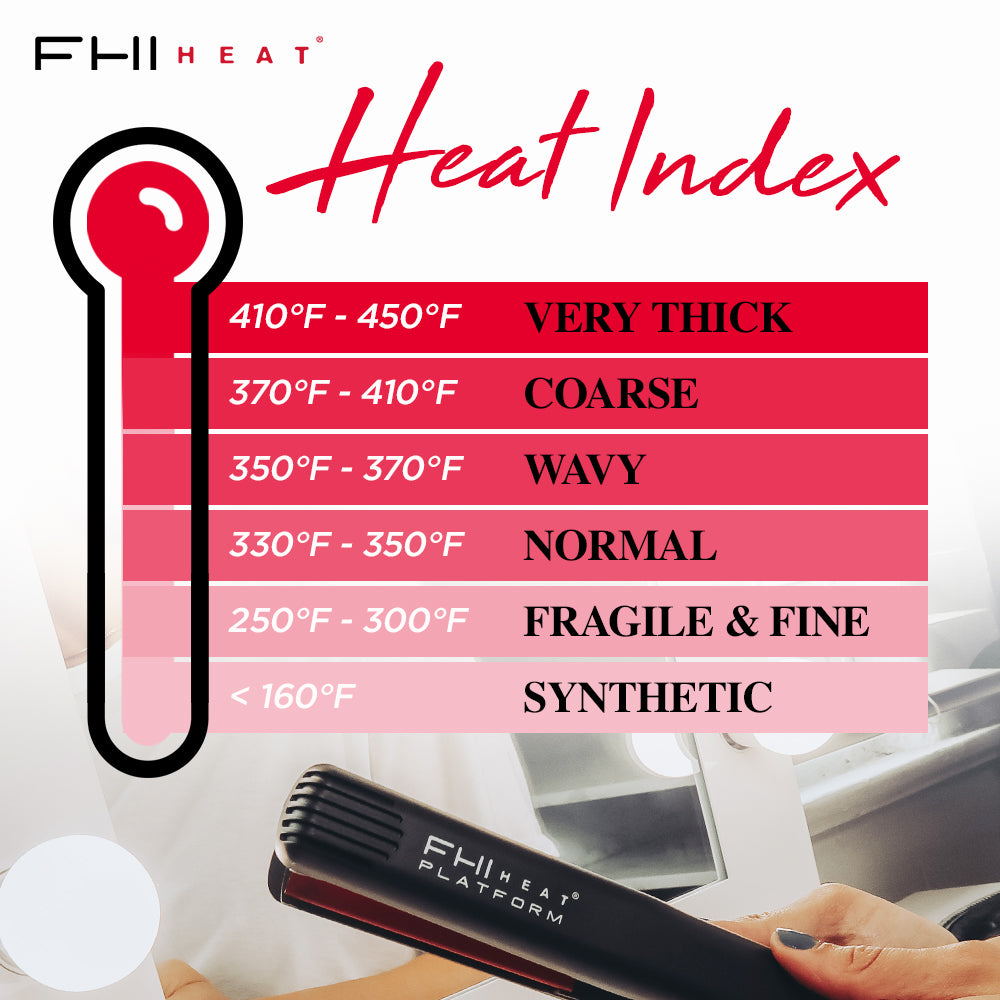
Temperature settings make the difference between beautiful, long-lasting curls and damaged, frizzy hair. Short hair generally requires lower temperatures than long hair because there’s less length to distribute heat, meaning the same temperature affects your strands more intensely. Finding your optimal heat setting protects your hair while still creating effective curls.
For fine, damaged, or color-treated hair, stay between 250°F and 300°F. These temperatures are sufficient to set curls on shorter strands without causing excessive damage. Normal hair typically curl well between 300°F and 350°F, providing enough heat to reshape the hair shaft while maintaining integrity. Only use temperatures above 350°F for very thick, coarse hair that refuses to hold curls at lower settings, and even then, test on a small section first.
Warning: Never start at maximum heat—always begin with the lowest effective temperature and increase only if your curls fall flat after cooling. Short hair cools faster than long hair, so your curls set quickly—don’t be tempted to crank up the heat to speed up the process. Modern wand irons often have adjustable temperature controls with digital displays, making it easy to find and maintain your ideal setting. Allow your wand to fully heat before starting, which usually takes one to two minutes depending on the model.
Section Your Hair Strategically for Perfect Curl Placement
Strategic sectioning is crucial when using a wand curling iron on short hair because working with untamed, messy sections leads to uneven curls and missed spots. Short hair can be deceptive—what looks like a small amount of hair actually contains many strands that need individual attention. Taking the time to create clean, manageable sections ensures every strand gets properly curled.
Divide your hair into four to six sections based on your hair’s thickness and length. For very short cuts, create more sections (six to eight) because each section contains fewer strands and needs precise handling. Use clips to secure each section, starting with the bottom layers and working your way up. This approach prevents already-curled sections from getting disturbed while you work on remaining hair.
Make your sections narrow and manageable—about one to two inches wide for most short hair styles. Wider sections result in larger, looser curls that may not hold well, while very narrow sections create tight ringlets that can look unnatural on shorter lengths. For a pixie cut or very short bob, you may not need clips at all; instead, work methodically around your head, curling small pieces one at a time while keeping the rest of your hair pinned back.
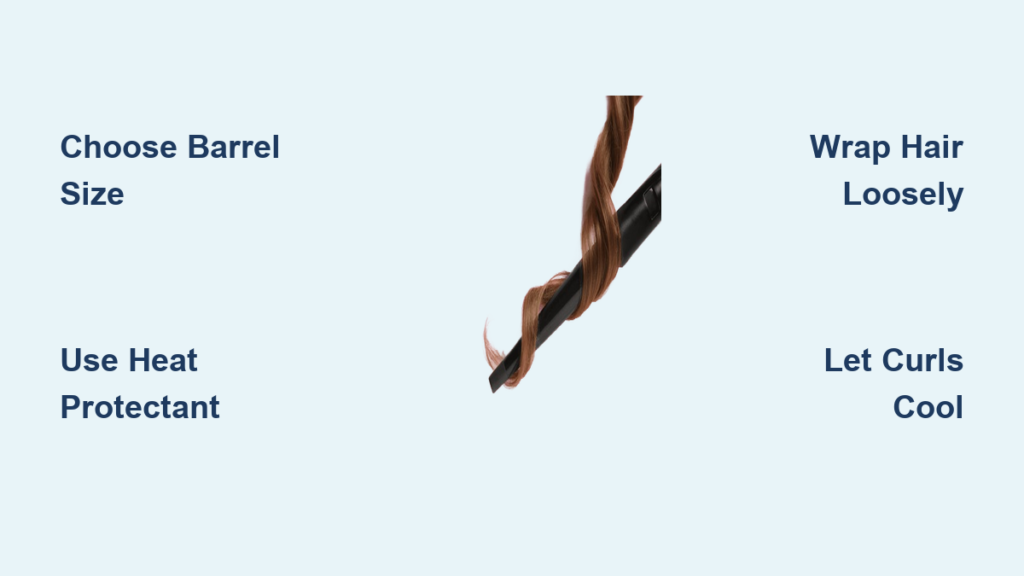
Master the Wrapping Technique for Natural-Looking Short Hair Curls
The wrapping technique distinguishes wand curling from traditional curling iron methods and creates more natural, flowing curls. Unlike clamp-style irons that sandwich hair between a barrel and clamp, a wand requires you to manually wrap hair around the barrel. This technique gives you complete control over curl direction, tightness, and placement—essential for achieving professional-looking results on short hair.
Hold your wand vertically with the barrel pointing downward. Take a small section of hair (about one inch wide) and position the ends against the barrel, about two to three inches down from your roots. Slowly wrap the hair around the barrel in a spiral motion, moving toward your scalp. The direction you wrap determines whether your curls spiral inward or outward—wrap toward your face for face-framing curls or away for a more voluminous, dramatic look.
For short hair, wrap the hair loosely rather than tightly to prevent the curls from bunching up near the roots. Leave the last inch or two of hair near your scalp uncurled to maintain natural volume and avoid the “candy apple” look where all your hair seems attached to your head at one point. Hold each curl on the wand for 8 to 15 seconds, depending on your hair’s thickness and the temperature setting. Thinner hair needs less time (8 to 10 seconds), while thicker hair benefits from longer hold times (12 to 15 seconds).
Create Different Curl Styles for Various Short Hair Lengths
A wand curling iron can achieve multiple distinct looks on short hair simply by varying your technique. Understanding these variations helps you choose the right approach for any occasion, from casual everyday styling to formal event glamour. The same tool produces dramatically different results based on how you wrap, how long you hold, and how you finish the curls.
For loose, beachy waves on short hair, use a larger barrel (1¼-inch or larger) and wrap very large sections loosely. Hold each section for only 5 to 8 seconds, then release and immediately finger-comb through to break up the curls. This technique creates soft, undulating waves rather than defined ringlets. Finish with a light-hold hairspray and scrunch your hair gently to encourage the relaxed texture.
Defined, bouncy curls require smaller sections wrapped tightly around a medium barrel (¾-inch to 1-inch). Hold each section for the full 12 to 15 seconds, then release and let the curl cool completely before touching it. Once cooled, spray with strong-hold hairspray and gently separate the curls with your fingers for a full, bouncy look. For a retro-inspired vibe, wrap all curls in the same direction for a uniform, polished appearance.
Time-Saving Trick: For a quick style change, curl just the top layer of your short hair while leaving the underneath layers straight—this creates dimension without committing to a full curly look that might take longer to reset later.
Avoid Common Short Hair Curling Mistakes That Ruin Your Style
Even experienced stylists make mistakes when using wand curling irons on short hair, but knowing these pitfalls in advance helps you achieve better results from your first attempt. Short hair’s limited length amplifies errors, making mistakes more visible and harder to correct mid-styling. Being aware of these common issues lets you adjust your technique proactively.
Applying too much heat to short hair is the most frequent mistake. Because short hair has less mass, it heats up faster and more intensely than long hair at the same temperature setting. This causes damage, frizz, and curls that fall flat within hours. Always start with lower temperatures and shorter hold times, increasing only if necessary. If your curls won’t hold, the problem is usually technique, not temperature—try smaller sections or a different wrapping method before increasing heat.
Neglecting to let curls cool completely ruins otherwise perfect styling. Short hair cools very quickly, but disrupting curls before they set causes immediate relaxation and loss of definition. After releasing each curl from the wand, hold it gently in your hand for five to ten seconds, then pin it or set it aside carefully. Avoid running your fingers through your hair until you’ve completed all sections and allowed everything to cool for at least two minutes.
Using the wrong barrel size for your hair length creates frustration and poor results. Very small barrels on longer short hair (like bobs) produce curls that look tight and dated, while large barrels on very short hair create waves that fall flat almost immediately. Match your barrel size to both your desired look and your actual hair length for best results.
Finish and Set Your Style for All-Day Short Hair Curls
Proper finishing techniques lock in your curls and extend their lifespan throughout the day. Short hair curls tend to drop faster than long hair curls simply because there’s less weight holding them down, making your finishing routine essential for all-day hold. The products and methods you use after curling determine whether your style lasts hours or minutes.
Allow all curls to cool completely before touching or styling further—this usually takes three to five minutes after you finish curling. During this time, avoid touching your hair, as the oils from your fingers introduce frizz and disrupt the curl pattern. If you’re short on time, you can speed cooling by gently waving a fan or cool-air dryer over your curls, but never use warm air as this relaxes the curls.
Apply finishing products while your curls are still warm to help them set. A medium-hold hairspray applied from 10 to 12 inches away provides flexible hold without making your hair stiff. For added shine and frizz control, smooth a tiny amount of hair oil or serum over the surface of your curls, focusing on the ends rather than the roots. Avoid heavy creams or pomades that weigh down short curls and reduce volume.
To extend curl longevity, sleep on a silk or satin pillowcase which reduces friction and prevents curls from getting crushed. Alternatively, loosely gather your curls on top of your head and secure with a soft scrunchie before bed. In the morning, refresh any flattened sections by misting lightly with water and re-curing small pieces, or use a curling wand touch-up on specific areas rather than restyling entirely.
Maintain Your Wand Iron for Consistent Short Hair Styling Results
Regular maintenance of your wand curling iron ensures consistent performance and protects your hair from damage caused by product buildup or damaged barrels. A well-maintained tool heats evenly, glides smoothly through hair, and creates better curls with less effort. Neglected tools require higher temperatures to achieve the same results, increasing heat damage over time.
Clean your wand regularly by wiping the barrel with a damp cloth after each use once it has cooled completely. For stubborn residue from styling products, use a cloth dampened with isopropyl alcohol. Never submerge your wand in water or use abrasive cleaners that could damage the barrel coating. Check the barrel for any nicks, scratches, or uneven coating that could snag or damage your hair—replace the tool if the barrel surface is compromised.
Store your wand curling iron safely by wrapping the cord loosely (never tightly) around the base and storing it in a heat-resistant pouch or dedicated drawer. Allow the tool to cool completely before storing to prevent damage to the cord or housing. Regular inspection of the cord for fraying or damage prevents electrical hazards and ensures safe operation. For best results, replace your wand iron every 12-18 months as the heating elements degrade over time, affecting performance.


