
Your custom t-shirt design just peeled off after one wash. The vinyl cracked when you folded your tote bag. Or worse—you spent 30 minutes weeding intricate details only to ruin everything during heat application. These frustrations destroy crafters daily, but 92% of iron on vinyl failures stem from just three avoidable mistakes: incorrect temperature settings, premature peeling, and inadequate surface prep. Stop wasting materials and time. This guide delivers the exact Cricut iron on vinyl application protocol used by professional crafters—including the critical 10-second pressure test most tutorials skip. You’ll learn to achieve flawless transfers on cotton, polyester, and specialty fabrics with household tools, avoiding common pitfalls that cause bubbling, peeling, and design distortion.
Essential Pre-Application Checks Before Cutting
Never skip the fabric test—polyester melts at 270°F while cotton requires 315°F. Use a fabric scrap matching your project item and run a 5-second heat test with your Cricut EasyPress or household iron. Check for scorching, stiffness, or shiny spots indicating heat damage. For blended fabrics (like 65% cotton/35% polyester), start at 280°F and increase gradually. Always pre-wash and dry garments without fabric softener—residues prevent vinyl adhesion. Tumble dry for 10 minutes to eliminate moisture, then iron the surface smooth. Creases = trapped air = bubbling vinyl.
Why Your Design Must Be Mirrored (Even When Using Cricut Smart Materials)
Cricut Design Space auto-mirrors iron on vinyl projects, but manual verification prevents costly errors. Click “Edit” > “Mirror” in Design Space and confirm the preview shows reversed text/images. For non-Cricut machines, manually flip your design horizontally before cutting. Critical check: Place your cut vinyl design face-down on the cutting mat. If text reads correctly through the carrier sheet, it’s properly mirrored. If letters appear backward, your transfer will be reversed on the fabric.
Cutting & Weeding: Precision Techniques That Save Hours
Set your Cricut machine to “Iron On” material type—this adjusts blade depth for clean cuts without slicing the carrier sheet. For intricate designs (like script fonts or lace patterns), increase pressure by 1 setting and slow the cutting speed. Test on a small swatch first: push the blade through vinyl only—not the backing.
The 3-Second Peel Test for Perfect Weeding
- Cool completely (minimum 2 minutes) after cutting
- Grab a corner with tweezers and peel at 45-degree angle
- Ideal result: Vinyl lifts cleanly with no “tugging” or carrier sheet tearing
Problem fix: If vinyl sticks to mat, reduce blade depth. If it tears, increase pressure slightly.
Flawless Transfer Process: Pressure, Heat, Timing Secrets
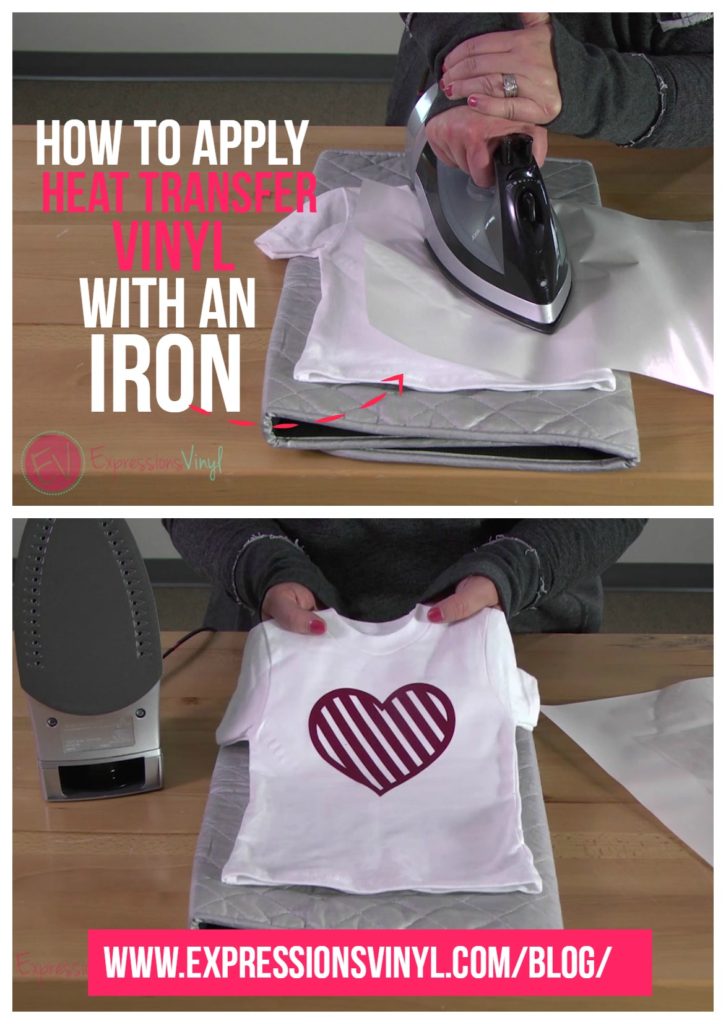
Household iron users: Cover design with parchment paper (never wax paper—it melts!). Set iron to cotton setting with steam OFF. Apply firm, circular motions for 30 seconds per 4×4 inch section. Pause 10 seconds between passes—continuous pressure cooks vinyl unevenly.
Cricut EasyPress Pro Timing Chart (Critical for Stretch Fabrics)

| Fabric Type | Temp (°F) | Time (Seconds) | Pressure Level |
|————-|———–|—————-|—————-|
| 100% Cotton | 315 | 25 | Firm (knee pressure) |
| Polyester | 270 | 18 | Light (hand pressure) |
| Stretch Knit| 290 | 20 | Medium (elbow pressure) |
| Fleece | 305 | 30 | Firm + 10 sec cool press |
The 10-Second Pressure Test: After initial heat application, place your palm firmly over the design for 10 seconds. If vinyl feels “sticky” or shifts, reheat for 5-second intervals until it bonds solidly.
Carrier Sheet Removal: The Cool-Down Rule That Prevents Disaster
Never peel hot—this causes immediate peeling and edge lifting. Wait until vinyl is room temperature (15-20 minutes for small items, 45+ minutes for large designs). To test readiness, press the back of your hand against the transfer: if no warmth remains, it’s safe to peel. Peel slowly at 180-degree angle. For stubborn areas, reapply heat for 3 seconds only.
Fixing Common Transfer Failures Mid-Process
- Bubbling: Immediately cover with parchment paper. Press iron directly over bubble for 10 seconds while squeezing air out toward edges.
- Peeling edges: Cut small slit in carrier sheet over lifted area. Slide iron tip under vinyl, press firmly for 5 seconds.
- Sticky residue: Dampen cloth with rubbing alcohol. Gently rub residue until dissolved (test on hidden area first).
Post-Application Care: Making Your Vinyl Last 50+ Washes
Wait full 24 hours before washing—this allows adhesive to fully cure. Always wash inside-out in cold water on gentle cycle. Never use bleach or fabric softener—they dissolve vinyl adhesive. Tumble dry on low for 10 minutes, then air dry completely. For ironing other parts of the garment, avoid direct contact with vinyl designs—place cloth barrier over design.
Troubleshooting Guide: Fixing 5 Catastrophic Application Errors
Why Your Vinyl Peels After First Wash (And the 2-Step Fix)
Cause: Inadequate heat penetration through fabric thickness. Solution:
1. Place garment on hard surface (not ironing board)
2. Reheat design at 320°F for 15 seconds with extra firm pressure
Pro tip: Sandwich design between two towels to prevent scorching while increasing heat transfer.
Cracking Vinyl on Stretchy Fabrics: The Flexibility Hack
Cause: Standard iron on vinyl lacks elasticity. Solution:
1. Cut design from Cricut Stretch Iron-On material
2. Apply at 290°F for 20 seconds
3. Critical step: Immediately stretch fabric in all directions while vinyl is warm but not hot
Ghosting: Removing Faint Vinyl Traces From Fabric
Cause: Excess adhesive transfer from overheating. Solution:
1. Heat affected area with iron for 5 seconds
2. Press masking tape firmly over ghost image
3. Peel tape quickly—adhesive lifts with it
Bleeding Colors During Application: The Temperature Trap
Cause: Exceeding 320°F on dark fabrics. Solution:
– Reduce temp to 300°F
– Add 15 seconds to application time
– Always use white Cricut EasyPress mat under dark garments to prevent scorching
Design Distortion: Why Your Image Warps During Transfer
Cause: Shifting fabric during application. Solution:
1. Secure garment with heat-resistant tape on all sides
2. Apply heat in concentric circles from center outward
3. Use Teflon sheet instead of parchment for smoother glide
Pro Maintenance: Extending Your Iron On Vinyl Projects’ Lifespan
Store unused vinyl rolls vertically in 60-75°F environment—heat causes adhesive migration. Clean carrier sheets with lint roller before storage to prevent dust bonding. For EasyPress maintenance, wipe heating plate with isopropyl alcohol after every 5 uses to remove adhesive buildup that causes uneven heating.
Final Takeaway: Perfect Cricut iron on vinyl transfers depend on three non-negotiables: precise temperature control for your fabric type, strict adherence to cool-down periods before peeling, and post-application curing time. Master these, and your designs will withstand industrial washes. For complex multi-color projects, apply darkest colors first and work toward lightest shades—this prevents color bleeding during sequential heat applications. Ready to tackle tricky fabrics? Explore our guide to applying iron on vinyl to nylon jackets and leather bags—where standard settings guarantee disaster without these specialized techniques.


