
Your cast iron skillet sits unused for eggs while you reach for non-stick pans—yet this workhorse can create the creamiest, most flavorful omelette when handled correctly. Cast iron’s exceptional heat retention sears eggs perfectly, but its porous surface demands specific techniques to prevent sticking disasters. Many home cooks abandon cast iron for omelettes after one tragic slide of scrambled eggs across the stovetop. But with precise heat control, proper fat application, and timing discipline, your skillet will release flawless omelettes every time. This guide reveals the exact steps professional chefs use to master cast iron omelettes, including how to test seasoning readiness, avoid rubbery textures, and clean without damaging your pan’s patina.
Why Your Cast Iron Skillet Sticks When Making Omelettes
:max_bytes(150000):strip_icc()/faw-best-egg-pans-tout-78fcdcea4322404f98a6f32ffa721618.jpg)
Cast iron’s natural porosity creates microscopic pits that grip food when conditions aren’t ideal. Unlike non-stick coatings, this material relies entirely on polymerized oil layers (seasoning) for release. Eggs’ high protein content bonds aggressively with unseasoned metal, especially during the critical first 30 seconds of cooking. High heat accelerates this reaction—when the skillet exceeds 350°F, egg proteins instantly seize and weld to the surface. Even well-seasoned pans fail if preheated unevenly, as cold spots cause inconsistent cooking. Moisture is another silent culprit; water droplets from washed pans create steam pockets that lift eggs off the seasoning barrier.
How to Test Your Skillet’s Seasoning Readiness
Before cracking eggs, verify your cast iron’s non-stick capability with the water droplet test. Heat the empty skillet over medium flame for 3 minutes until uniformly warm. Flick 2-3 water beads onto the surface—they should skate freely like mercury without sizzling violently. If beads explode or flatten, your seasoning is compromised. For immediate rescue, rub ½ teaspoon of flaxseed oil into the hot pan with a paper towel, then bake upside-down at 450°F for 1 hour. Always cook omelettes in skillets that pass this test; attempting eggs on subpar seasoning guarantees sticking.
Identifying Heat Distribution Problems
Uneven heating creates hot zones that burn egg edges while centers remain runny. To diagnose: sprinkle ¼ cup of kosher salt evenly across the cold skillet, then heat on medium for 2 minutes. Rotate the pan—if salt melts in patches but remains crystalline elsewhere, your burner’s flame doesn’t match the skillet’s base diameter. Fix this by using a burner one size smaller than your pan (e.g., 10″ skillet on 8″ burner) or investing in a diffuser plate. Never rush preheating; 5 full minutes allows thermal equilibrium crucial for delicate omelettes.
Optimal Heat Settings for Cast Iron Omelette Success
Medium heat isn’t just a suggestion—it’s the non-negotiable foundation for cast iron egg cooking. High heat scorches proteins before fat can create a release barrier, while low heat prolongs coagulation, yielding dry, chalky textures. The ideal sweet spot is 275-325°F, where butter foams gently without browning.
Why Medium Heat Prevents Rubberiness
Egg proteins unravel (denature) at 140°F and solidify at 158°F. Cast iron’s thermal mass holds temperature steadily in this range, allowing gradual setting that traps steam for fluffiness. At high heat, proteins seize violently, expelling moisture and creating dense rubber. Test your burner’s medium setting by timing how long it takes to bring 1 cup of water to a simmer: 4-5 minutes indicates proper intensity. If water boils in under 3 minutes, reduce the flame immediately.
The Butter Foam Visual Cue
Once your preheated skillet passes the water test, add 1 tablespoon of unsalted butter. Watch closely—it should melt smoothly, then form small, persistent bubbles within 20 seconds. If butter blackens instantly or vanishes without foaming, the pan is too hot; cool it 60 seconds off-heat. If butter pools greasily without bubbling, the pan is too cold—return to medium heat 30 seconds. Perfect butter behavior creates an invisible non-stick film that lets eggs glide.
Fat Selection and Quantity for Guaranteed Release
Using insufficient fat is the #1 cause of cast iron omelette failures. Eggs require a continuous oil barrier between proteins and metal—½ tablespoon won’t cover a 10″ skillet adequately. Butter’s milk solids enhance flavor but burn faster than oils, making blended fats essential.
Butter-Oil Hybrid Technique
Combine 2 teaspoons butter with 1 teaspoon high-smoke-point oil (avocado or grapeseed). The oil stabilizes butter’s low smoke point while milk solids add richness. Swirl immediately to coat the entire cooking surface, including 1″ up the sides where eggs lift first. Listen for a steady, quiet sizzle—not violent spattering—when adding eggs. This hybrid method provides enough lubrication to prevent sticking while avoiding butter’s bitter compounds.
Minimum Fat Measurements by Skillet Size
| Skillet Diameter | Minimum Fat Required |
|---|---|
| 8-inch | 1½ tablespoons |
| 10-inch | 2 tablespoons |
| 12-inch | 2½ tablespoons |
Measure precisely—eyeballing leads to under-application. Pour fat into the skillet’s center, then tilt to create an even film. If dry patches appear before adding eggs, your quantity is inadequate. Never reuse fat from previous cooks; degraded oils polymerize unevenly.
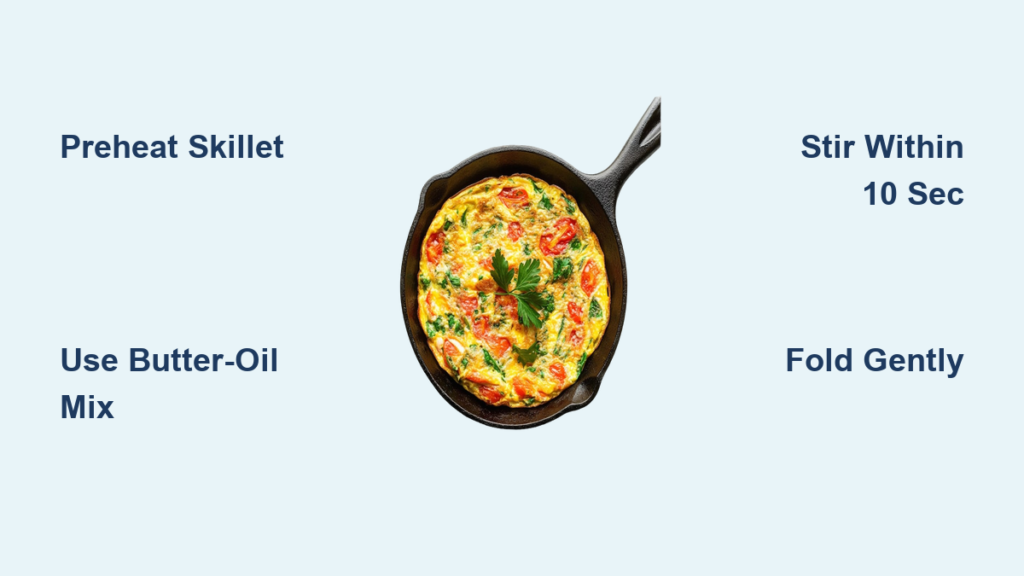
Step-by-Step: Cooking Your Cast Iron Skillet Omelette
Perfect Egg Whisking for Creamy Texture
Whisk 2 large eggs with 1 tablespoon cold water (not milk—water’s lower fat content prevents toughness) until homogenous but not frothy. Over-whisking incorporates excess air, causing bubbles that rupture during cooking. Add salt after whisking; early salting breaks down proteins prematurely. Let the mixture rest 1 minute—this relaxes the proteins for even setting.
The Critical First 30-Second Technique
Pour eggs into the buttered skillet, shaking gently to spread evenly. Within 10 seconds, drag a silicone spatula in small circles from the pan’s edge toward the center. This forms delicate curds while preventing a solid crust from bonding to metal. Stop when 70% of the surface looks set but remains glossy—typically 25-30 seconds. Over-stirring here causes scrambled eggs, not an omelette.
Folding Without Tearing
Tilt the skillet 45 degrees toward you. Use the spatula to lift the far edge, folding it toward the center. Roll the omelette gently onto a plate using the spatula for support. If it resists rolling, it’s undercooked—return to heat 5 seconds. Never force a fold; tearing means the bottom layer hasn’t released fully. A properly cooked omelette slides freely when tilted.
Troubleshooting Common Cast Iron Omelette Failures
“My Omelette Is Welded to the Pan!”
This occurs when:
– Fat was added to a cold pan (oil doesn’t polymerize properly below 200°F)
– Eggs were stirred too late (allowing a solid crust to form)
– Pan was overheated (causing instant protein bonding)
Emergency fix: Immediately reduce heat to low. Add ½ teaspoon water to the pan’s side—steam will gently lift stuck edges. Wait 15 seconds before attempting to slide the omelette. For future cooks, always add fat to a preheated skillet and begin stirring within 10 seconds of adding eggs.
“Edges Burn Before Center Sets”
This signals uneven heat distribution. Solutions:
1. Cook over a ring-shaped flame diffuser
2. Rotate the skillet 90 degrees every 15 seconds
3. Use a smaller burner to concentrate heat under the pan’s center
4. Reduce heat to low once edges begin setting and finish under a lid for 30 seconds
Never compensate by lowering the burner—this creates new cold spots. Instead, manage heat distribution proactively.
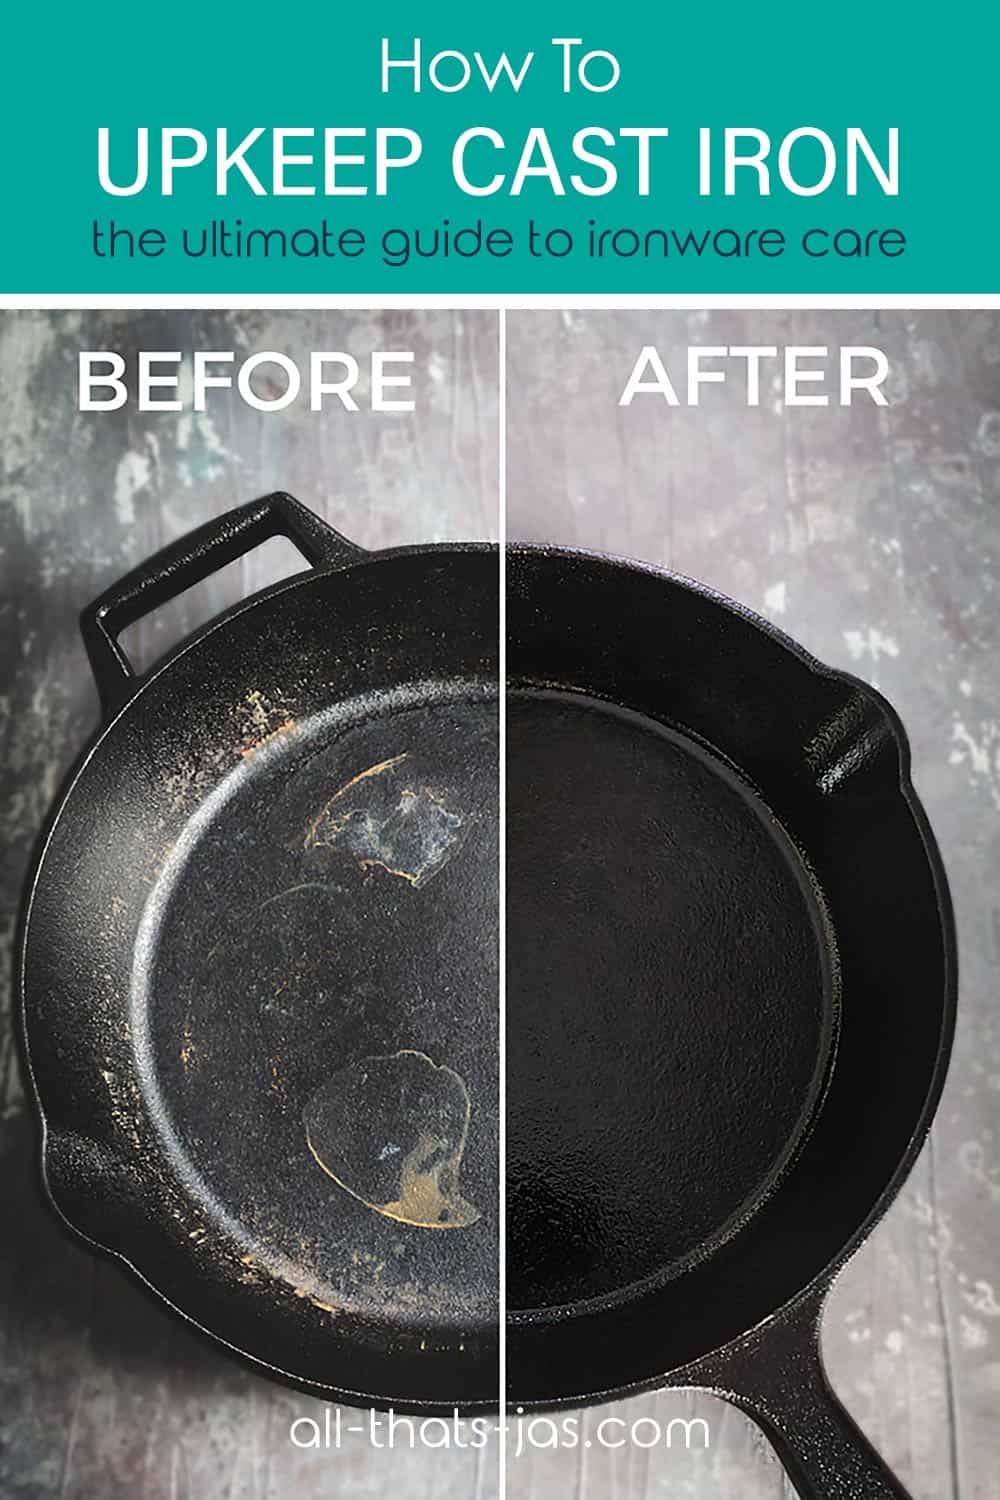
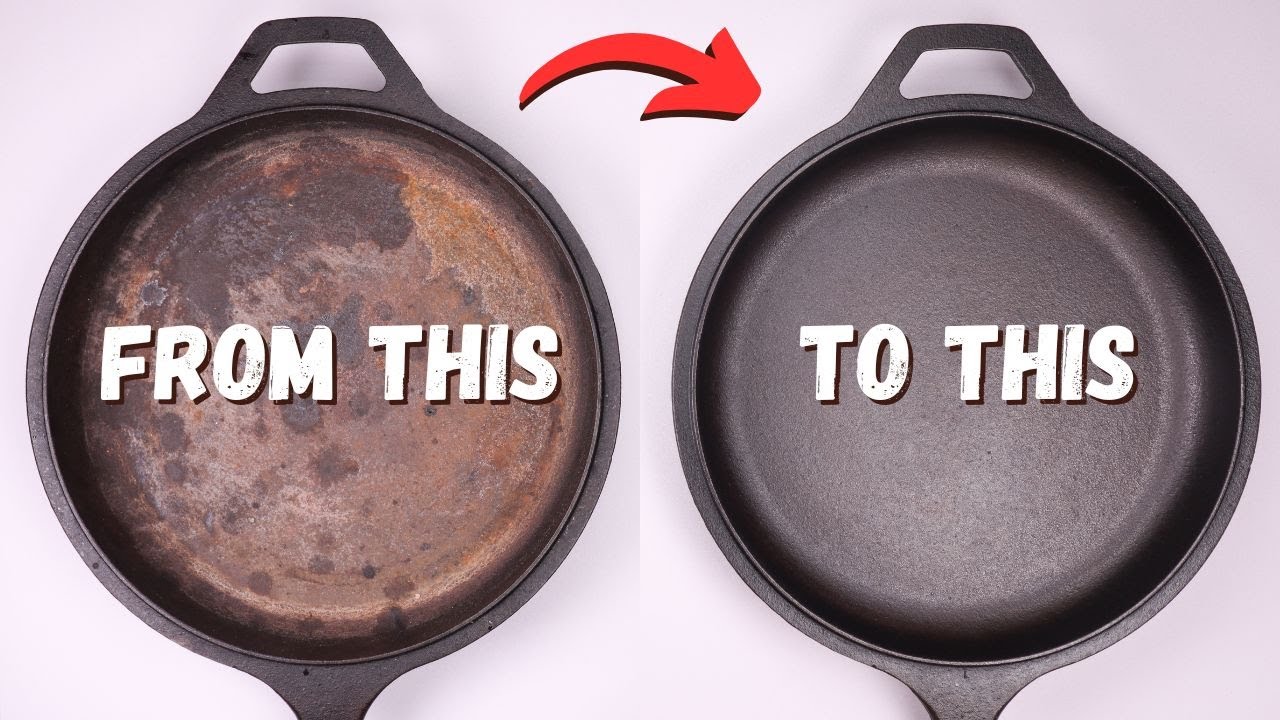
Cleaning and Re-Seasoning After Egg Cooking
Gentle Cleaning That Preserves Seasoning
After sliding out your omelette, pour ½ cup hot water into the warm skillet (never cold water—it causes thermal shock). Scrape gently with a bamboo brush while water simmers 30 seconds. Rinse under hot water until runoff is clear—no soap needed. Dry immediately on the stovetop over low heat for 2 minutes. Wipe with a thin oil coat while still warm. Skipping the heat-dry step invites rust in seasoning pores.
When to Re-Season Post-Omelette
Re-season only if:
– You used soap (it strips polymerized oils)
– Eggs stuck severely (indicating seasoning damage)
– The surface looks dull gray instead of glossy black
For routine maintenance, a post-cook oil wipe suffices. For full re-seasoning, apply flaxseed oil with a lint-free cloth, wipe until the pan looks dry, then bake at 450°F for 1 hour.
Pro Tips for Cast Iron Omelette Mastery
The Steam Escape Technique for Fluffiness
After pouring eggs, place a lid slightly askew over the skillet for the first 20 seconds. Trapped steam gently puffs the omelette without drying it. Remove the lid before folding—excess moisture causes sogginess. This mimics restaurant “basting” without added fat.
Silicone Spatula vs. Metal: The Texture Difference
Use flexible silicone spatulas exclusively for omelettes. Metal edges catch microscopic seasoning imperfections, tearing delicate eggs. Silicone glides smoothly over the polymerized surface. Replace spatulas when edges stiffen—they lose flexibility after 6 months of high-heat use.
Mastering the cast iron skillet omelette transforms your most intimidating pan into a breakfast hero. By respecting its heat dynamics and applying precise fat quantities, you’ll achieve custardy interiors with caramelized edges impossible in non-stick pans. Remember the golden rules: always preheat thoroughly, use the butter-oil hybrid method, and begin stirring within 10 seconds of adding eggs. After cooking, preserve your skillet’s patina with immediate heat-drying and oiling. Within three attempts, you’ll develop instinctive timing—notice how butter behaves, how eggs set at different heat levels, and when to fold. Once conquered, this technique unlocks cast iron’s full potential for everything from frittatas to Spanish tortillas. Your perfectly released omelette isn’t just a meal; it’s proof you’ve tamed the skillet.


