
Your soldering iron’s tip condition directly determines whether you’ll create flawless connections or struggle with frustrating cold joints. A degraded tip transforms what should be precise work into a battle against poor heat transfer and inconsistent results. The secret to maintaining peak performance isn’t expensive equipment—it’s consistent maintenance habits that protect your tip from oxidation. This guide reveals the exact procedures professional technicians use to keep soldering irons performing like new, extending tip life by 300% or more with simple daily practices.
Most soldering problems trace back to one overlooked component: the tip. When oxidation damages the pre-tinned surface, heat transfer suffers dramatically, forcing you to apply more heat for longer periods—damaging both your work and the tip itself. By implementing these maintenance techniques, you’ll ensure reliable heat transfer, consistent wetting action, and professional-quality joints every time you pick up your iron.
Spot Early Signs of Tip Degradation Before Damage Spreads
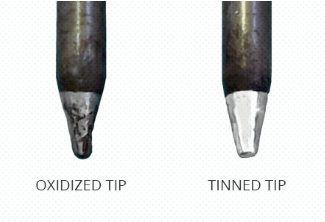
A healthy soldering tip displays unmistakable visual characteristics that signal optimal heat transfer capability. When properly maintained, the pre-tinned area appears consistently wet and shiny, covered with a smooth layer of molten solder that flows evenly across the surface. This wet appearance confirms the protective metallic coating remains intact and capable of transferring heat efficiently to your components. Before starting any project, take two seconds to verify your tip shows this characteristic shine—if it doesn’t, immediate corrective action is required.
Conversely, a deteriorating tip presents clear warning signs that demand your attention. The tip end appears dull, darkened, or discolored rather than bright and reflective. Most critically, solder beads up on the surface instead of flowing smoothly—a definitive indicator that oxidation has compromised the pre-tinned coating. When you observe these symptoms, your tip has lost 50% or more of its heat transfer capability, forcing you to work at higher temperatures that accelerate further degradation.
Critical mistake to avoid: Continuing to solder with a degraded tip. Each additional minute of use at this stage compounds the damage, making recovery more difficult. Instead, clean the tip immediately and apply fresh solder. If proper wetting doesn’t return after two cleaning cycles, your tip requires more aggressive reconditioning before further use.
Prime New Soldering Tips for Maximum Longevity From Day One
Fresh soldering tips require immediate protective treatment before their first use, as oxidation begins the moment they heat up. Many technicians make the critical error of assuming new tips arrive ready for immediate work, but factory packaging and storage expose tips to conditions that compromise the pre-tinned coating. Taking 30 seconds to properly prepare your new tip establishes the foundation for extended service life.
The moment your soldering iron reaches operating temperature, apply fresh solder specifically to the pre-tinned area, completely covering it with molten solder. Watch carefully as the solder flows—it should spread evenly across the surface without beading. Smooth, uniform wetting confirms the pre-tinned coating is intact and functional. If solder beads immediately, your new tip may have manufacturing defects or excessive oxidation from storage.
This initial tinning process serves as your blueprint for ongoing maintenance. The thin layer of solder creates an oxygen barrier that prevents oxidation from taking hold during idle periods. Make this your non-negotiable first step with every new tip installation—skipping it guarantees premature tip failure regardless of subsequent care.
Optimize Pre-Soldering Cleaning for Oxidation Prevention
Proper cleaning before you begin soldering establishes the foundation for successful tip maintenance throughout your work session. The sequence and timing of cleaning procedures significantly impact tip protection, and understanding why certain methods work better prevents common oxidation mistakes.
Turn on your soldering iron and allow it to reach operating temperature while resting in the holder—never heat an uncoated tip. Once adequately heated, use a wire-type cleaner (like the HAKKO 599B) to remove any oxidation or debris. Crucially, perform this cleaning BEFORE you begin soldering, as cleaning afterward leaves the tip exposed to air during work, accelerating oxidation. The optimal cleaning technique involves:
- Inserting the tip into the cleaning coils
- Rotating gently 2-3 times
- Verifying a shiny, wet appearance remains
Wire cleaners outperform wet sponges by leaving a protective solder residue on the pre-tinned area. This residual solder continues shielding the tip from oxidation between cleaning cycles, while sponge cleaning removes all protective coating. After cleaning, immediately apply a thin layer of fresh solder before beginning your work to maintain continuous protection.
Maintain Peak Performance During Extended Soldering Sessions

Continuous attention to tip condition during active soldering prevents oxidation buildup that degrades performance mid-project. Temperature management represents your most powerful tool for maintaining tip health during extended work sessions.
Set your soldering iron to the lowest temperature that still allows proper solder flow—typically between 330°C and 350°C for standard leaded solder. Every 10°C increase above this range exponentially accelerates oxidation. If solder flows poorly, increase temperature in 10-degree increments rather than jumping to unnecessarily high settings. For heat-sensitive components, consider reducing temperature and using higher-quality solder with better wetting characteristics.
When pausing briefly between connections (under 5 minutes), never clean the tip—leave the protective solder coating intact in the holder. If the solder layer appears thin, apply additional solder before setting the iron down. This simple habit prevents significant oxidation during otherwise idle moments. For extended pauses exceeding five minutes, power off completely after applying generous solder coverage—continuous idle heating damages tips faster than thermal cycling from powering down and restarting.
Apply Correct Post-Soldering Protection for Long-Term Storage
The protective measures you take immediately after completing work determine your tip’s condition during your next soldering session. Proper post-soldering procedures protect your tip throughout storage and eliminate the frustration of starting each session with a degraded tip.
After finishing your last connection but before placing the iron in the holder, apply a generous amount of solder to the pre-tinned area—more than seems necessary. This protective layer must be substantial enough to prevent oxidation throughout your storage period. A thin coating may allow oxidation to develop overnight, while generous coverage provides reliable protection for weeks.
If your work session ended with minimal solder remaining, follow this two-step recovery process:
1. Clean the tip thoroughly to remove oxidized material
2. Apply fresh solder generously to completely cover the pre-tinned area
When you return to your workstation, always clean the tip again before beginning work. This removes any oxidation that formed on the protective layer and exposes fresh, properly-wetting solder. Following this “clean before use, protect after use” pattern maintains tip condition regardless of storage duration.
Master Temperature Management for Oxidation Control
Your temperature setting directly determines oxidation rates and tip longevity—higher temperatures exponentially accelerate tip degradation. Understanding the precise relationship between temperature and oxidation enables informed decisions that maximize your tip’s service life.
Use the lowest temperature that achieves reliable solder joints—this principle alone extends tip life by 200-300%. For standard 60/40 leaded solder, start at 330°C and adjust only as needed. When establishing appropriate temperatures for specific applications, consider three critical factors:
- Solder alloy melting point (lead-free requires 20-40°C higher)
- Component thermal mass (large ground planes need more heat)
- Component heat sensitivity (ICs and plastics require lower temps)
Once you’ve established an appropriate temperature, maintain it consistently rather than constantly adjusting. Temperature variations cause thermal cycling stress on the tip’s internal structure. Document your optimal settings for common tasks to eliminate guesswork during future projects.
Prevent Oxidation Through Comprehensive Protective Measures
Oxidation prevention requires a systematic approach combining proper technique, temperature management, and consistent protective measures throughout every phase of tip use. Understanding exactly how oxidation develops enables targeted prevention strategies.
Oxidation occurs when atmospheric oxygen reacts with the tip’s pre-tinned surface, forming a non-wetting barrier that blocks heat transfer. This reaction accelerates dramatically at elevated temperatures but continues even at room temperature over time. Your primary defense is maintaining continuous solder coverage on the pre-tinned area—this physical barrier isolates the surface from oxygen.
Implement these oxidation prevention protocols:
– Apply solder immediately after cleaning
– Maintain solder coating during brief rests
– Use generous solder coverage before storage
– Power down during extended idle periods
– Inspect tip condition before each use
Regular tip inspection serves as your early warning system. The pre-tinned area should maintain a bright, reflective appearance when properly protected. Any darkening, dulling, or loss of reflectivity indicates oxidation beginning to develop. Catching these signs early allows simple corrective action before damage becomes severe.
Power Down Strategically During Work Interruptions
Proper power management during idle periods protects both your tip and your equipment while ensuring immediate readiness when you return to work. Different interruption durations require specific approaches to maximize tip protection.
For interruptions under five minutes: Leave the iron powered on with the tip properly coated in solder. The protective layer prevents oxidation during these brief periods, and the iron remains at operating temperature for immediate use. Never clean the tip during these short pauses—maintain the solder coating.
For interruptions exceeding five minutes: Power off completely after applying generous solder coverage. Extended idle heating causes more oxidation damage than the thermal cycling from powering down and restarting. Before shutdown, verify the tip carries sufficient solder to protect it throughout the cooling period.
Critical reminder: Always apply fresh solder immediately before powering down—never store a clean, uncoated tip. The protective solder layer remains effective even as the tip cools to room temperature, providing continuous oxidation protection throughout the storage period.
Restore Poor Solder Wetting With Targeted Techniques
When solder beads up on your tip rather than flowing smoothly, immediate corrective action prevents permanent damage and restores reliable performance. This wetting failure signals oxidation has compromised the pre-tinned surface, requiring specific remediation steps.
Begin by cleaning the tip thoroughly with your wire cleaner, then apply fresh solder. If wetting doesn’t improve, assess these potential causes:
– Temperature too low: Solder won’t flow properly even on a healthy tip
– Severe oxidation: Requires multiple cleaning/soldering cycles
– Damaged pre-tinning: May need aggressive reconditioning
For moderate oxidation, follow this recovery process:
1. Clean tip thoroughly
2. Apply fresh solder generously
3. Repeat 2-3 times until proper wetting returns
4. Reduce operating temperature if previously excessive
If solder continues beading after three attempts, your tip likely has significant oxidation damage requiring specialized tip refurbishing products. Heavily damaged tips may need replacement, but proper maintenance prevents this scenario 90% of the time.
Follow Proven Technical Specifications for Reliable Results
Adhering to industry-established operational parameters ensures consistent results and maximizes tip life. These specifications provide the foundation for developing effective personal techniques that work reliably across different situations.
For temperature settings with no specific guidelines, start at 330°C-350°C as your baseline range. Adjust only as needed based on actual solder flow characteristics—never exceed 400°C unless working with specialized lead-free alloys. Document your optimal settings for common tasks to eliminate guesswork during future projects.
The five-minute threshold for power shutdown during idle periods represents a critical operational parameter. This duration balances convenience against tip protection—oxidation during extended idle heating exceeds damage from thermal cycling during power cycles. Develop the habit of powering down whenever interruptions exceed this threshold.
Wire-type cleaners like the HAKKO 599B have become professional standards because they leave protective solder residue after cleaning. This characteristic provides ongoing oxidation protection that wet sponge cleaning cannot match, making them essential for maintaining tip condition between soldering operations.
Implement This Daily Soldering Iron Maintenance Checklist
Maximize your soldering iron’s performance and tip longevity with this comprehensive daily maintenance routine. Following these specific procedures ensures consistent heat transfer and eliminates frustrating soldering problems.
Before each use:
– Power on iron and allow to reach operating temperature
– Clean tip with wire-type cleaner to remove storage oxidation
– Verify proper solder wetting before beginning work
During soldering:
– Maintain lowest effective temperature (330°C-350°C baseline)
– Leave solder coating intact during brief rests
– Power down completely for interruptions exceeding 5 minutes
– Apply additional solder before setting down for longer pauses
After completing work:
– Apply generous solder coating to pre-tinned area
– Power down only after tip carries sufficient solder protection
– Store in secure holder away from drafts
By implementing these precise maintenance techniques consistently, you’ll extend tip life dramatically while ensuring reliable heat transfer and professional-quality solder joints. The minimal time invested in proper care pays exponential dividends through improved work quality, reduced tip replacement costs, and frustration-free soldering sessions. Your soldering iron performs at its peak only when you protect its most critical component—the tip.


