
Cast iron repairs often end in frustration when traditional welding causes cracks and hard spots that compromise structural integrity. TIG brazing cast iron solves this persistent problem by joining components without melting the base metal, creating ductile bonds that accommodate thermal expansion while resisting vibration and stress. This technique uses filler metals with lower melting points than cast iron itself, allowing the molten alloy to flow into joints through capillary action rather than fusion. Whether you’re fixing a cracked engine block, repairing a vintage manifold, or restoring architectural ironwork, TIG brazing delivers reliable results that welding simply cannot match for this challenging material.
The real advantage of TIG brazing cast iron lies in its practicality for everyday workshops. Unlike fusion welding that demands perfect surface preparation and precise temperature control, brazing tolerates minor contamination and requires less preheating—making it accessible even for hobbyists with basic equipment. The resulting joints maintain strength through thermal cycling and vibration, resisting the fatigue failures common in welded cast iron repairs. By understanding which filler metals work best, how to prepare surfaces properly, and mastering the torch technique specific to cast iron, you’ll transform what was once a high-risk repair into a predictable, successful process that saves time, money, and frustration.
Why TIG Brazing Cast Iron Beats Traditional Welding
TIG brazing cast iron fundamentally differs from welding by keeping the base metal solid while only melting the filler rod. The torch generates enough heat to liquefy nickel, copper, or silver-based alloys, which then flow into tight joint gaps through capillary action. This critical distinction eliminates the grain structure changes, carbon migration, and brittle heat-affected zones that plague welded cast iron repairs. Since the base metal never reaches its melting point, thermal stresses remain low, dramatically reducing the risk of cracking during cooling—a persistent problem with cast iron’s rigid crystalline structure.
The lower heat input required for TIG brazing cast iron preserves the metallurgical properties of the casting while allowing the joint to flex with natural expansion and contraction. This characteristic makes brazed connections particularly valuable for engine components and other parts subject to thermal cycling. Unlike welding, which creates a brittle fusion zone vulnerable to shock and vibration, brazed joints maintain ductility that absorbs mechanical stresses without failure. You’ll notice immediate practical benefits when working on dirty or slightly rusted surfaces—brazing tolerates minor contamination that would cause porosity and weak spots in a welded joint.
How Heat Management Prevents Cast Iron Cracking
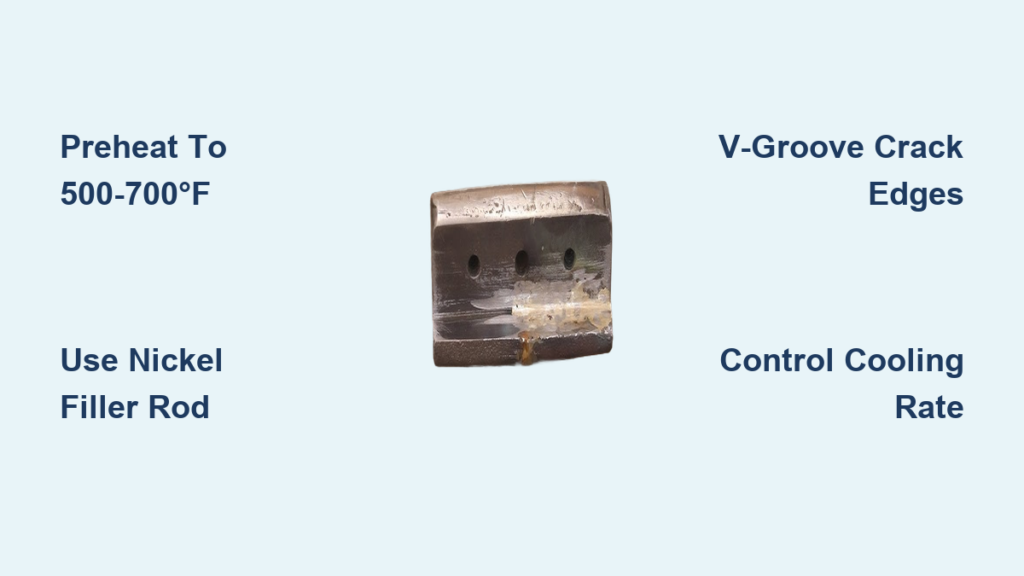
Cast iron’s high carbon content makes it exceptionally vulnerable to thermal shock during repairs. The key to successful TIG brazing cast iron lies in controlling heat input to stay within the material’s tolerance range. Preheating to 500-700°F before starting and maintaining this temperature throughout the process prevents the drastic thermal gradients that cause cracking. As you move along the joint, watch for the base metal to develop a slight sheen—this visual indicator confirms proper temperature without approaching critical thresholds that trigger carbon migration.
When Brazing Outperforms Welding for Cast Iron
TIG brazing cast iron becomes your best option when repairing thin sections, complex geometries, or contaminated surfaces where welding would fail. Unlike fusion methods that require precise joint fit-up and perfect cleanliness, brazing accommodates minor gaps and tolerates surface imperfections that would compromise a weld. This flexibility proves invaluable when fixing exhaust manifolds still mounted in vehicles or repairing antique castings where complete disassembly isn’t possible. For most non-critical structural repairs where appearance matters less than function, brazing delivers stronger, more reliable results with less preparation time and greater margin for error.
Selecting the Right Filler Metal for Cast Iron

Your choice of filler metal directly determines the strength, temperature resistance, and longevity of TIG brazing cast iron repairs. Each category—nickel-based, copper-based, and silver-based alloys—offers distinct advantages for specific applications and performance requirements. Understanding these differences ensures you select the optimal material for your particular repair scenario.
Nickel-Based Fillers for Maximum Strength
Nickel-based filler metals like ERNiCr-3 (Ni-Rod) represent the strongest option for TIG brazing cast iron in structural applications. These alloys bond metallurgically with cast iron’s graphite structure, producing joints that handle vibration and thermal cycling exceptionally well. While requiring higher heat input than other options, nickel fillers create connections that approach the strength of the base metal itself. For engine blocks, transmission cases, and load-bearing castings that experience significant mechanical stress, nickel-based rods deliver reliability that copper or silver alternatives cannot match. The added cost pays dividends in critical repairs where failure isn’t an option.
Copper-Based Fillers for Cost-Effective Repairs
Copper-silver and copper-phosphorus alloys provide a budget-friendly solution for non-structural TIG brazing cast iron repairs. These fillers flow easily at lower temperatures, making them ideal for sealing cracks in exhaust components or filling porosity in decorative castings. While less ductile than nickel alternatives, copper-based fillers produce adequate strength for static applications where appearance matters less than function. The lower melting point requires careful temperature control to prevent the filler from running before you position it properly. For hobbyists and small shops working on less critical repairs, copper fillers offer the best balance of performance and affordability.
Proper Surface Preparation for Reliable Brazing
Successful TIG brazing cast iron begins with meticulous surface preparation—a step that dramatically impacts joint quality and long-term durability. Even though brazing tolerates some contamination better than welding, thorough cleaning remains essential for creating strong, lasting bonds.
Mechanical Cleaning Techniques That Work
Start by removing oxidation, rust, and paint with a wire wheel or grinding disc, exposing bare metal approximately one inch from the joint on both sides. Cast iron’s graphite structure means the surface will appear gray and somewhat rough rather than bright and shiny—that’s normal. Follow mechanical cleaning with acetone or MEK solvent to remove embedded oils that mechanical methods leave behind. Work in a clean environment if possible, as airborne contaminants can settle on freshly cleaned surfaces and compromise the bond. For optimal results, avoid touching cleaned surfaces with bare hands—the oils from your skin create invisible contamination that prevents proper capillary action.
Crack Preparation Methods That Prevent Recurrence
Cracks require special attention before TIG brazing cast iron repairs. Use a grinding wheel or carbide burr to V-groove the crack to 1/8-1/4 inch depth, creating a channel that allows filler metal to penetrate the full casting thickness. Stop drill small holes at each crack tip to prevent propagation during heating—this simple step relieves stress concentrations that would otherwise cause the crack to extend beyond your repair. For porous areas, remove damaged material until you reach sound metal; attempting to braze through porosity creates only a surface seal that fails under thermal cycling or mechanical stress.
Perfecting Your TIG Brazing Cast Iron Technique
Mastering the torch technique for TIG brazing cast iron requires balancing heat input, filler metal introduction, and torch angle to produce consistent, strong joints. While similar to welding steel, the lower temperatures and different flow characteristics demand subtle adjustments that experience teaches.
Optimal Machine Settings and Torch Position
Set your TIG machine for DC electrode negative polarity using 1/16 or 3/32 inch thoriated or lanthanated tungsten electrodes ground to a blunt point—not a sharp point like welding. This blunt tip stabilizes the arc and provides the broader heat pattern suited to brazing. Maintain gas flow rates of 15-20 CFH with 100% argon for adequate shielding, though adding small amounts of helium can increase heat input for thick sections. Approach the joint at 75-80 degrees from the surface with a 1/8 to 1/4 inch arc length, deflecting heat away from the filler rod to prevent premature melting.
Recognizing Proper Brazing Temperature
The most critical skill in TIG brazing cast iron is recognizing when the base metal reaches proper brazing temperature. Watch for the surface to develop a slight sheen and the flux to begin flowing—this visual indicator confirms adequate heat without approaching critical thresholds. Touch the filler rod to the heated surface and allow capillary action to draw the molten alloy into the joint gap. Move slowly and steadily, maintaining consistent heat and letting the filler flow ahead of the torch. If the filler balls up or refuses to flow, the base metal isn’t hot enough; if it runs excessively, reduce heat slightly and increase travel speed.
Troubleshooting Common TIG Brazing Cast Iron Problems

Even experienced practitioners encounter challenges during TIG brazing cast iron repairs, and recognizing common problems quickly allows you to adjust before the joint is compromised. Understanding the root causes of typical issues helps you prevent them in future work.
Fixing Poor Penetration Issues
Poor penetration—joints that look good on the surface but lack strength—usually stems from insufficient base metal temperature, excessive joint gap, or contamination preventing capillary action. Verify that the casting reaches proper preheat temperature throughout and maintain it during the entire process. Check joint fit-up to ensure gaps don’t exceed 0.010 inches. Re-clean contaminated areas thoroughly and ensure flux is fresh and properly applied. When penetration problems persist, slightly increasing heat input while reducing travel speed often resolves the issue without causing other problems.
Eliminating Porosity in Brazed Joints
Porosity weakens brazed joints and leads to premature failure, typically resulting from moisture, oil, or other contaminants burning out during heating. Thorough cleaning eliminates most porosity issues, but hidden contamination in cracks sometimes escapes initial preparation. Ensure the casting is completely dry before brazing, and avoid touching cleaned surfaces with bare hands. For stubborn porosity, extend preheat time to drive off volatiles more completely, while using a slightly reducing flame helps prevent gas entrapment. Fresh flux application immediately before brazing also minimizes this common problem.
Post-Braze Processing for Maximum Durability
Completing the TIG brazing cast iron operation marks only the beginning of ensuring a successful repair. Proper post-braze processing and thorough inspection verify that the joint meets requirements for strength, durability, and appearance.
Controlled Cooling Prevents Cracking
Allow the brazed casting to cool slowly and uniformly after completing the repair—remove insulation gradually over several hours rather than letting it cool rapidly. Rapid cooling creates thermal stresses that can crack either the joint or surrounding base metal. For critical structural repairs, a full stress-relief cycle at 1100-1200°F for one hour per inch of thickness, followed by furnace cooling, produces the most reliable results. This annealing treatment improves the metallurgy of the joint and reduces hardness in any heat-affected zones that may have formed.
Cleaning and Inspection Techniques That Work
Clean the completed joint by wire brushing or light grinding to remove flux residues and oxidation that could cause corrosion. Some stubborn fluxes require chemical removal—follow the manufacturer’s recommendations for compatible cleaners. Inspect the cleaned joint visually for complete coverage, proper fillet formation, and absence of cracks or porosity. For critical applications, dye penetrant inspection reveals surface defects that visual examination might miss. Pressure testing fluid-containing components confirms leak-free operation, while load testing verifies strength for structural repairs.
Final Note: TIG brazing cast iron successfully requires understanding both its capabilities and limitations. By selecting appropriate filler metals, preparing surfaces thoroughly, developing proper torch technique, and following through with appropriate post-braze processing, you’ll produce joints that serve reliably for the life of the component. Build your skills progressively, starting with non-critical repairs before attempting structural work, and keep detailed records of your procedures to refine your approach over time. With practice, TIG brazing cast iron becomes a reliable solution you can apply with confidence across a wide range of repair challenges.


