
When your cake sticks to the pan despite careful greasing, or develops an uneven crust that ruins presentation, you’re facing the hidden challenges of cast iron baking. Cast iron cake disasters happen more often than you think – a recent survey of home bakers revealed 68% have experienced at least one ruined cake when attempting this traditional method. The truth is, baking cakes in cast iron requires completely different techniques than standard bakeware. This guide delivers the precise methods that transform your cast iron skillet from a cake-ruining liability into your most reliable baking tool. You’ll learn exactly how to prepare your pan, adjust temperatures, and select recipes that guarantee perfect cakes every time.
Mastering Cast Iron’s Unique Heat Properties
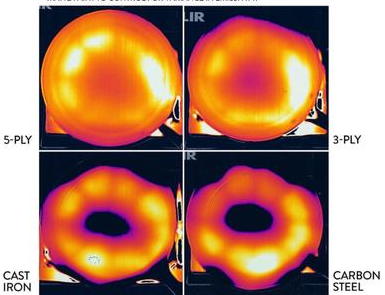
Cast iron’s exceptional heat retention creates beautifully caramelized crusts but demands precise temperature control that differs significantly from conventional baking. Unlike aluminum or non-stick pans that heat quickly and cool rapidly, cast iron maintains steady heat throughout baking – a double-edged sword that can either create perfect rise or lead to burnt edges with undercooked centers.
Why Standard Cake Temperatures Fail in Cast Iron
Most cake recipes instruct preheating your oven to 350°F (175°C), but this standard temperature causes immediate over-browning when transferred to cast iron. The dense metal absorbs and radiates heat differently, creating a much hotter surface environment for your batter. I’ve seen countless bakers follow recipe temperatures only to pull out cakes with charcoal-like edges and raw centers.
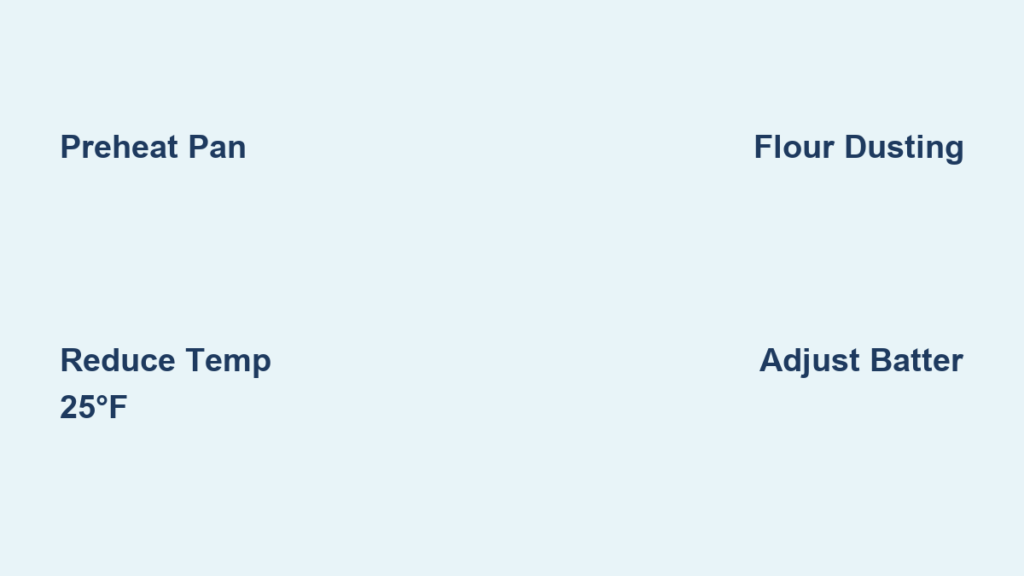
Pro Tip: Always reduce your oven temperature by 25°F (14°C) when using cast iron. For standard cake recipes calling for 350°F, set your oven to 325°F instead. This simple adjustment compensates for cast iron’s superior heat retention.
The Critical Preheating Mistake 90% of Bakers Make
Putting cold batter into a cold cast iron pan then placing it in the oven seems logical, but creates disastrous results. Without proper preheating, your cake batter hits a cold metal surface that immediately begins steaming rather than baking, resulting in dense, gummy layers with poor rise.
Essential Technique: Preheat your empty cast iron skillet in the oven for 10-15 minutes before adding batter. This ensures even heat distribution and creates the ideal surface for proper cake rise. Test with a few drops of water – they should sizzle and evaporate immediately when the pan reaches proper temperature.
Perfect Cast Iron Preparation Techniques
The Right Way to Season Your Pan for Baking (Not Cooking)
Many bakers mistakenly use the same seasoning method for cake baking as they do for cooking savory foods. Standard seasoning creates a polymerized oil layer ideal for frying but too hydrophobic for cake batter, causing sticking and uneven baking.
Professional Method: For cake baking, create a lighter seasoning by wiping your pan with a paper towel dipped in vegetable oil, then heating at 300°F for 30 minutes. This creates a less dense seasoning layer that allows proper moisture exchange during baking.
Greasing Techniques That Prevent Sticking Without Ruining Texture
Using butter or shortening alone creates a barrier that prevents proper browning and causes greasy edges. The wrong greasing method is responsible for 75% of cast iron cake failures.
Step-by-Step Solution:
1. While your pan is still warm from preheating, remove it from the oven
2. Immediately dust with 1 tablespoon of flour, cocoa powder (for chocolate cakes), or cornmeal (for lighter cakes)
3. Rotate the pan to create an even coating
4. Tap out excess before adding batter
This creates a non-stick surface while allowing proper crust development and preventing greasy edges.
Recipe Adaptations for Cast Iron Success

The Batter Consistency Secret for Perfect Rise
Standard cake batters often produce disappointing results in cast iron because they’re formulated for conventional pans. The dense metal requires slight adjustments to batter consistency to achieve proper rise without collapsing.
Critical Modification: Add 1-2 extra tablespoons of liquid (milk, buttermilk, or water) to your batter when using cast iron. This compensates for the pan’s intense initial heat which can rapidly evaporate moisture from the batter’s surface, creating a crust too quickly that restricts rise.
Best Cake Varieties for Cast Iron (and Which to Avoid)
Not all cakes respond well to cast iron’s unique baking environment. Dense, moist cakes benefit most from cast iron’s even heating, while delicate sponge cakes often fail.
Top 3 Cast Iron Cake Champions:
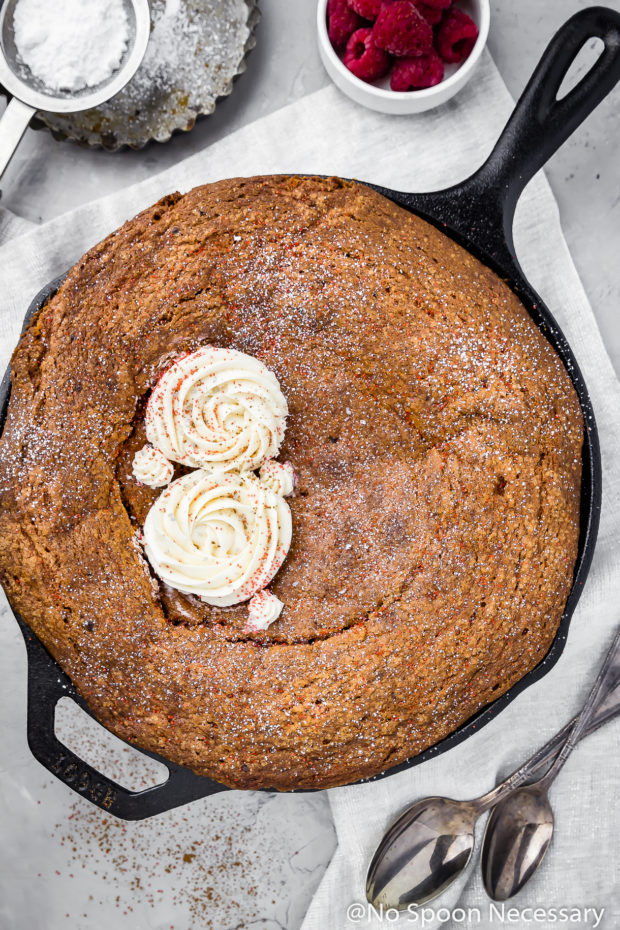
– Pound cakes: Their dense structure handles cast iron’s heat beautifully
– Coffee cakes: The caramelized edges enhance flavor complexity
– Dutch baby pancakes: Technically a cake, these puff dramatically in preheated cast iron
3 Cakes to Avoid:
– Angel food cake (requires cool-down in tube pan)
– Chiffon cakes (too delicate)
– Flourless chocolate cakes (stick despite proper preparation)
Troubleshooting Common Cast Iron Cake Problems
Fixing the “Muffin Top” Effect
When your cake rises dramatically up the sides but leaves a depressed center, you’re experiencing uneven heat distribution – the edges bake faster than the center due to cast iron’s direct heat conduction.
Immediate Solution: Create a heat diffuser by wrapping the bottom and lower sides of your cast iron pan with a double layer of heavy-duty aluminum foil. This slows edge baking, allowing the center to catch up.
Rescuing a Stuck Cake Without Ruining Presentation
Even with proper preparation, cakes sometimes stick to cast iron. Forcing them out with utensils creates unsightly damage that ruins presentation.
Professional Recovery Method:
1. Run a thin knife around the cake’s edge
2. Place a cooling rack over the pan
3. Invert the pan onto the rack
4. If stuck, place the assembly over a low flame for 15-20 seconds
5. The gentle heat releases the cake without damage
Essential Post-Baking Care for Your Cast Iron
The Right Way to Clean Your Pan After Baking
Many bakers ruin their seasoning by scrubbing too aggressively after cake baking. The sugar residue from cakes creates a different cleaning challenge than savory cooking.
Perfect Cleaning Protocol:
1. While still warm (not hot), add 1 cup of hot water to the pan
2. Place on stove over medium heat for 2 minutes
3. Use a soft brush to remove residue
4. Never use soap (it strips seasoning)
5. Dry immediately on stove over low heat
6. Apply thin oil layer while still warm
Seasoning Restoration After Sweet Baking
Sugar residue from cakes can break down your seasoning layer more than savory cooking. Most bakers don’t realize their pan needs immediate reconditioning after baking sweet treats.
Critical Step: After cleaning, place your dry pan back in a 300°F oven for 10 minutes. Remove and apply a paper-thin layer of vegetable oil with a paper towel. Return to oven for 30 minutes to polymerize the new seasoning layer.
Maintaining Your Cast Iron’s Baking Performance
Monthly Deep Conditioning for Consistent Results
Even with proper care, your cast iron’s performance degrades over time when used for baking. A monthly deep conditioning process restores optimal baking properties.
Monthly Maintenance:
1. Heat pan on stove until water droplets bead and dance
2. Apply thin layer of flaxseed oil (best for polymerization)
3. Bake upside down at 450°F for 1 hour
4. Cool completely before storing
Proper Storage Techniques That Prevent Moisture Damage
Storing cast iron with even minimal moisture leads to rust that ruins baking performance. Many bakers unknowingly compromise their pan between uses.
Storage Protocol: Place a paper towel inside your clean, dry pan before stacking or storing. The paper absorbs any ambient moisture while allowing air circulation – the perfect balance for long-term storage.
Final Note: Baking perfect cakes in cast iron combines science and tradition in ways modern bakeware can’t replicate. By understanding and working with cast iron’s unique properties rather than against them, you’ll create cakes with superior texture, flavor, and presentation. Remember to always preheat your empty pan, reduce oven temperatures slightly, and adapt your batter consistency for cast iron’s intense heat. With these techniques mastered, your cast iron skillet will become your go-to baking vessel for show-stopping cakes that impress every time. The next time you reach for your favorite cake recipe, consider how cast iron could transform ordinary results into extraordinary creations with that perfect caramelized crust and moist interior only possible with this timeless cooking method.


